How to Create a Blog With Hugo
In this article I would like to explain you how to create your own blog using Hugo, Github and Netlify! 😊
The Idea
During the last months, I thought about creating my own space where I can write/tell what I want, like the old “Diary” back in the days. The inspiration came from an ex-colleague of mine who owns his famous blog . During a lunch he told me “Do you ever think about creating a blog?”, I said “Well….not really!” and he came back to me with “Why not?”… From that point and for several nights I started to learn and study about this process!
After long research, I found Hugo! It is very fast, easy to use and customizable ❤️
Hugo
Let’s review together the benefits of using Hugo , an open-source static site generator!
Speed
Hugo is absurdly fast! The developers claim that one webpage can be built in less than 1 millisecond! 💥
Ease of use
Another very important reason to use Hugo. Hugo is not only faster but also a lot easier to use compared to other available website generators out there. While it certainly requires some technical knowledge to set it up, it has an awesome documentation and it is definitely the most user-friendly and intuitive site generator I have worked with. 👶
Customizable
Hugo offers a wide selection of prebuilt themes and specifications and allows you to introduce your customized code. First, pick the design for your site and customise it with your unique code and third-party plugins. Second, leverage your expertise in HTML/CSS/JavaScript to integrate custom features and popups. These two simple steps can deliver static sites that stand out from the crowd. ⭐
Shortcodes
We love the beautiful simplicity of markdown’s syntax, but there are times when we want more flexibility. Hugo shortcodes allow for both beauty and flexibility 📋
Multilingual
Hugo provides full i18n support for multi-language sites with the same straightforward development experience Hugo users love in single-language sites 🌎
Themes
There are tons of themes ready to use in order to make your Blog unique! Here you can find the entire list of themes, the choice is up to you! 😊
Implementation
A Hugo blog is completely static. This means you don’t need to host your own server or use a special service. You can host a Hugo blog for free on different places like Netlify
, GitHub Pages
or others
!
Personally, I chose to host my blog on Netlify. All my files are saved on my Google Drive account and sync with Github. Moreover, Netlify is linked to my GitHub account in order to publish the contents.
I assume that you have basic knowledge of Linux terminology and BASH commands.
Install hugo
This guide is based on my experience with Ubuntu and Windows Subsystem for Linux
.
Please consider that if you have just install WSL you have to apply some more commands in order to make it right:
sudo apt-get update
sudo apt-get upgrade
sudo apt-get autoremove
sudo apt-get autoclean
Now you are ready! First, let install Hugo on our machine:
sudo apt-get install hugo
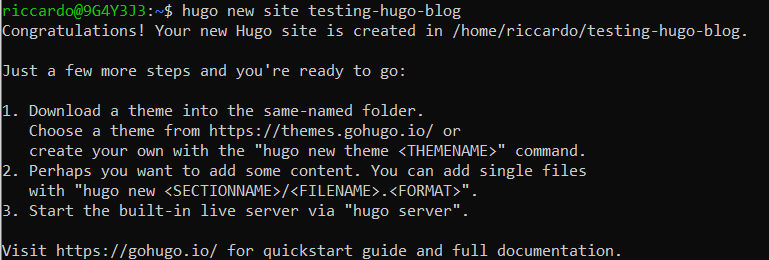
Once Hugo is installed, you can create a Hugo site by running:
hugo new site testing-hugo-blog
Please note that “testing-hugo-blog” is a fantasy name, you can choose yours.
This is the output:
Move on inside the new blog folder with the following command:
cd testing-hugo-blog/
Here you can find the following folders and the configuration file, called “config.toml”. This is one of the most important file into your structure. You need to understand the structure in order to be comfortable during your activity 😊

Install the Theme
Once Hugo has been installed, you have to choose your blog’s theme from a Hugo list . I chose the Anatole Theme , it aims to be minimalistic and sleek but still brings some great functionalities!
👉 Please read the Documentation
to discover all the features available and how to implement them!
Now that you read the documentation, we can go ahead and install the theme:
cd testing-hugo-blog
git init
git submodule add https://github.com/lxndrblz/anatole.git themes/anatole
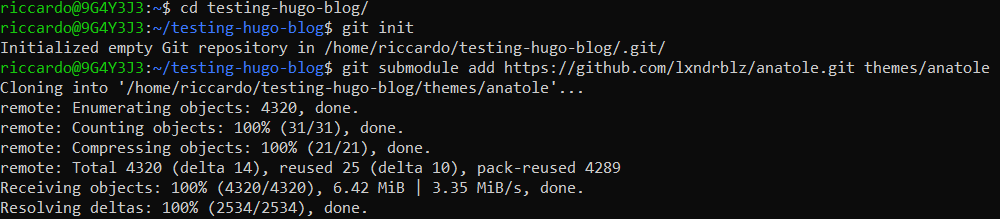
The theme has been installed inside the “theme” folder.
Create the first post
Now, we need to create some contents in order to populate the blog!
[❗TIP❗]
Usually, each theme has some articles or other stuff that help us create the blog into a particular folder. Anatole theme has an Example site on the following path:
cd themes/anatole/exampleSite/

Here you can find some posts and verify the structure of this example 😊
For example inside the static folder you can find the images, inside the content folder you’ll find some pretty posts and so on…I suggest you to take some minutes to go through these folders in order to understand the structure
[❗/TIP❗]
Let’s create our first article!
First, verify in which directory we are by typing:
pwd
And be sure to be at “/home/yourname/testing-hugo-blog/”, if it’s not the case type:
cd
cd testing-hugo-blog/
Now we are ready to create the post by typing:
hugo new posts/my-first-post.md

With this command we’re creating a new file called “my-first-post” into “posts” folder (that it’s inside the content folder). If you want to public a new post, you have to put the relative file into the “posts” folder.
As you can we, we created a file .md (markdown). I strongly recommend you to study this kind of format in order to correctly write your posts, here a guide
. Moreover, you can do some online practice thanks to some sites like stackedit
and dillinger
😉
Now, let’s edit this file using “vi
”!
vi content/posts/my-first-post.md
❗ Comment: If you don’t know how to use “vi”, be careful and read the documentation! It’s not difficoult, but you must know how to use it ❗
We need to modify the draft parameter from true to false in order to change the visibility in our blog (true = not visible, false = visible):
title: “My First Post”
date: 2022-05-16T11:09:14+02:00
draft: false
or you can just comment this line with “#” :
#draft: true
[❗TIP❗]
This first part comes from a template located on “archetypes” folder. If you want to modify this template (and all the future files), just edit the “default.md” file located on that folder 😊.
cd
cd testing-hugo-blog/archetypes/
[❗/TIP❗]
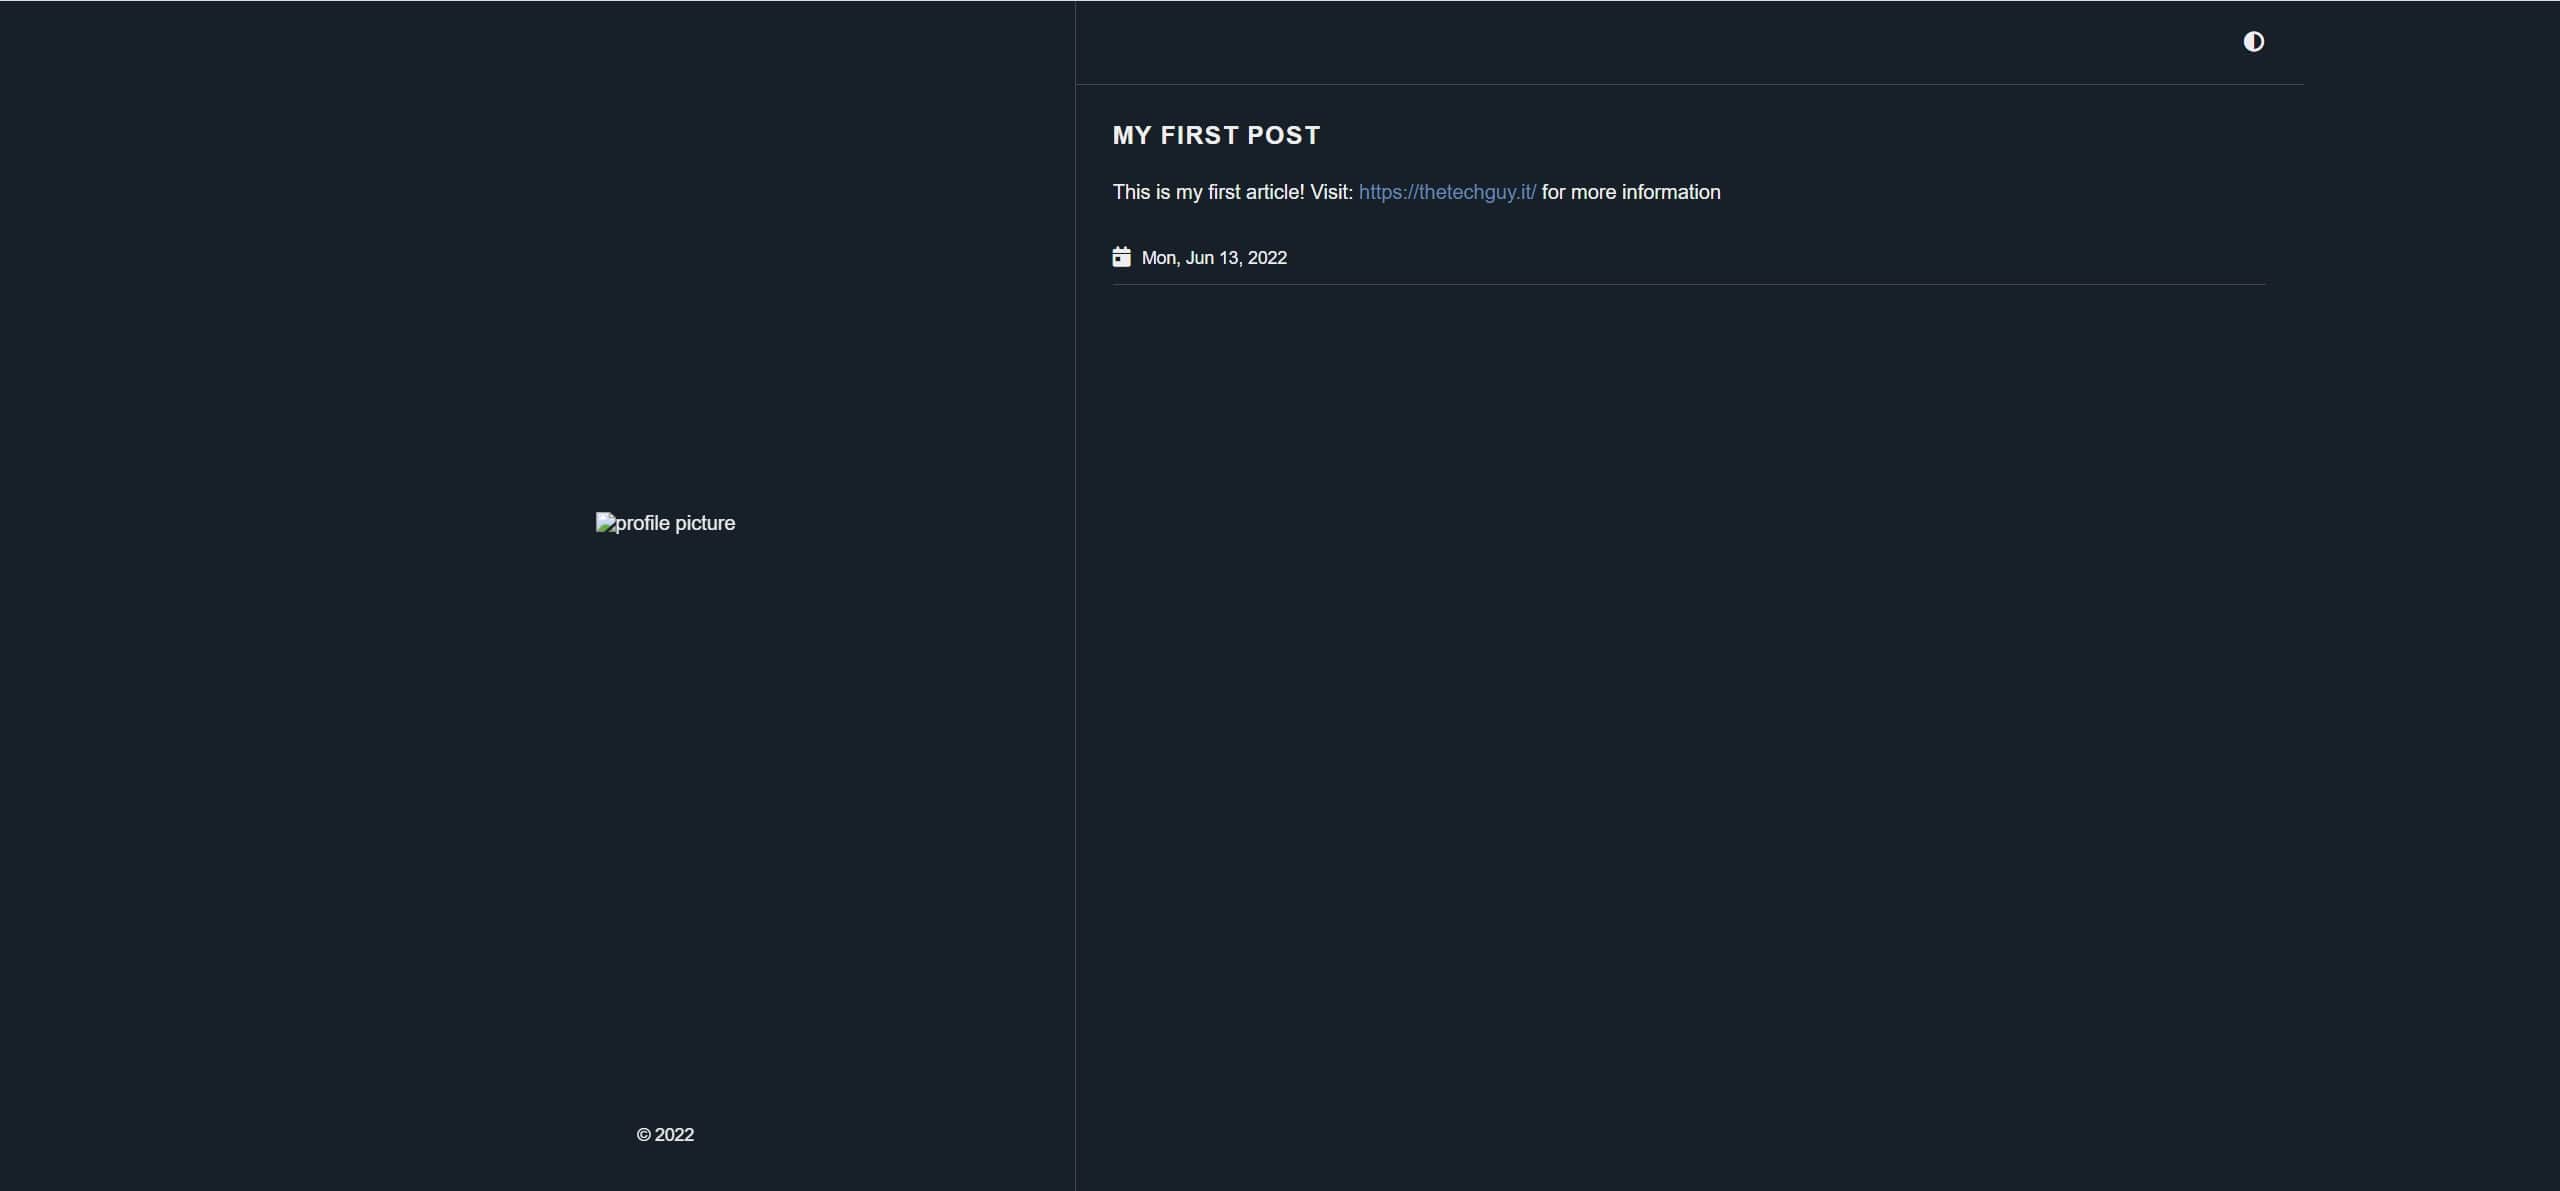
After that part, you can start writing something! This is the real content of you post. This is an example:
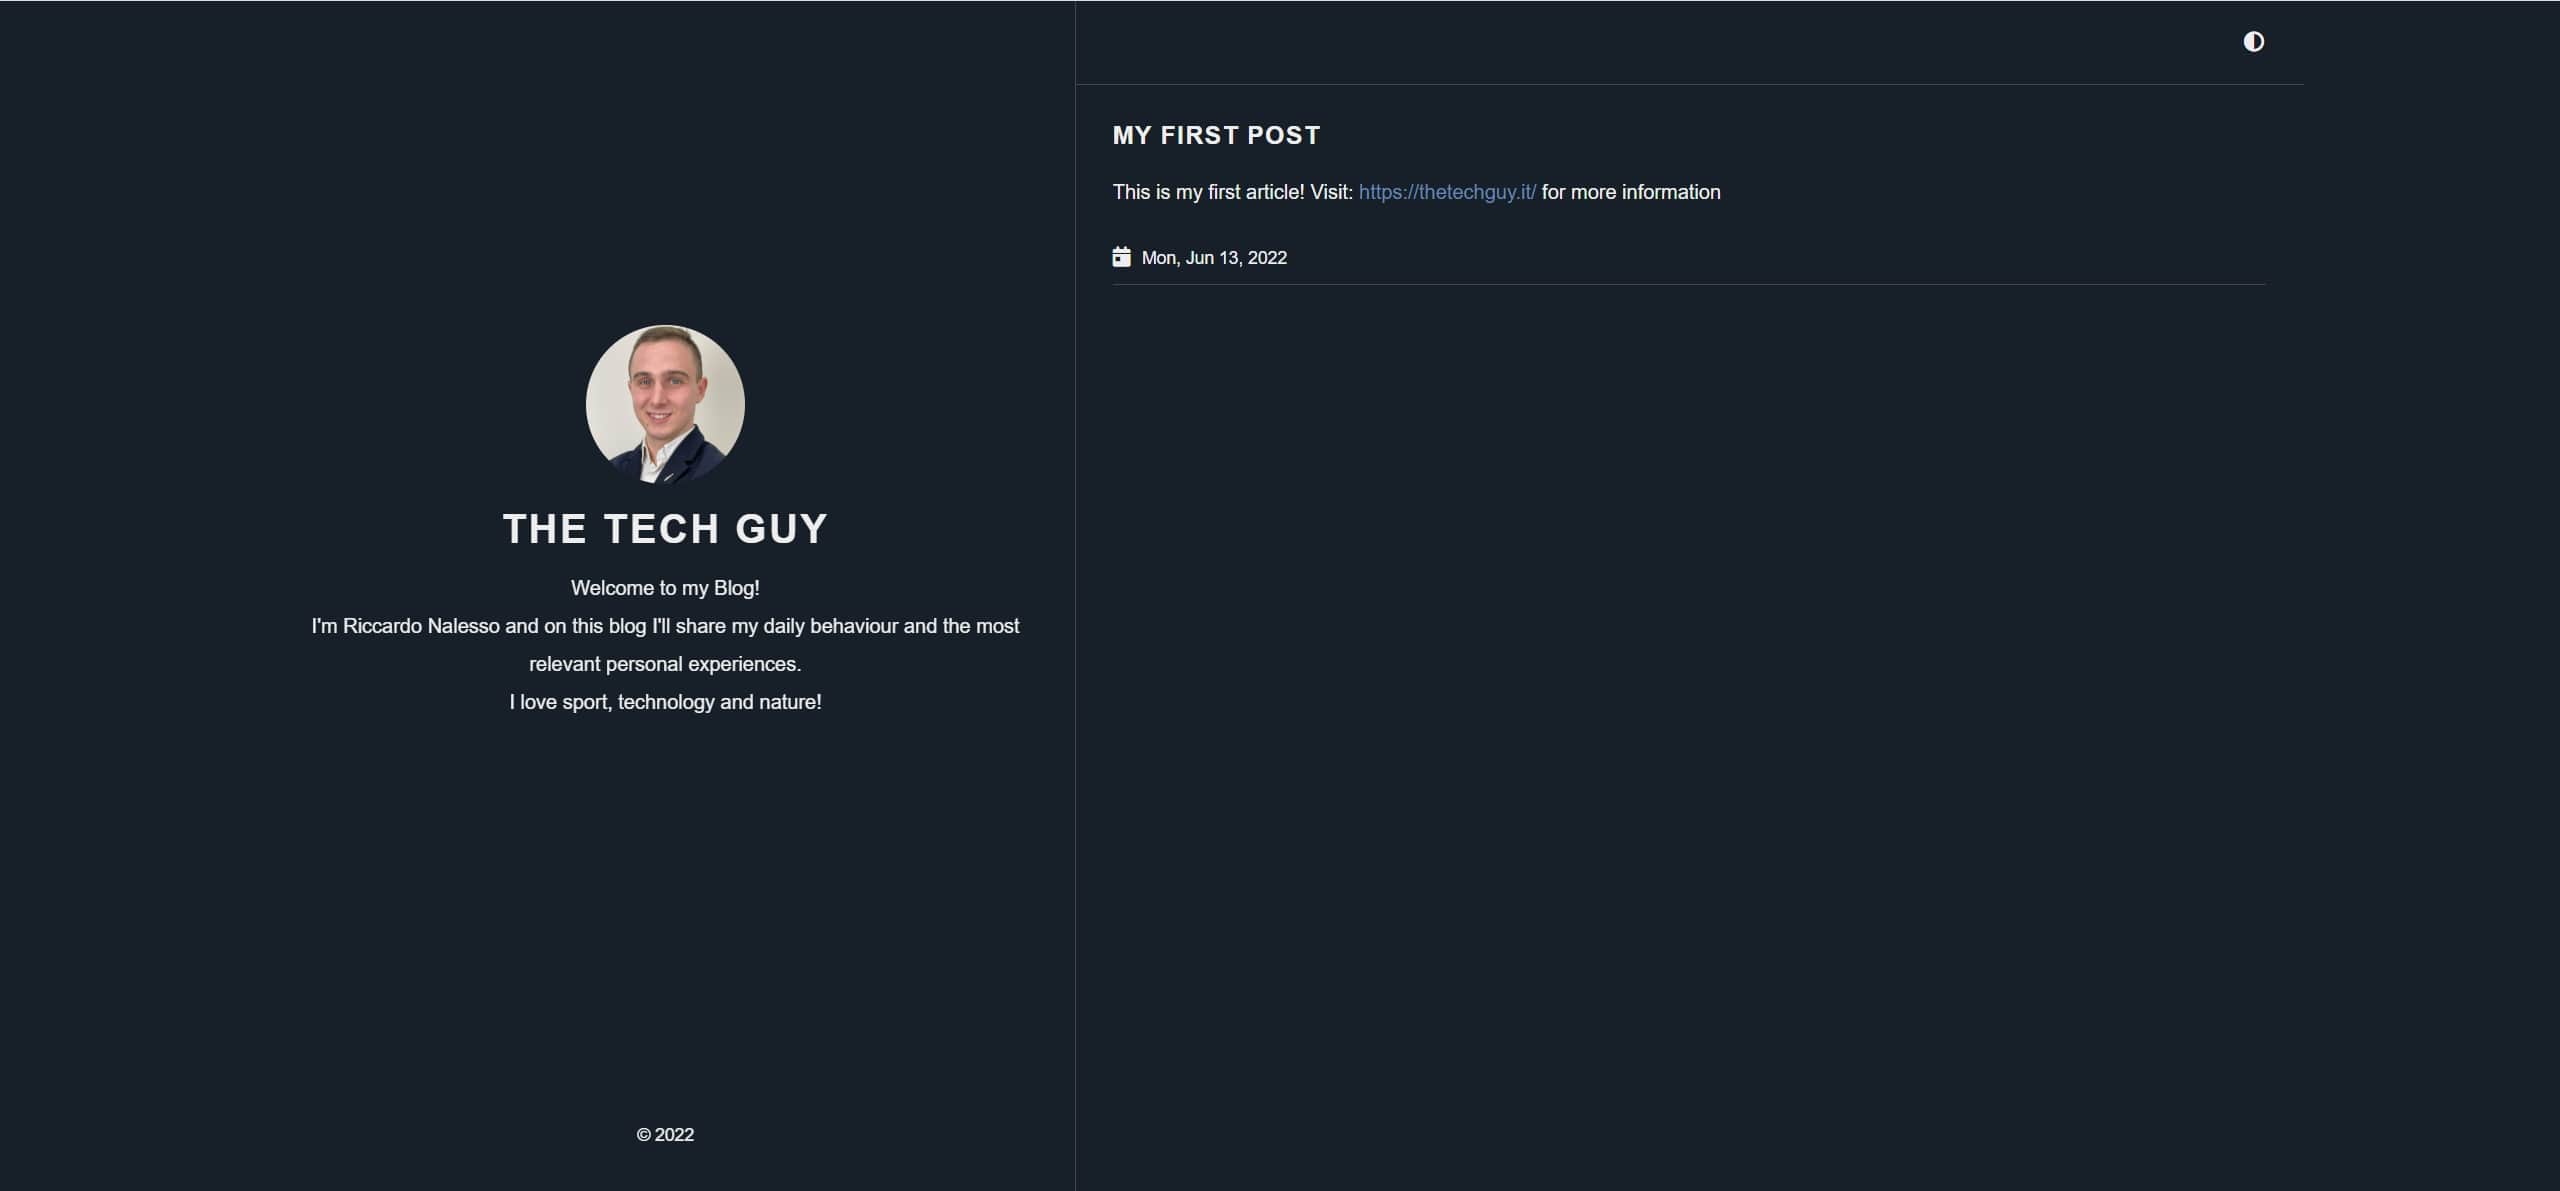
This is my first article!
Visit: https://thetechguy.it/ for more information

Great! Your first post is ready 😉
CONFIG.TOML
The final step is to modify the “config.toml” file. This is the configuration file for the entire blog, the most important file! This is an example, but you can find more documentation
in the official GitHub page of the theme.
We need to modify the configuration file in order to specify the theme that we’re using:
cd
cd testing-hugo-blog/
echo ‘theme = “anatole”’ » config.toml
#Please note that maybe you’ll face some problems with these characters: " , ' and >. Do not “copy/past” but type yourself this command
If you want to verify/view the configuration file, use this command:
cat config.toml
If you want to modify it:
vi config.toml
Now the skeleton of your blog is ready!
Please consider that in this phase we are ignoring all other parameters like Photos, Description, Title, etc.
Verify the website
With this code, you can see your new site at http://localhost:1313/ , but first let start the server:
hugo server -D
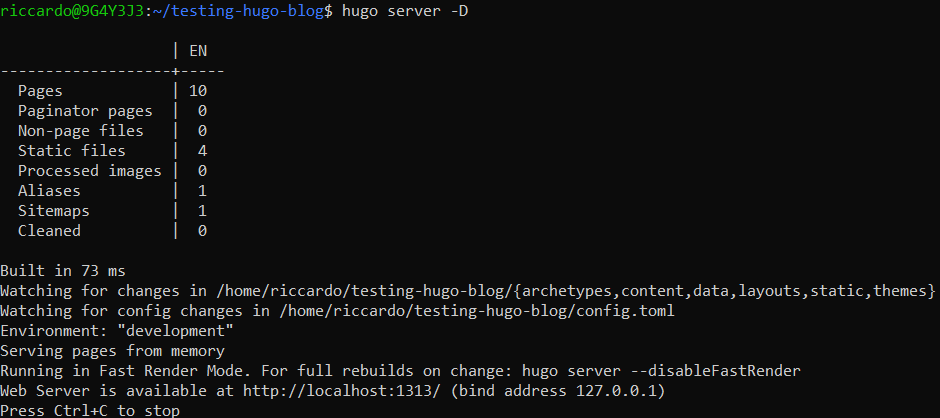
Now you can open your preferred browser and connect to http://localhost:1313/
More data: Title, Description and Images
Now that we created our blog, we want to improve it by putting some more personal data and to do that we need to modify the “config.toml” file:
cd /home/riccardo/testing-hugo-blog
vi config.toml
And edit this string:
[params] title = “The Tech Guy”
description = “Welcome to my Blog!\nI’m Riccardo Nalesso and on this blog I’ll share my daily behaviour and the most relevant personal experiences.\nI love sport, technology and nature!”
profilePicture = “images/picture_profile.jpg”
This is just an example, you need to put your personal data/information or whatever you want 😊! Please note that I decided to create a folder called “images” inside the “static” folder. Here is where I store all the images, divided into different folders, one for each post!
This is the final output:
[06-15-2022] My config.toml file:
baseurl = “https://www.thetechguy.it/"
languageCode = “en-us”
title = “Riccardo Nalesso’s Blog”
theme=“anatole”
summarylength = 10
enableEmoji = true
enableRobotsTXT = true
enableInlineShortcodes = true
privacy_pack = true
#Link custom CSS and JS assets
#(relative to /static/css and /static/js respectively)
custom_css = []
custom_js = [][params]
gtagId = “G-xxxxxxxxxx”
#hidesidebar = true
displayMode = “dark”
title = “The Tech Guy”
description = “Welcome to my Blog!\nI’m Riccardo Nalesso and on this blog I’ll share my daily behaviour and the most relevant personal experiences.\nI love sport, technology and nature!”
profilePicture = “images/picture_profile.jpg”
#author = “Riccardo Nalesso”
Copyright = “thetechguy.it - All rights reserved.”
keywords = “Netowork, Data Center, SDN, Experience, Technology, Cisco, Technology”
contentratio = 0.7[[params.socialIcons]]
icon = “fab fa-linkedin”
title = “Likedin”
url = “https://www.linkedin.com/in/riccardo-nalesso-6b7b92133/"[[params.socialIcons]]
icon = “fab fa-github”
title = “GitHub”
url = “https://github.com/thetechguy-it"[[params.socialIcons]]
icon = “fab fa-twitter”
title = “Twitter”
url = “https://twitter.com/thetechguy_it"[[params.socialIcons]]
icon = “fas fa-envelope”
title = “e-mail”
url = “mailto:riccardo.nalesso10@gmail.com”#[[params.socialIcons]]
#icon = “fab fa-telegram”
#title = “Telegram”
#url = “https://t.me/xxxxxxxxxx"[menu]
[[menu.main]]
name = “HOME”
identifier = “home”
weight = 100
url = “/”[[menu.main]]
name = “ARCHIVE”
weight = 200
identifier = “archive”
url = “/post/”[[menu.main]]
name = “ABOUT”
weight = 300
identifier = “about”
url = “/about/”[[menu.main]]
name = “CERTIFICATIONS”
weight = 400
identifier = “certifications”
url = “/certifications/”
Actually my repository on GitHub is private, I’ll make it public in the future!
Some real helpful resources 👇
https://www.webfx.com/tools/emoji-cheat-sheet/
https://github.com/osano/cookieconsent
https://stackoverflow.com/questions/62553228/adding-cookie-message-with-the-privacy-pack-to-blogdown-website
https://github.com/lxndrblz/anatole/wiki
Thanks for your time I hope that you’re enjoying my blog!
If you have some questions, please drop me a message through social networks!😊
👈 You can find the relative icons here on the left of the page
Riccardo