Cisco ACI: Deployment With Python
Let’s see how to automate the Cisco ACI deployment using Python!! 😊
Why Python?
I know…I know…you are thinking something like: “Why did Riccardo create a python script to do that and he didn’t just use Ansible or Terraform?”…
Well, the reply is pretty easy: I wanted to do it with Python and I did. I found the python library in the Cisco DevNet Cert Guide
and I decided to try it…. You know me, I’m sooooo curious 😉
Python Library
As mentioned before, I used a specific Python library to build this script called “acitoolkit”, you can find here
the GitHub page with more information.
If you want to use this library I strongly recommend you to read, or at least to know that there are these documents:
The ACI Toolkit is a set of python libraries that allow basic configuration of the Cisco APIC controller. It is intended to allow users to quickly begin using the REST API and accelerate the learning curve necessary to begin using the APIC.
Installation
Requirements
- Python 2.7+
- setuptools package
pip3 install setuptools
Downloading
I’ll show you how to install it on Ubuntu if you have git installed. Please clone the repository:
git clone https://github.com/datacenter/acitoolkit.git
cd acitoolkit/
python3 setup.py install
Great! We’re ready now 😊
Cisco ACI Sandbox (THANKS CISCO 🙏)
Ladies and gentlemen, Cisco offers us access to the Cisco ACI Sandbox! Here is the link: https://sandboxapicdc.cisco.com
Today, 06/18/2022 you can use the following username/password to log in:
- username: admin
- password: !v3G@!4@Y
If you are unable to log into the APIC, please look for new credentials on the web.
With this machine, you can test lots of stuff! Configuration, API, script, new features and so on 😉
First Python script: Retrive data from APIC
This first script is very easy but it can help you to understand how the libraries work!
We’ll connect to the APIC and we want to print all the configured tenants. You can find the script on my GitHub page: https://github.com/thetechguy-it/Cisco-ACI/blob/master/get_tenant.py
The script is called: get_tenant.py
from acitoolkit.acitoolkit import *
import credentialssession = Session(credentials.url, credentials.user, credentials.pwd)
session.login()tenantlist = Tenant.get(session)
for tenants in tenantlist:
print(tenants.name)
We’re using the “acitoolkit” library to retrieve data from APIC. I decided to store some variables such as URL, USER and PSW in a different file called “credentials.py” that this script has imported.
Usually is always a good choice to store this kind of variable (credentials) into a different file, so you can share the script without any personal data.
However, the output is something like that:
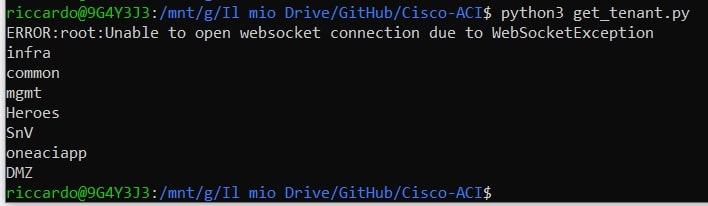
As we can see, there are 3 default tenants: infra, common and mgmt plus 4 user-created tenants: Heroes, SnV, oneaciapp and DMZ (some of you guys created this one…happy lab! 😊).
Ok, now we can move on and create our Tenant!
Second Python script: Tenant Creation
As always, all the scripts are stored on my GitHub account
from acitoolkit.acitoolkit import *
import credentialssession = Session(credentials.url, credentials.user, credentials.pwd)
session.login()
new_tenant = “THETECHGUY”
tenant = Tenant(new_tenant)
tenant.push_to_apic(session)print(“Configuration applied!\nNow let’s check the Tenant list:")
tenantlist = Tenant.get(session)
for tenants in tenantlist:
print(tenants.name)
if tenant.name == new_tenant:
print(f"Congrats! Configuration applied successfully!\nTenant called {new_tenant} is in the list”)
else:
print(f"Sorry! Tenant called {new_tenant} is not in the list, check your code and try again")
With this script I created a new tenant called “THETECHGUY” and checked the configuration has been applied correctly! 😊
To do that, I retrieve the tenant list thank to the get() function and compare it with the variable “new_tenant” (where the real Tenant name is stored).
If everything is OK I’ll receive this output:
“Congrats! Configuration applied successfully!
Tenant called THETECHGUY is in the list”
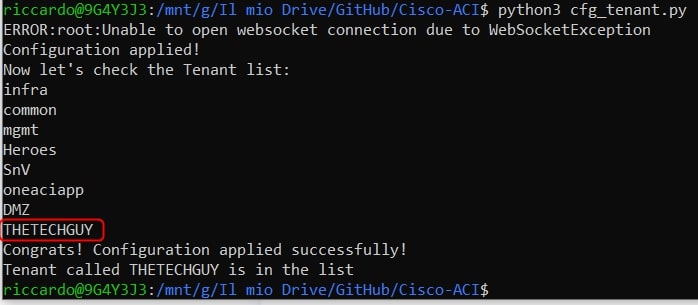
Please note that the configuration changes are possible thanks to the .push_to_apic() function.
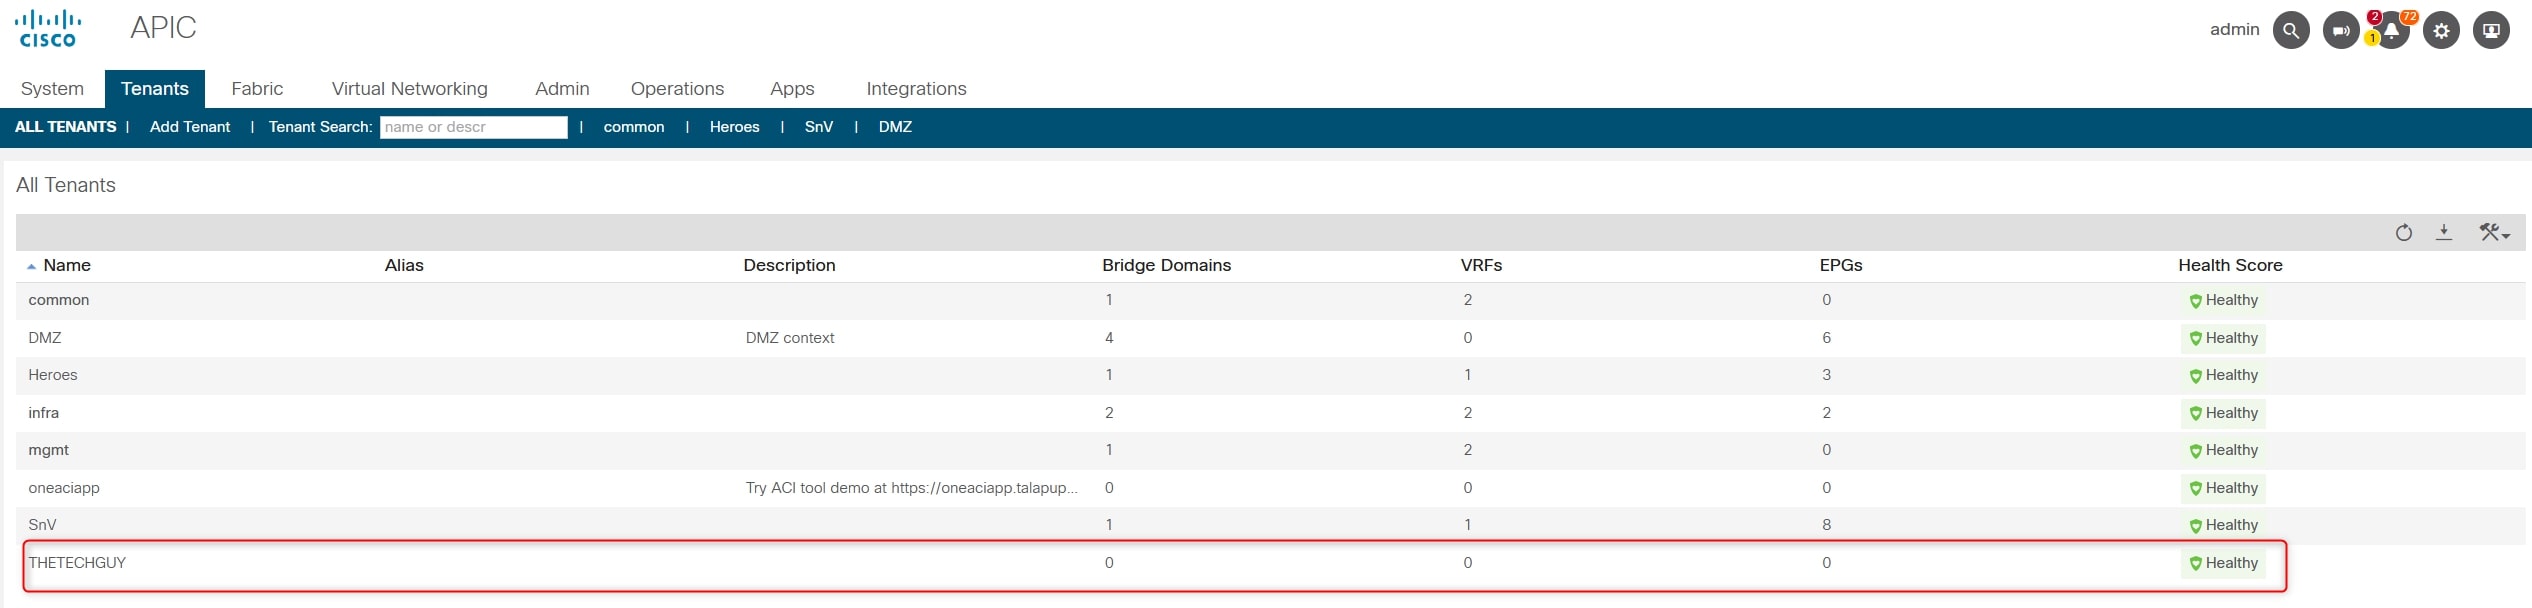
As you can see from the image, now the “THETECHGUY” Tenant is on the tenant list! Let’s check also via GUI :
Third Python script: VRF, BD and EPG Creation
Now that we discovered how to retrieve the tenant list and how to create a tenant, we need to do one more step: Create VRF, BD and EPG.
This is the main commands:
- tenant = Tenant(new_tenant)
- app = AppProfile(“Application Profile name”, tenant) : Denife the new application profile
- vrf = Context(“VRF Name”, tenant) : Define the new VRF
- bd = BridgeDomain(“BridgeDomain name”, tenant) : Define the new BridgeDomain
- epg = EPG(“EPG name”, app) : Define the new EndPoingGroup
- bd.add_context(vrf) : Associate the BridgeDomain to the VRF
- epg.add_bd(bd) : Associate the EndpoingGroup to the BridgeDomain
With this information and with the official documentation:
We can go ahead and create the script:
from acitoolkit.acitoolkit import *
import credentialssession = Session(credentials.url, credentials.user, credentials.pwd)
session.login()new_tenant = “THETECHGUY”
new_app = “APP1”
new_vrf = “VRF1”
new_bd = “BD1”
new_epg = “EPG1”tenant = Tenant(new_tenant)
app = AppProfile(new_app, tenant)
vrf = Context(new_vrf, tenant)
bd = BridgeDomain(new_bd, tenant)
epg = EPG(new_epg, app)
bd.add_context(vrf)
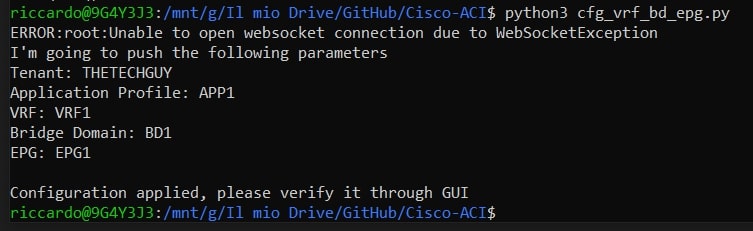
epg.add_bd(bd)print(f"I’m going to push the following parameters\nTenant: {tenant}\nApplication Profile: {app}\nVRF: {vrf}\nBridge Domain: {bd}\nEPG: {epg}\n")
tenant.push_to_apic(session)
print(“Configuration applied, please verify it through GUI”)
Output:
Now, let’s check the GUI:
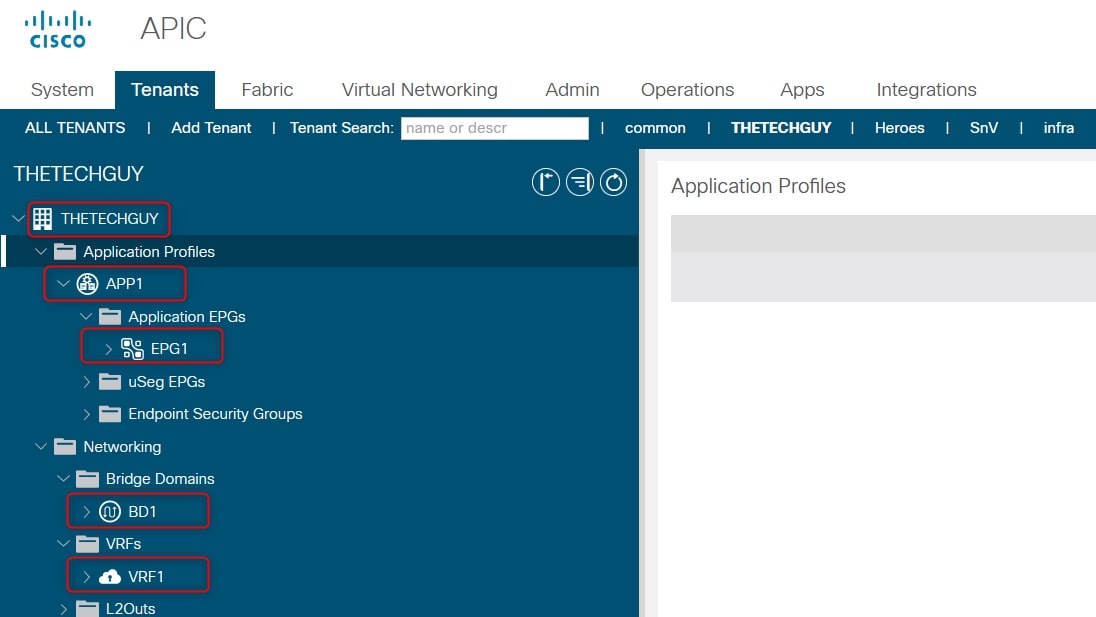
Perfect guys, now the final step: Put all this information together!
Fourth Python script: Create a full tenant
Ok, it’s time to simplify our job 😉
I created three different files:
- credentials.py –> APIC credentials
- cfg_tenantFULL_direct.py –> direct means without human interaction
- data.txt
Let’s talk about data.txt.
Usually, when you’re creating ACI documentation there is some information that you must have in your head:
- Tenant Name
- Application Profile
- VRF Name
- BridgeDomain Name
- BridgeDomain Subnet
- EPG Name
Using the migration approach called “Network-Centric” you’re doing the following association: 1 VLAN = 1 BD = 1 EPG.
With this in mind, you can understand now the reason why I put the following values into the file called “data.txt”:
| TENANT | APP. PROF | VRF | BD | BD SUBNET | EPG |
|---|---|---|---|---|---|
| THETECHGUY | App1 | VRF1 | BD1 | 10.10.10.1/24 | EPG1 |
| THETECHGUY | App1 | VRF1 | BD2 | 10.10.20.1/24 | EPG2 |
| THETECHGUY | App2 | VRF2 | BD3 | EPG3 | |
| THETECHGUY | App2 | VRF2 | BD4 | 10.10.40.1/24 | EPG4 |
| THETECHGUY | App3 | VRF3 | BD5 | 10.10.50.1/24 | EPG5 |
| THETECHGUY | App3 | VRF3 | BD6 | 10.10.60.1/24 | EPG6 |
The BD3 doesn’t have the subnet, it’s correct. Great, after that I created the script…take a look:
from acitoolkit.acitoolkit import *
import credentialssession = Session(credentials.url, credentials.user, credentials.pwd)
session.login()file = open(“data.txt”, “r”)
for line in file:
stripped_line = line.strip()
line_list = stripped_line.split()
single_string = line_list[0]
splitted_list = single_string.split(",")
tenant = Tenant(splitted_list[0])
app = AppProfile(splitted_list[1], tenant)
vrf = Context(splitted_list[2], tenant)
bd = BridgeDomain(splitted_list[3], tenant)
if splitted_list[4] == “":
print(”!!! NOTE: THIS BD DOESN’T HAVE A SUBNET !!!")
else:
bd_subnet = Subnet(splitted_list[5], bd)
bd_subnet.set_addr(splitted_list[4])
bd.add_subnet(bd_subnet)
bd.set_unknown_mac_unicast(‘flood’) #Enable ARP Flooding AND L2 Unknown Unicast
epg = EPG(splitted_list[5], app)
bd.add_context(vrf)
epg.add_bd(bd)
print(f"I’m going to push the following parameters\nTenant: {tenant}\nApplication Profile: {app}\nVRF: {vrf}\nBridge Domain: {bd}\nEPG: {epg}\n")
tenant.push_to_apic(session)
print(“Configuration applied successfully!\n\n\n”)
file.close()
I’ll not explain everything, I suggest you study Python and the most important libraries 😉 Run it and see what happens:
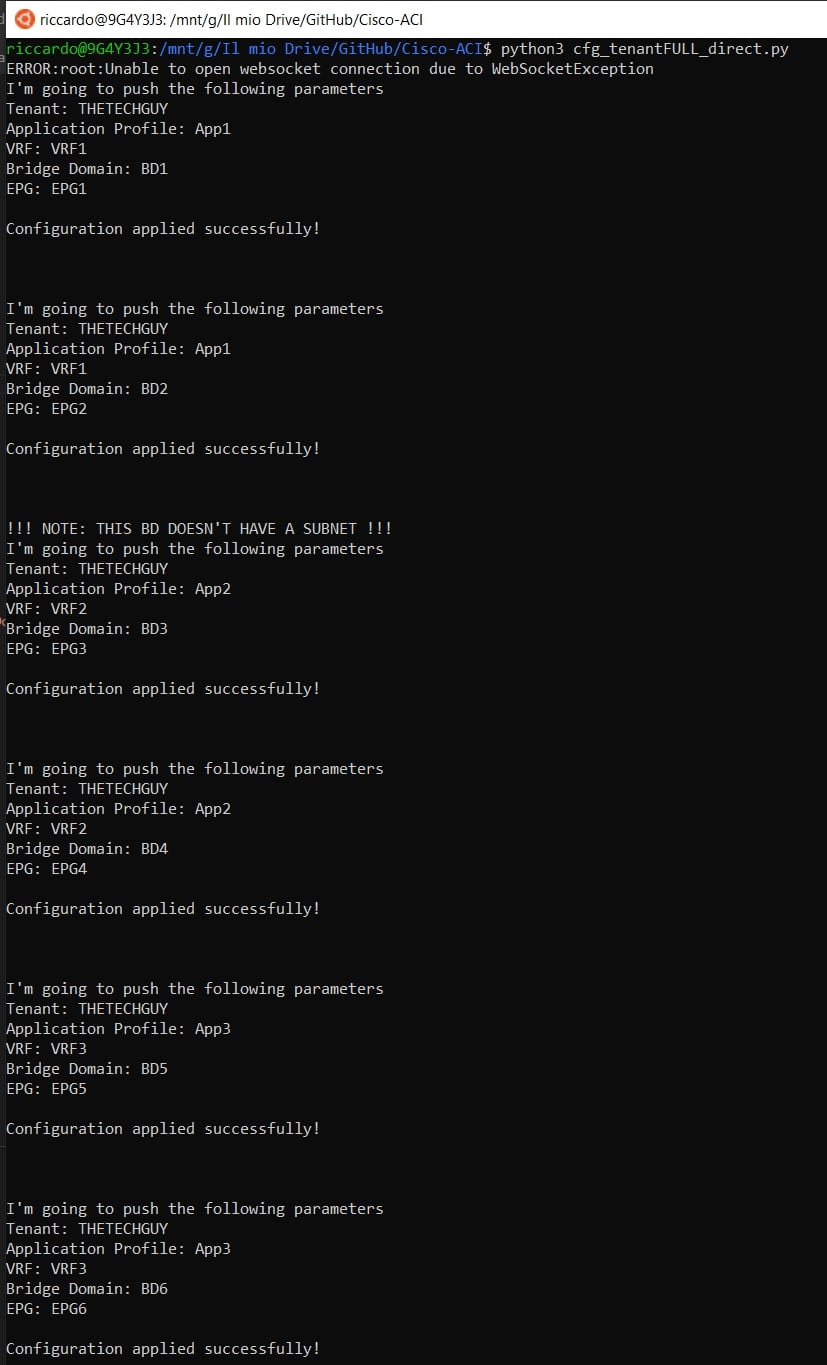
Great, everything seems to be fine! Final check on the GUI:
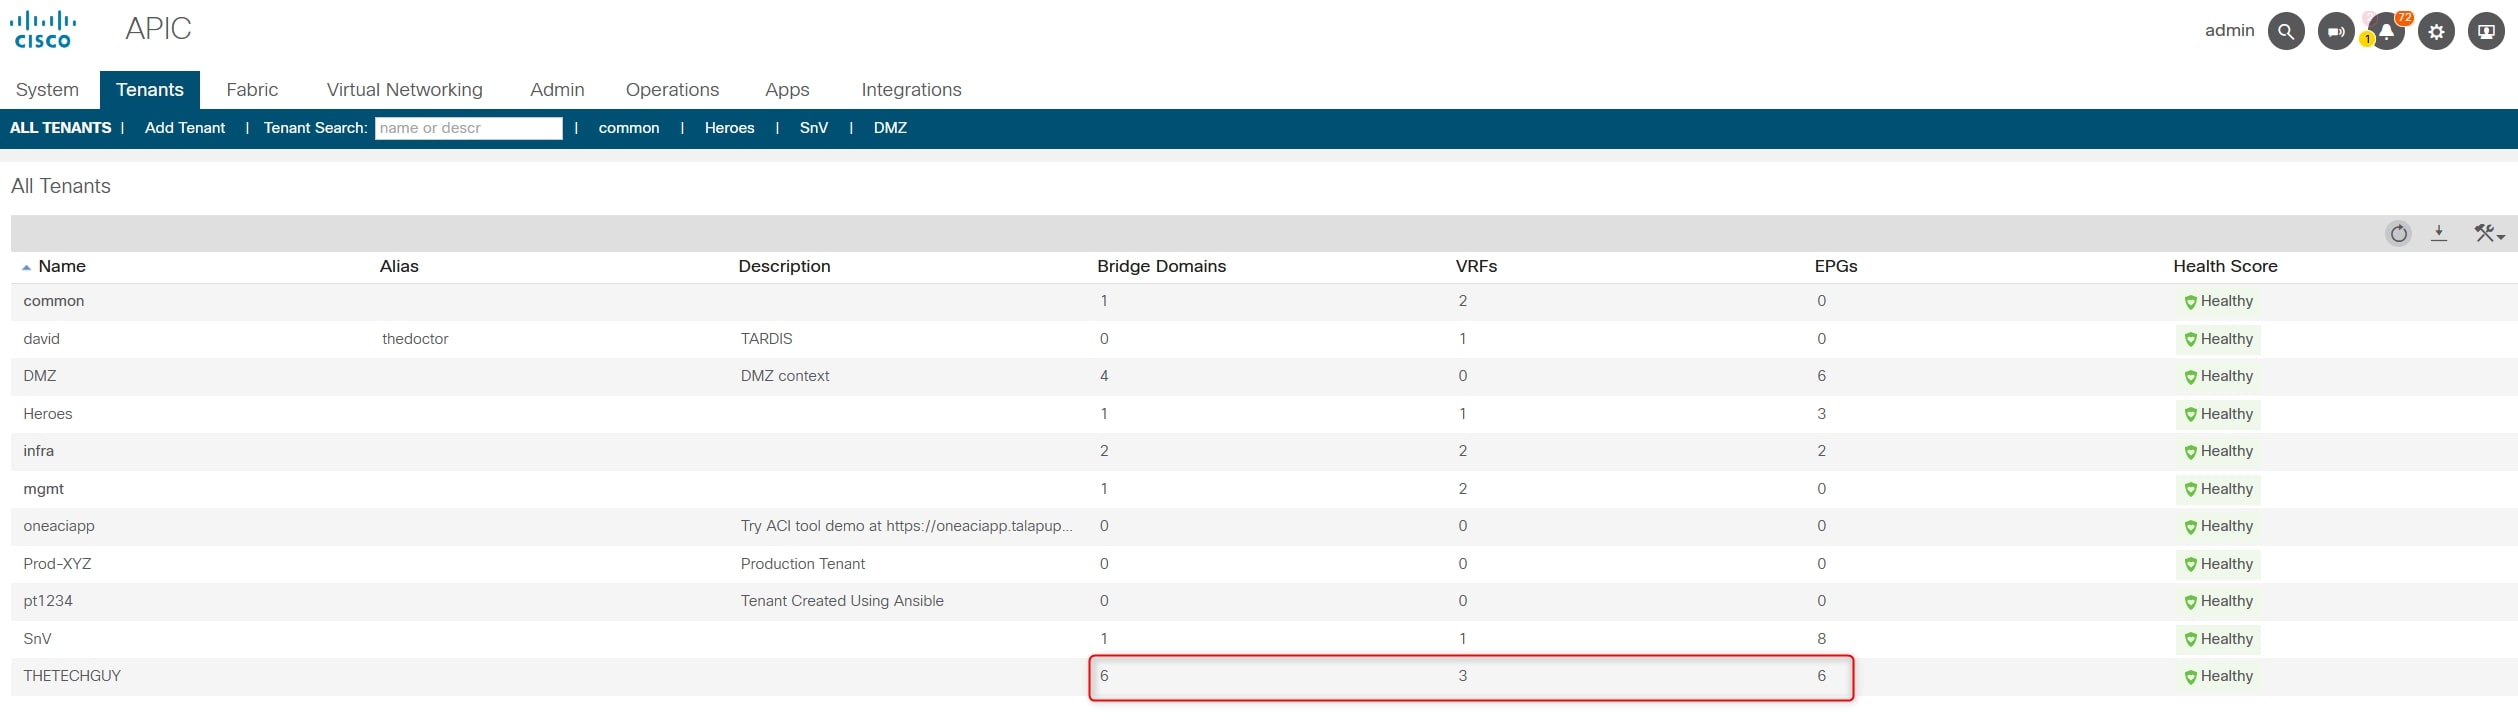
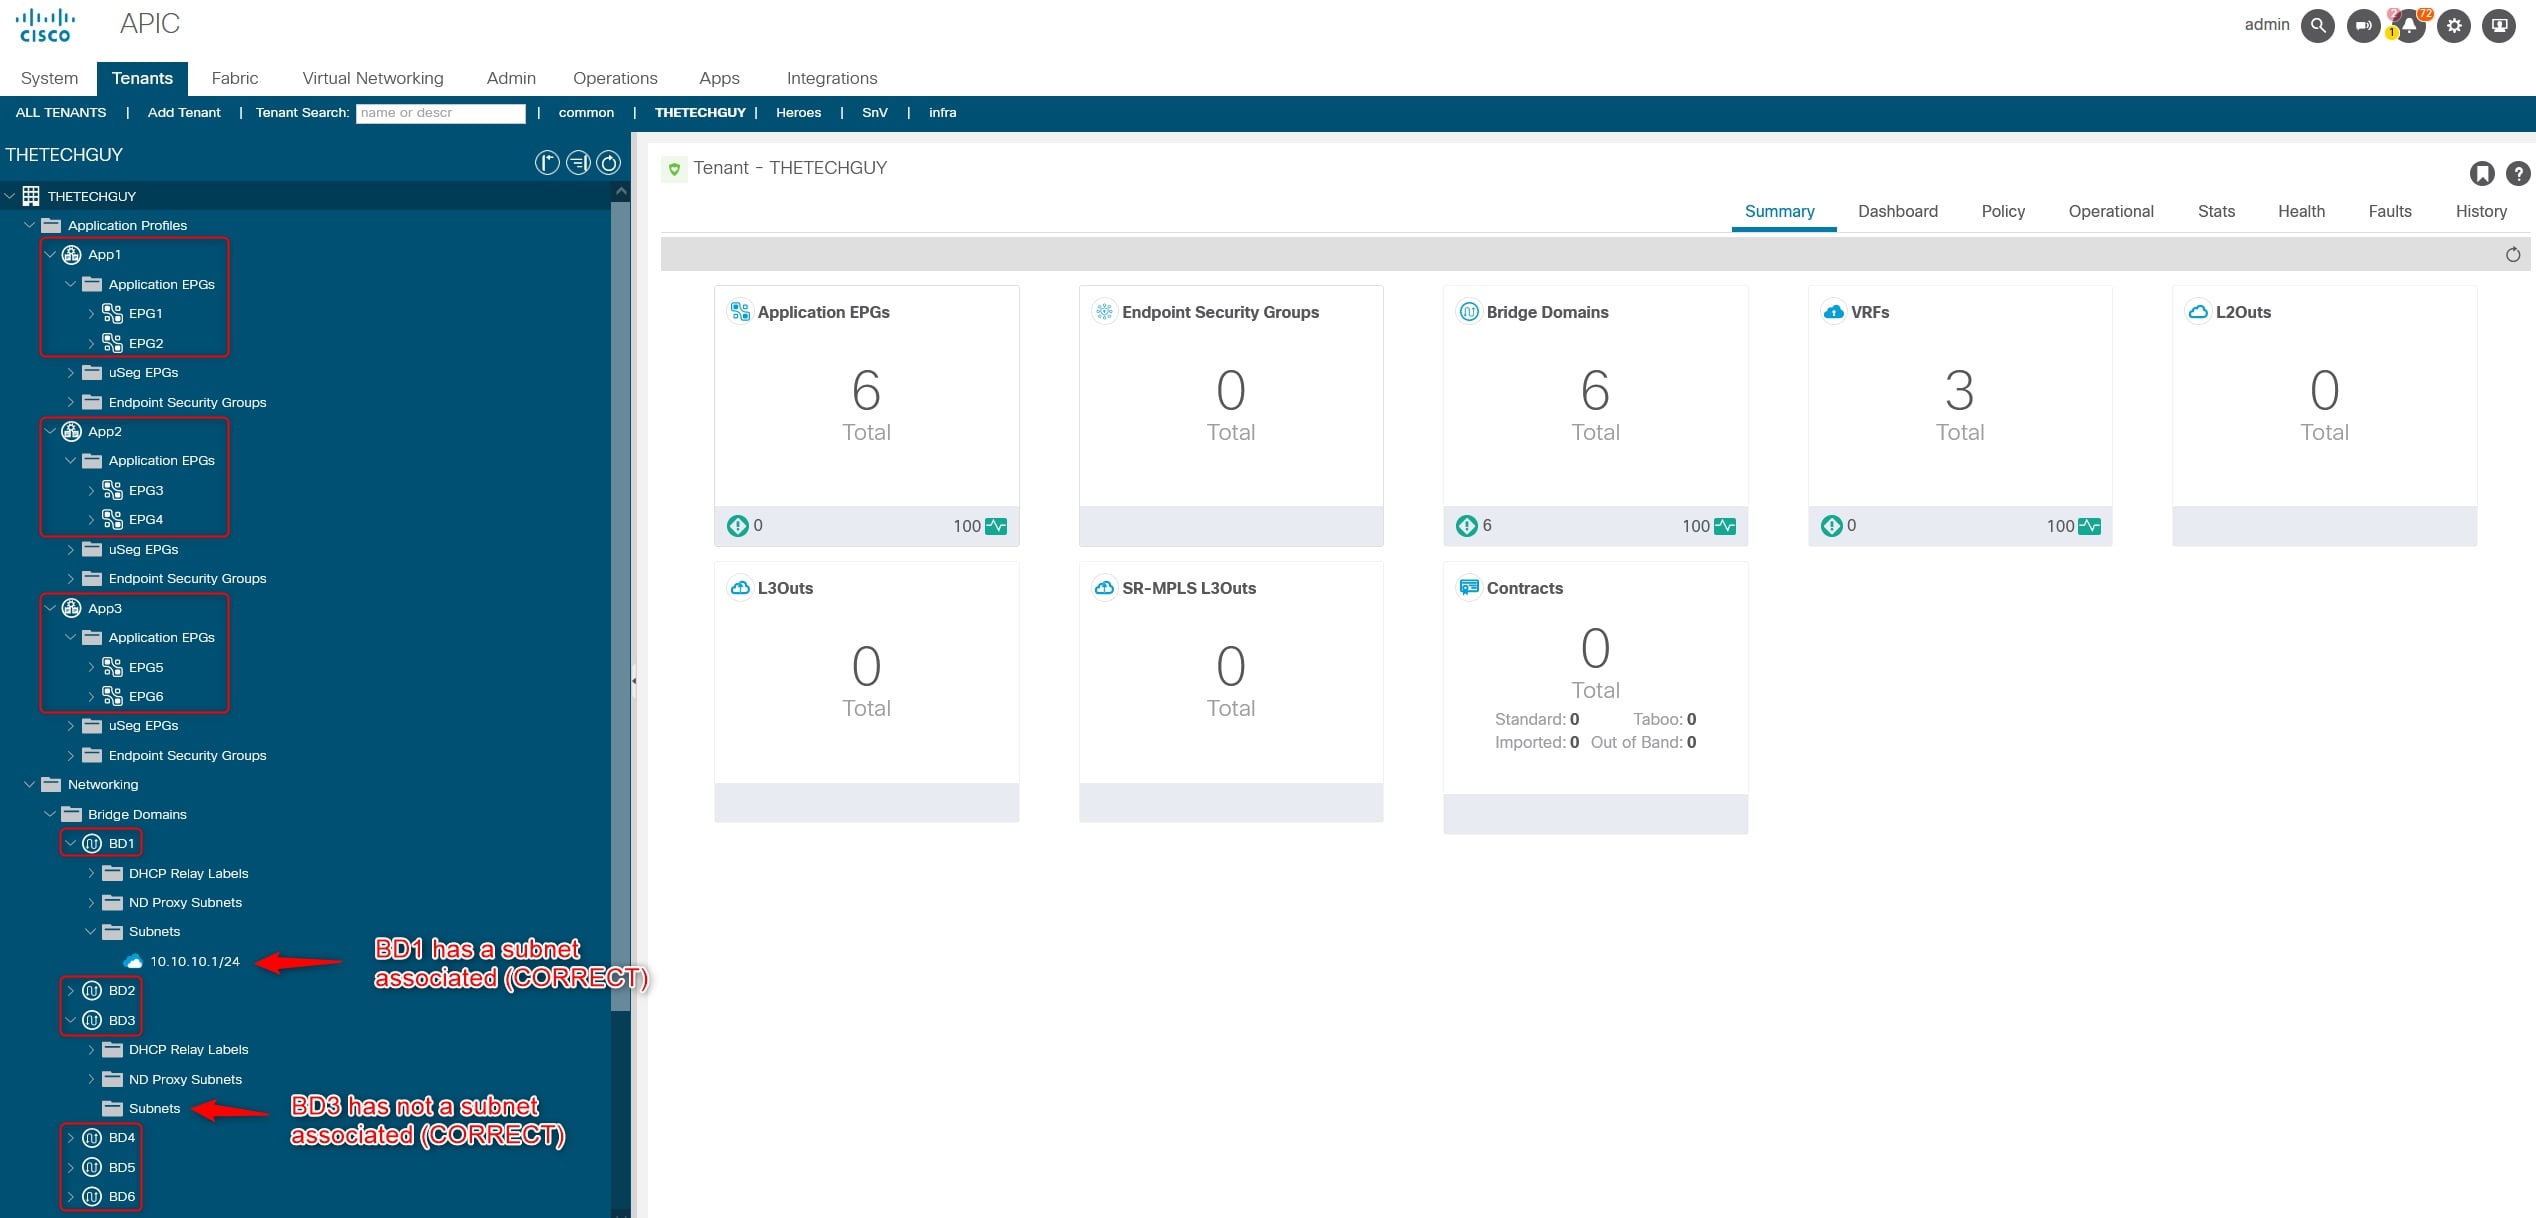
Perfect!
You have successfully deployed a brand new Tenant with multiple Application Profiles, VRFs, BDs and EPGs. Moreover, you associate EPGs to BDs, BDs to VRFs and subnets to the relative BDs!
UPDATE
Please note that I implemented also the EPG and Physical Domain association, you can find the updated script on GitHub
Btw, here a preview:
phydom = splitted_list[6]
dom = aci.EPGDomain.get_by_name(session, phydom)
epg.add_infradomain(dom)
[❗ONE MORE THING…❗]
If you want to have more control of the operations, I created a script called “cfg_tenantFULL_interactive.py”, you can find it on GitHub
This script after each part asks “Are you sure you want to proceed?[y/n]":
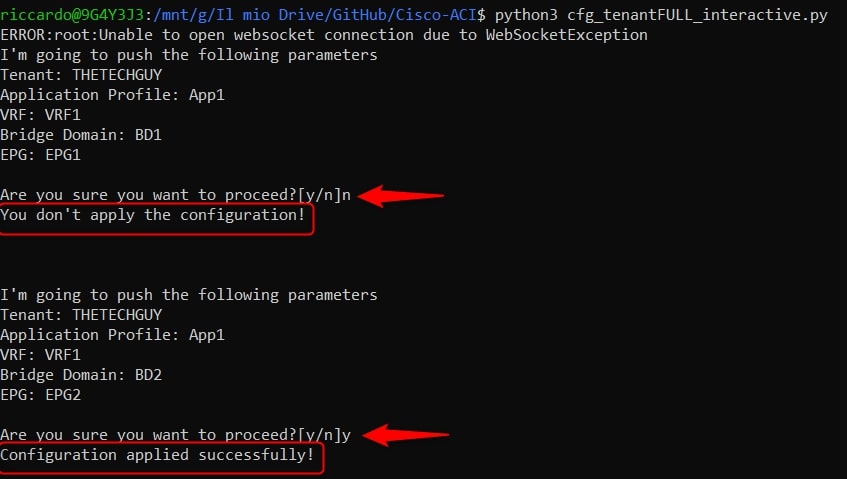
With this method, you can verify each parameter and decide if you are ok to push these parameters or not (just skip to the next one)
[❗/ONE MORE THING…❗]
DISCLAIMER
I take no responsibility for any damage you may do running the scripts I provide here. Use it at your own risk, always test before running in production.
Thanks for your time I hope that you’re enjoying my blog!
If you have some questions, please drop me a message through social networks!😊
👈 You can find the relative icons here on the left of the page
Riccardo