Cisco SDWAN: How to Filter Networks Using Centralized Policy
During this post we’ll see how to manipulate network advertisements thanks to centralized policy.
Centralized Policy
Centralized policies refer to policies that are provisioned on Cisco vSmart Controllers, which are the centralized controllers in the Cisco SD-WAN overlay network.
Centralized control policy applies to the network-wide routing of traffic by affecting the information that is stored in the Cisco vSmart Controller’s route table and that is advertised to the Cisco vEdge devices. The effects of centralized control policy are seen in how Cisco vEdge devices direct the overlay network’s data traffic to its destination.
The cool stuff is that they are like a puzzle, you must create different Groups of Interest and the put them together!
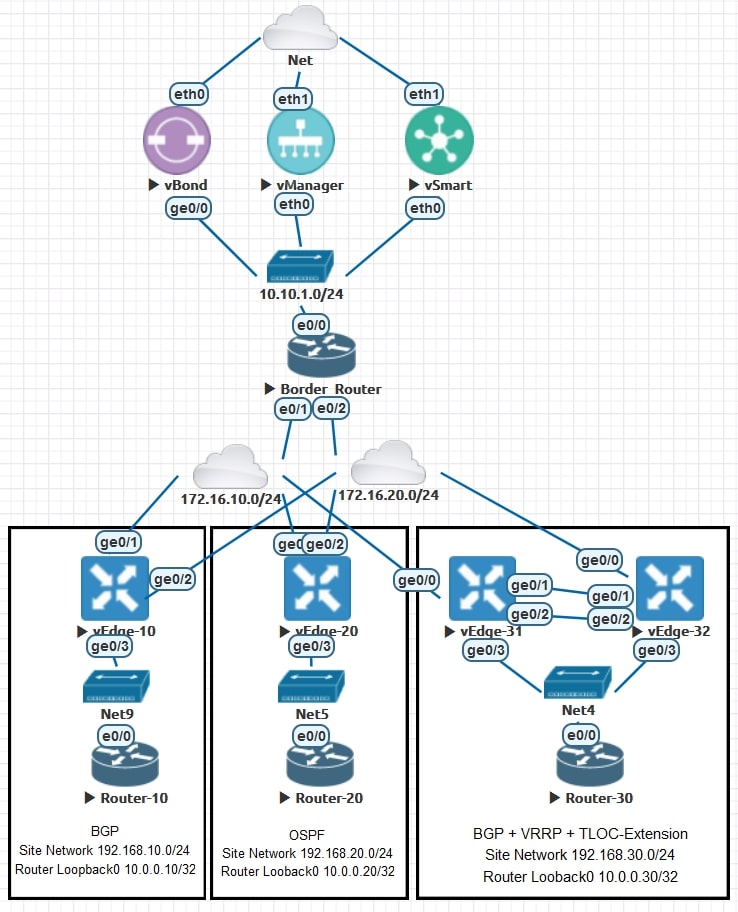
Topology review and requirements
Let’s review together the toplogy and the requirements for this activity:
AS-IS
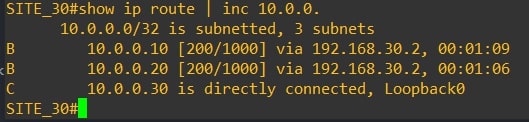
All the routers are receiving all the router’s loopback0.
show ip route | inc 10.0.0.


Requirements
We don’t want to receive the Router-10 Looback0 on Site-20 and Site-30. This means that from site 20 and site 30 we will not able to reach 10.0.0.10/32
Disclaimer
I’m using the following release: 20.3.5
If you are not confident about the procedure, test it on you lab environment before apply changes in production.
Centralized Policy Configuration
First, click on we need to create two Groups of Interest, AKA List.
- Prefix List
Custom Options(centralized policy)>Lists>Prefix>New Prefix List: Here we need to define the prefix for network you want filter [10.0.0.10/32]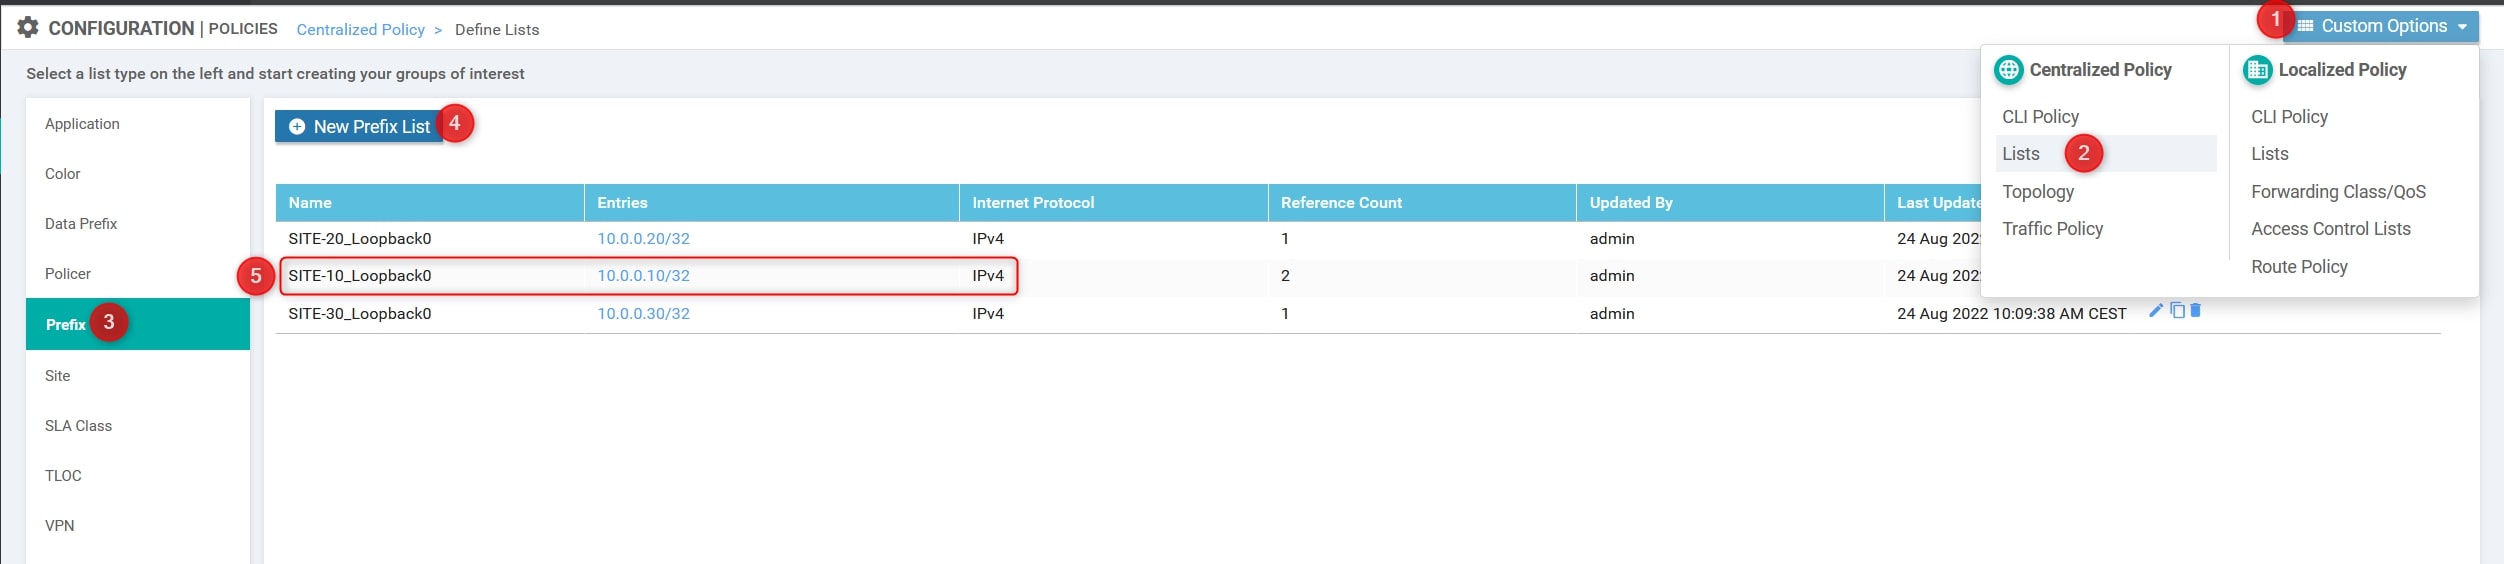
- Site List
Custom Options(centralized policy)>Lists>Prefix>Site List: Here we need to define the site list which includes sites where you don’t want to send prefix(es) [site 20 and site 30]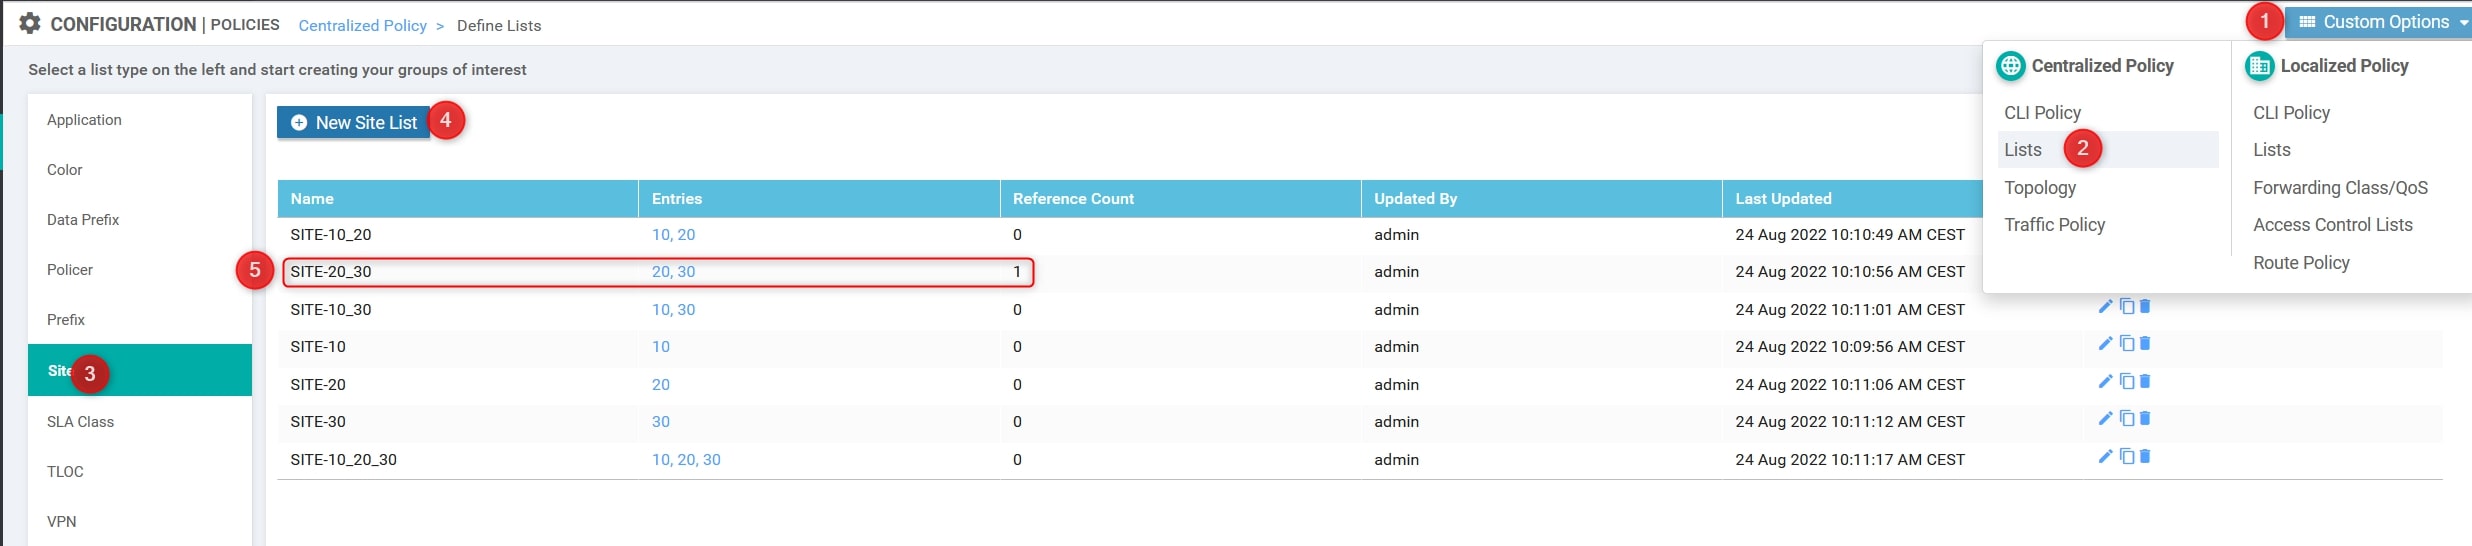
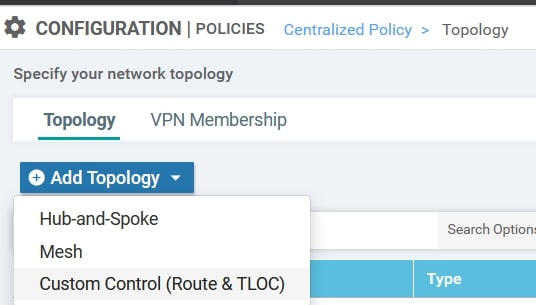
Again, using the Custom Options, create the Custom Control:
- Custom Options(centralized policy)>Topology>Add Topology>Custom Control(Route & TLOC)
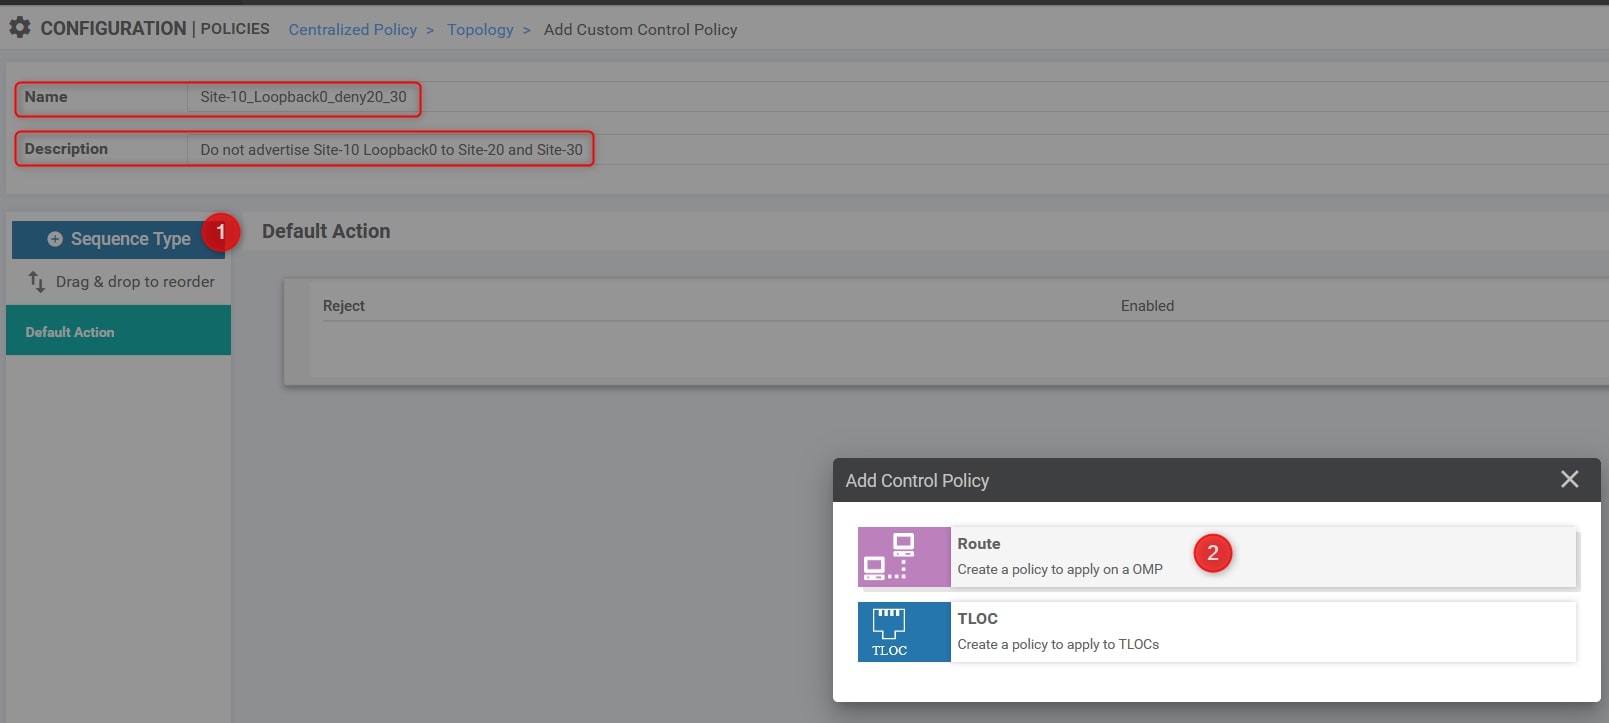
Here we need to specify four things:
- Name: Site-10_Loopback0_deny20_30
- Description: Do not advertise Site-10 Loopback0 to Site-20 and Site-30
- The Prefix List related to the 10.0.0.10/32 network.
- Change the default action from reject to accept.
Click on “Sequence Type” and choose “Route”
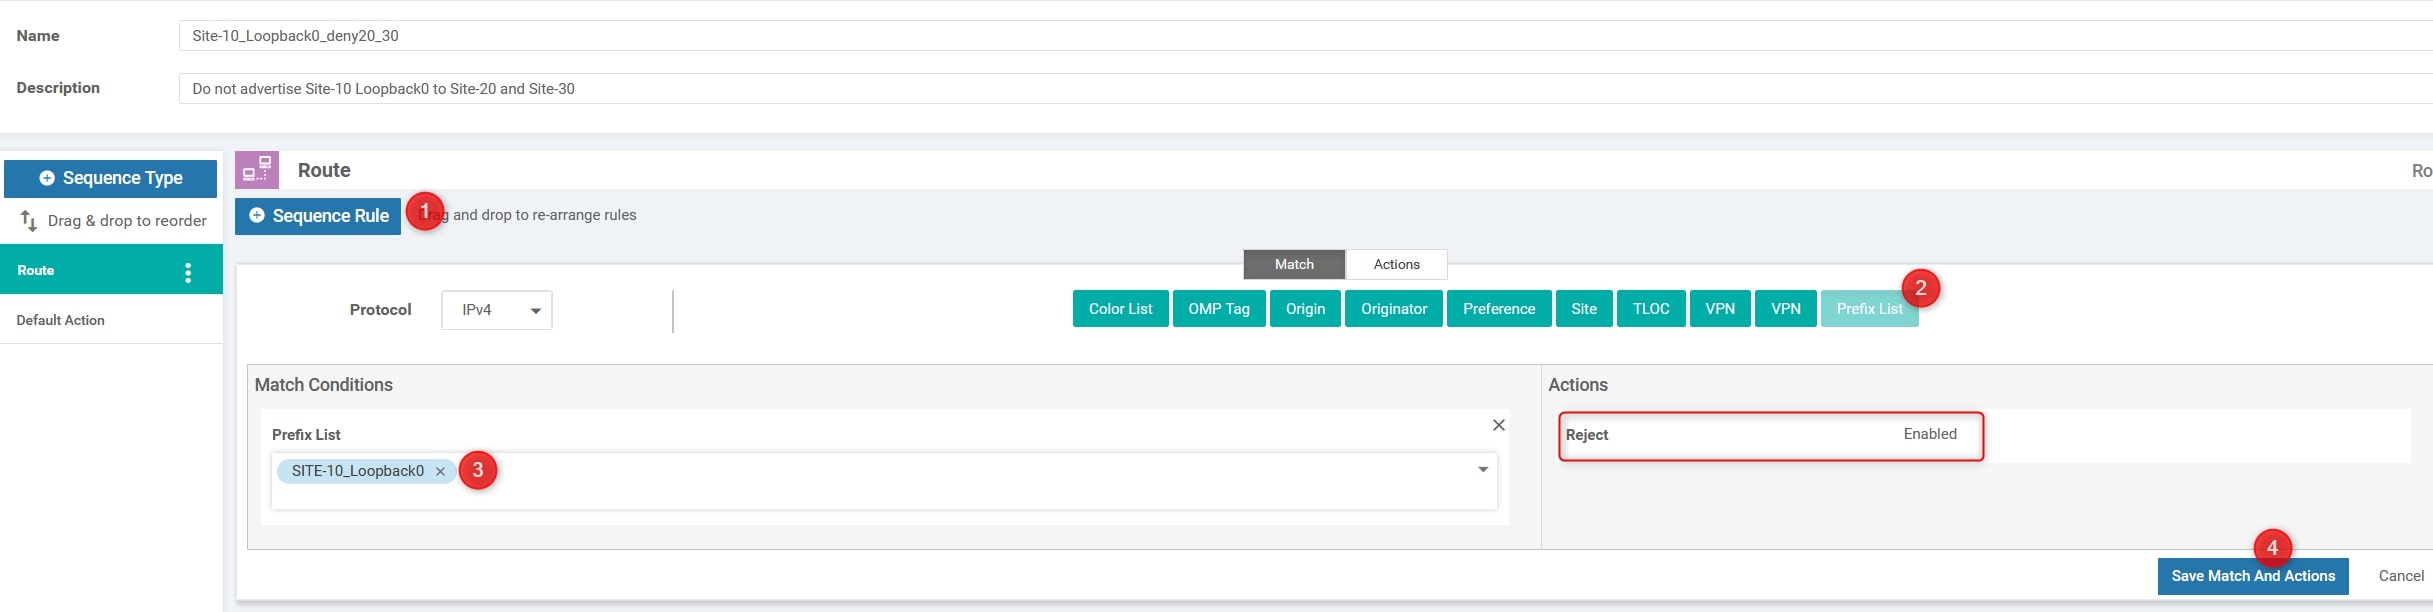
Click on “Requence Rule” and choose “Prefix List”. Here, we need to specify the Site-10 Router Loopback0 address, included into the relative list.
Please check that the action is in “Reject”. If everything is ok, go ahead and click “Save Match And Action”:
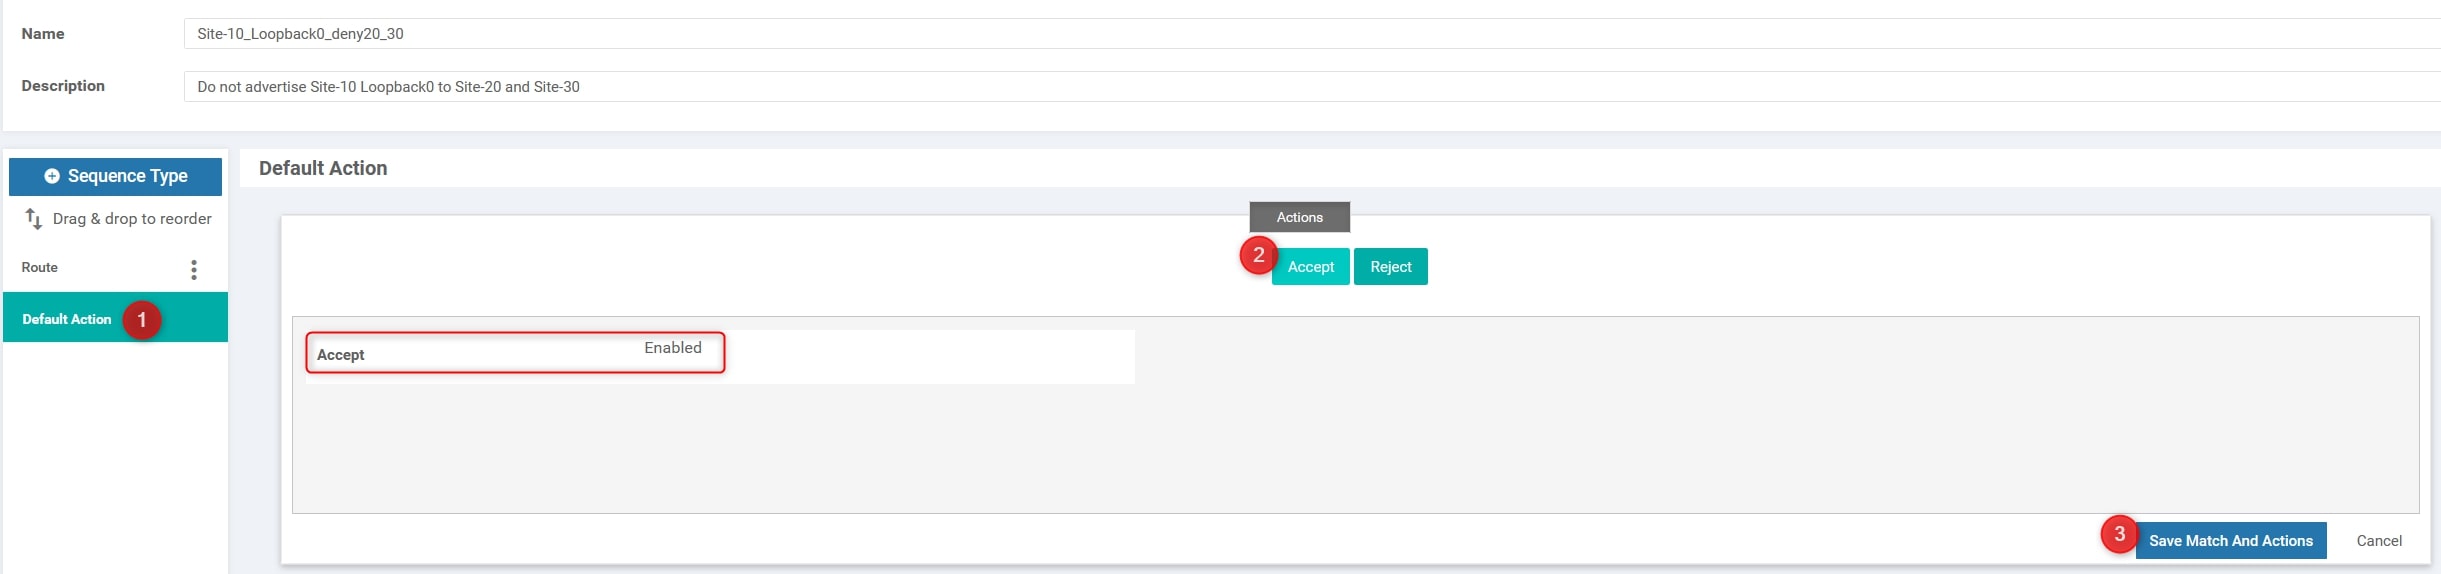
Now, we need to modify the default action from “Reject” to “Accept”:
Then, return to the initial policy section: Configuration>Policies and click “Add Policy”.
The first required step is to create the Groups of Interest, but we have done this task before so we can go ahead using the “Next” blue button at the bottom of the page.
After that, click on “Add Topology” and choose “Import Existing Topology”. Here, specify what you configured before:
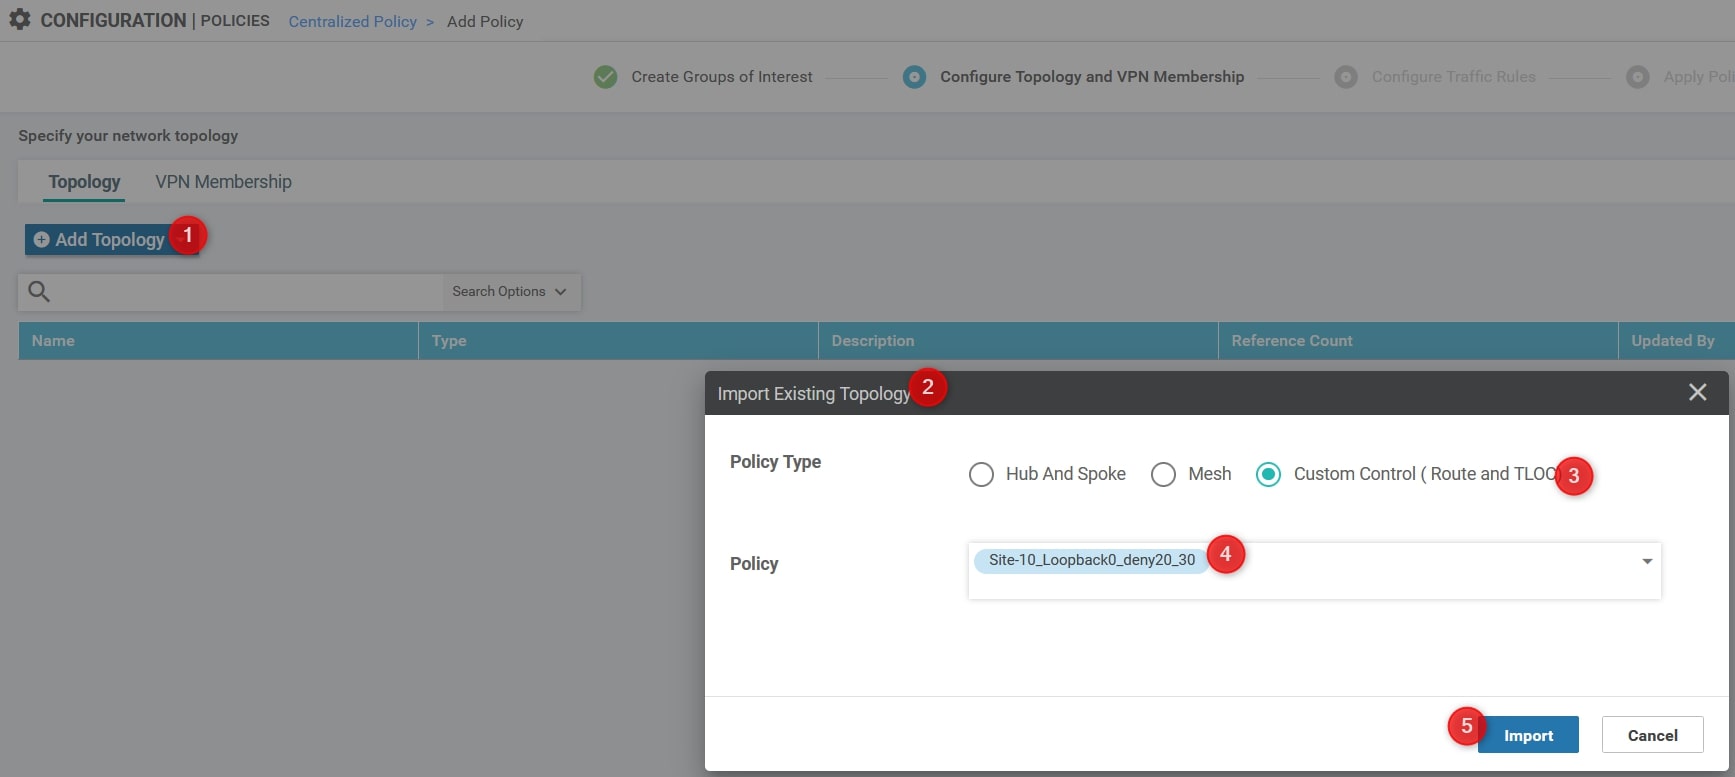
Then, click the “Next” blue button at the bottom of the page and again “Next” in order to skip the section called “Configure Traffic Rules”
Okay, we’re at the last step, we need to apply the policy to a specific site list!
Here we need to specify three things:
- Name: Site-10_Loopback0_deny20_30
- Description: Do not advertise Site-10 Loopback0 to Site-20 and Site-30
- The outbound Site List related to Site 20 and Site 30.
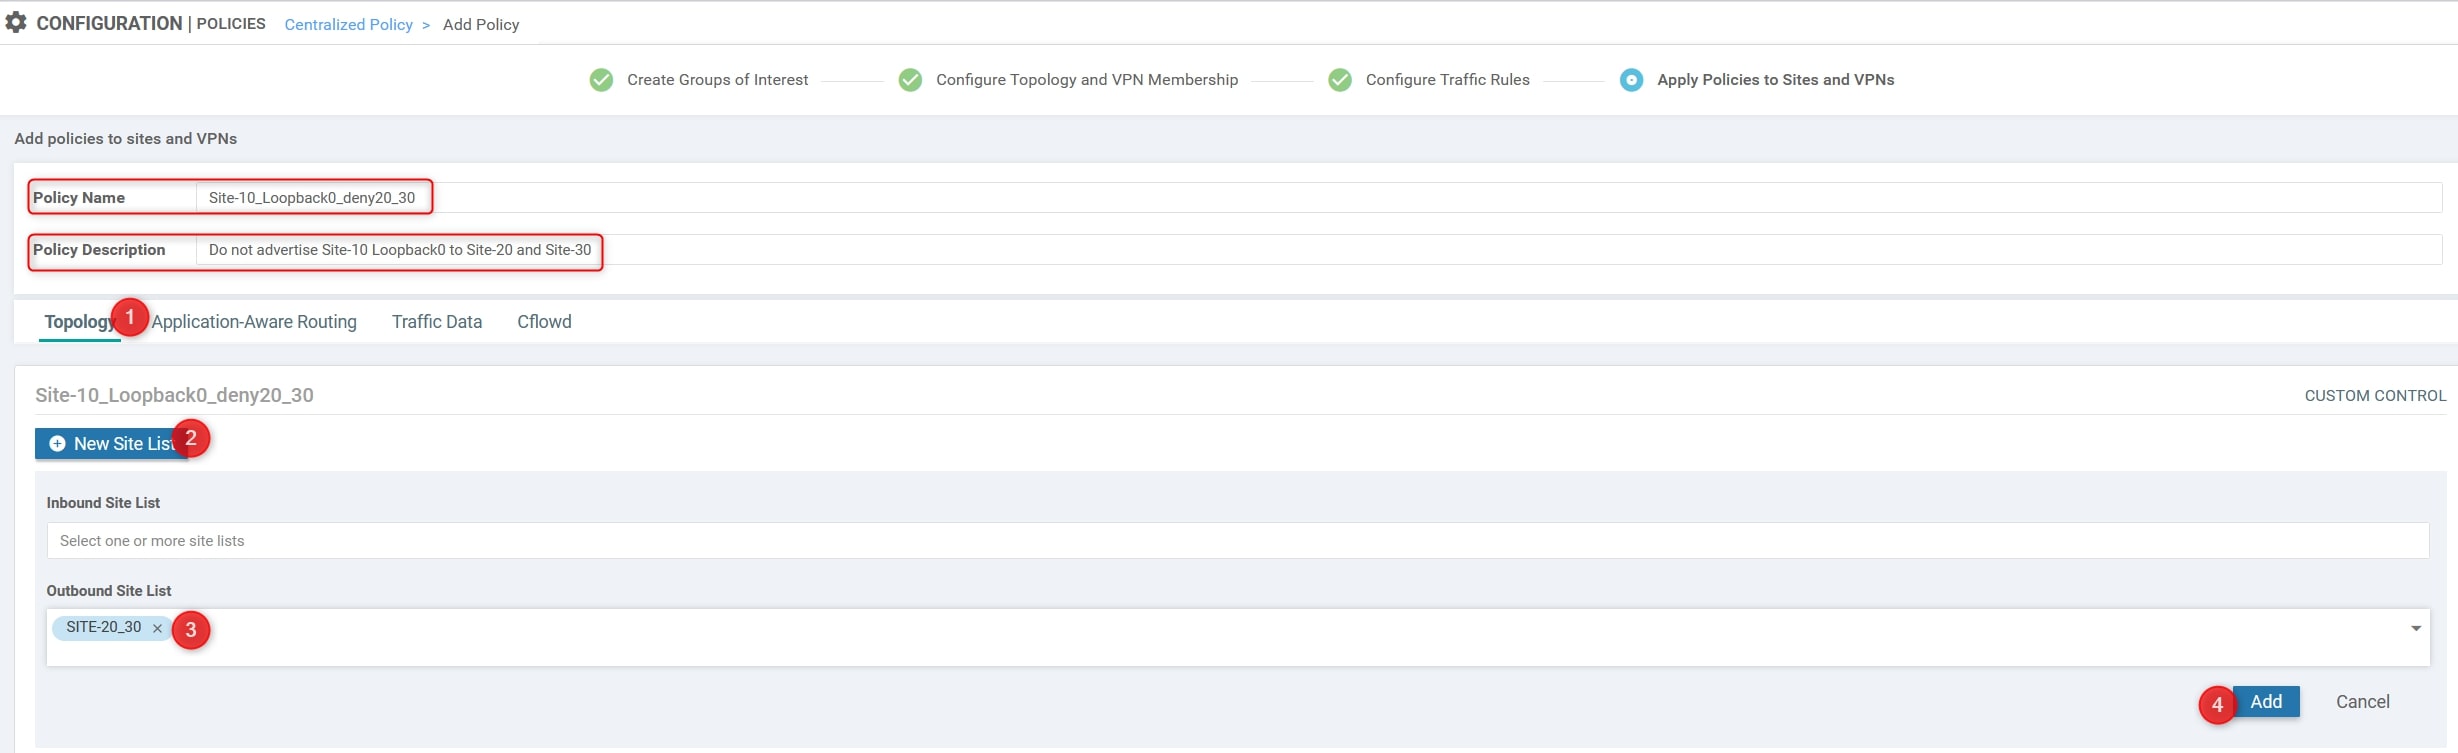
Now, you can finally click on Save Policy".
Great! We have almost done 😉
The last step is to activate the policy. To do that you can simply click on the policy, click on the three dots at the end of the row and click “Activate”:
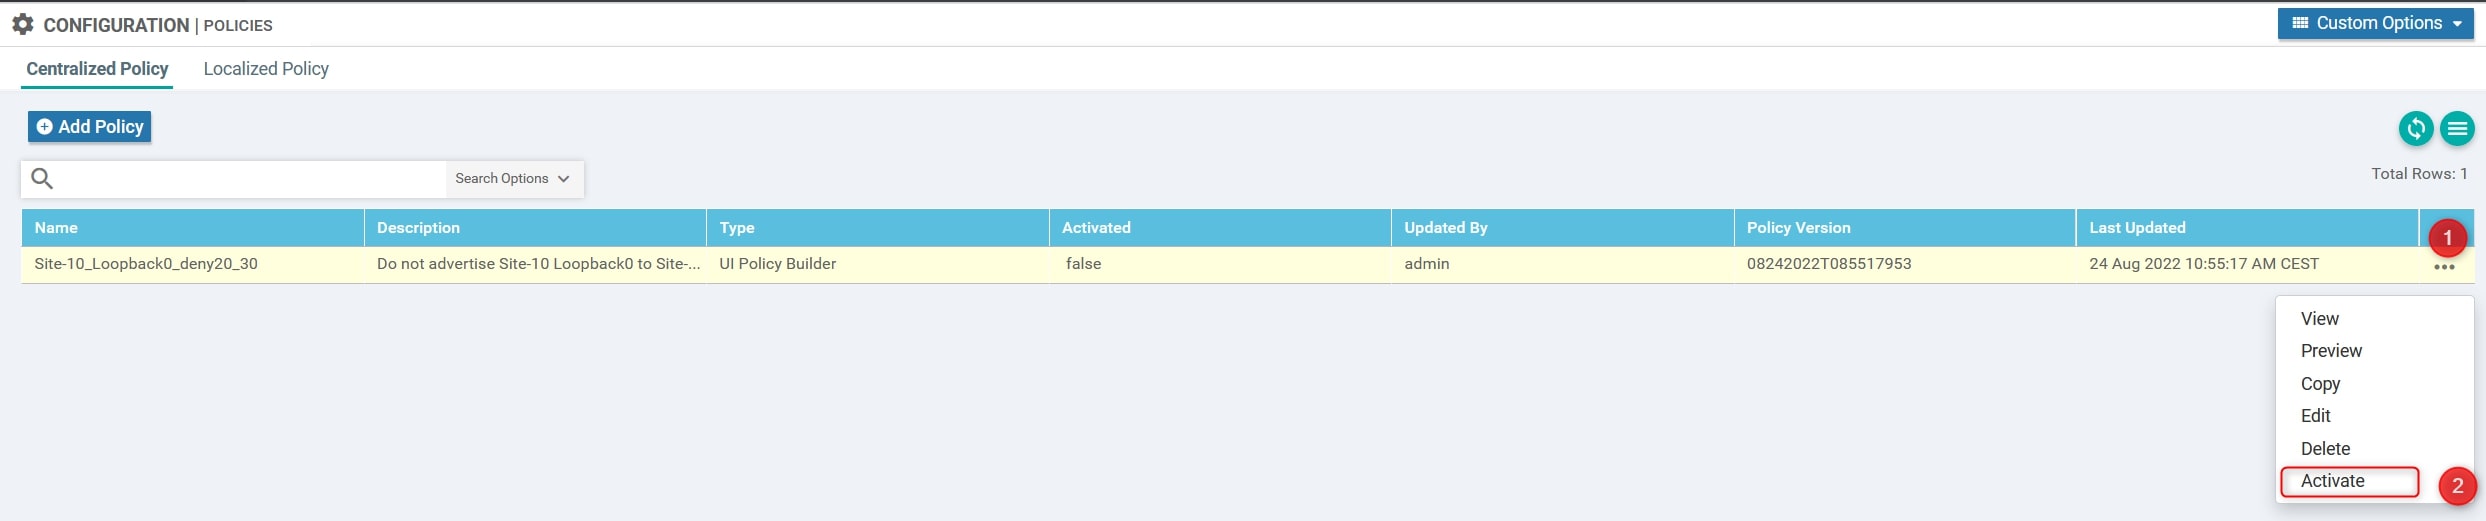
vManage will push the configuration to vSmart using NETCONF.
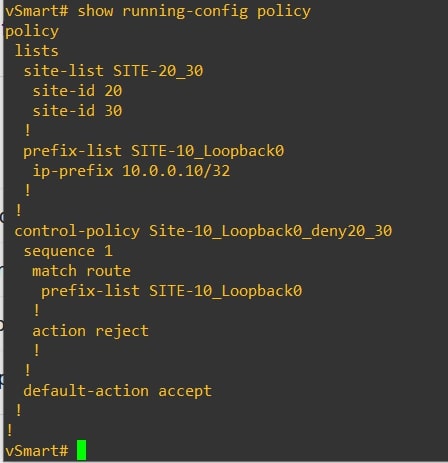
Output from vSmart CLI:
show running-config policy
Verify
Now we need to verify that the policy is working properly. Let connects to Site 20 and Site 30 routers and review their routing table using the following commands:
show ip route | inc 10.0.0.


Congratulations, you did it!💥
Thanks for your time I hope that you’re enjoying my blog!
If you have some questions, please drop me a message through social networks!😊
👈 You can find the relative icons here on the left of the page
Riccardo