Cisco SDWAN: Route Leaking Using Centralized Policy
During this post we’ll see how to perform route leaking between service VPNs using centralized policy.
VPNs
Cisco SDWAN VPNs are very similar to the VRF concept on legacy networks. In the Cisco SDWAN overlay network, VPNs divide the network into different segments. By default, two VPNs are present in the configurations of all Cisco SDWAN devices, and these VPNs serve specific purposes:
- VPN 0 is the transport VPN: It carries control traffic over secure DTLS or TLS connections between vSmart controllers and vEdge routers, and between vSmart controllers and vBond orchestrators. Initially, VPN 0 contains all a device’s interfaces except for the management interface, and all the interfaces are disabled. For the control plane to establish itself so that the overlay network can function, you must configure WAN transport interfaces in VPN 0.
- VPN 512 is the management VPN: It carries out-of-band network management traffic among the Cisco SDWAN devices in the overlay network. By default, VPN 512 is configured and enabled. You can modify this configuration if desired.
To segment user networks and user data traffic locally at each site and to interconnect user sites across the overlay network, you create additional VPNs on vEdge routers. (These VPNs are identified by a number that is not 0 or 512.) To enable the flow of data traffic, you associate interfaces with each VPN, assigning an IP address to each interface. These interfaces connect to local-site networks, not to WAN transport clouds. For each of these VPN, you can set other interface-specific properties, and you can configure features specific for the user segment, such as BGP and OSPF routing, VRRP, QoS, traffic shaping, and policing. These VPNs are called “Service VPNs”.
Topology review and requirements
Let’s review together the toplogy and the requirements for this activity:
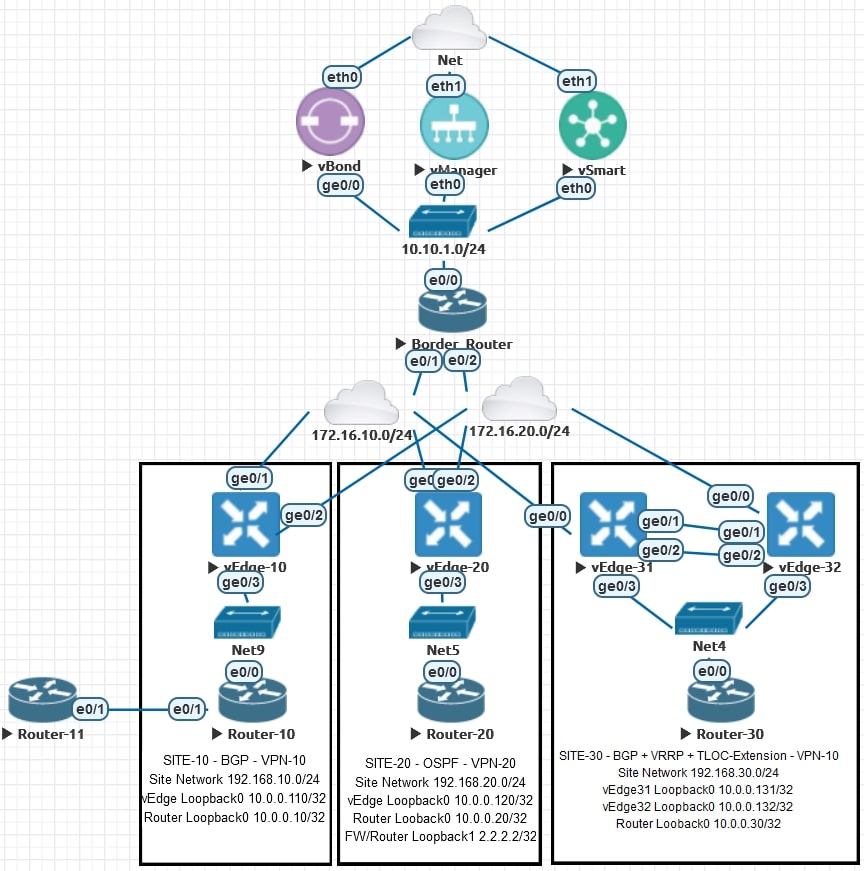
AS-IS
VPN-10 devices can only reach VPN-10 devices (Site-10 and Site-30) and VPN-20 devices can only reach VPN-20 devices (Site-20).
Here the routing table of Router-10, Router-20 and Router-30.
-
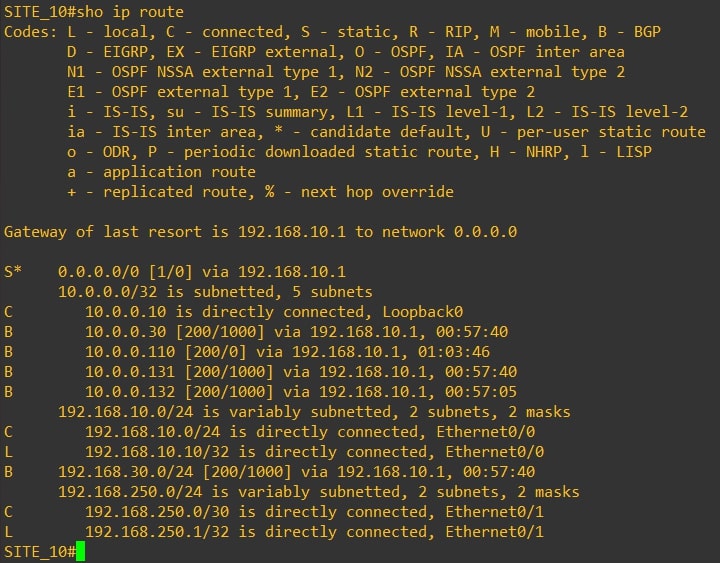
Router-10
-
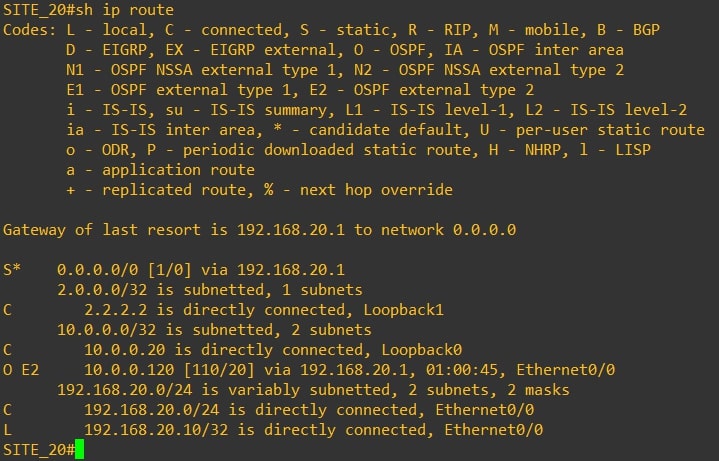
Router-20
-
Router-30
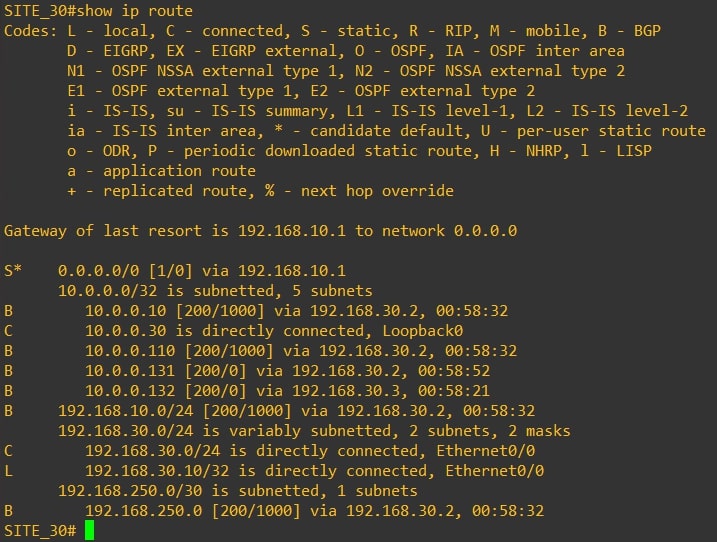
As you can see Router-10 and Router-30 have the same routing table and they do not receive VPN-20 (Site-20) networks. From Router-20 (Site-20) we’re not receiving Site-10 and Site-30 subnets.
Requirements
I decided to split the guide in two parts:
- We want to receive only Router-20 Loopback0 network on Site-10 and Site-30, Site-20 must receive all the subnets from Site-10 and Site-30 (partial route leaking).
- We want to receive all the Site-20 networks on Site-10 and Site-30, Site-20 must receive all the subnets from Site-10 and Site-30 (full route leaking).
Disclaimer
I’m using the following release: 20.3.5
If you are not confident about the procedure, test it on you lab environment before apply changes in production.
Leaking Selected Routes
First, click on we need to create two Groups of Interest, AKA List.
- Prefix List
Custom Options(centralized policy)>Lists>Prefix>New Prefix List: Here we need to define the prefix for network you want to leak [SITE-20_Loopback0 = 10.0.0.10/32]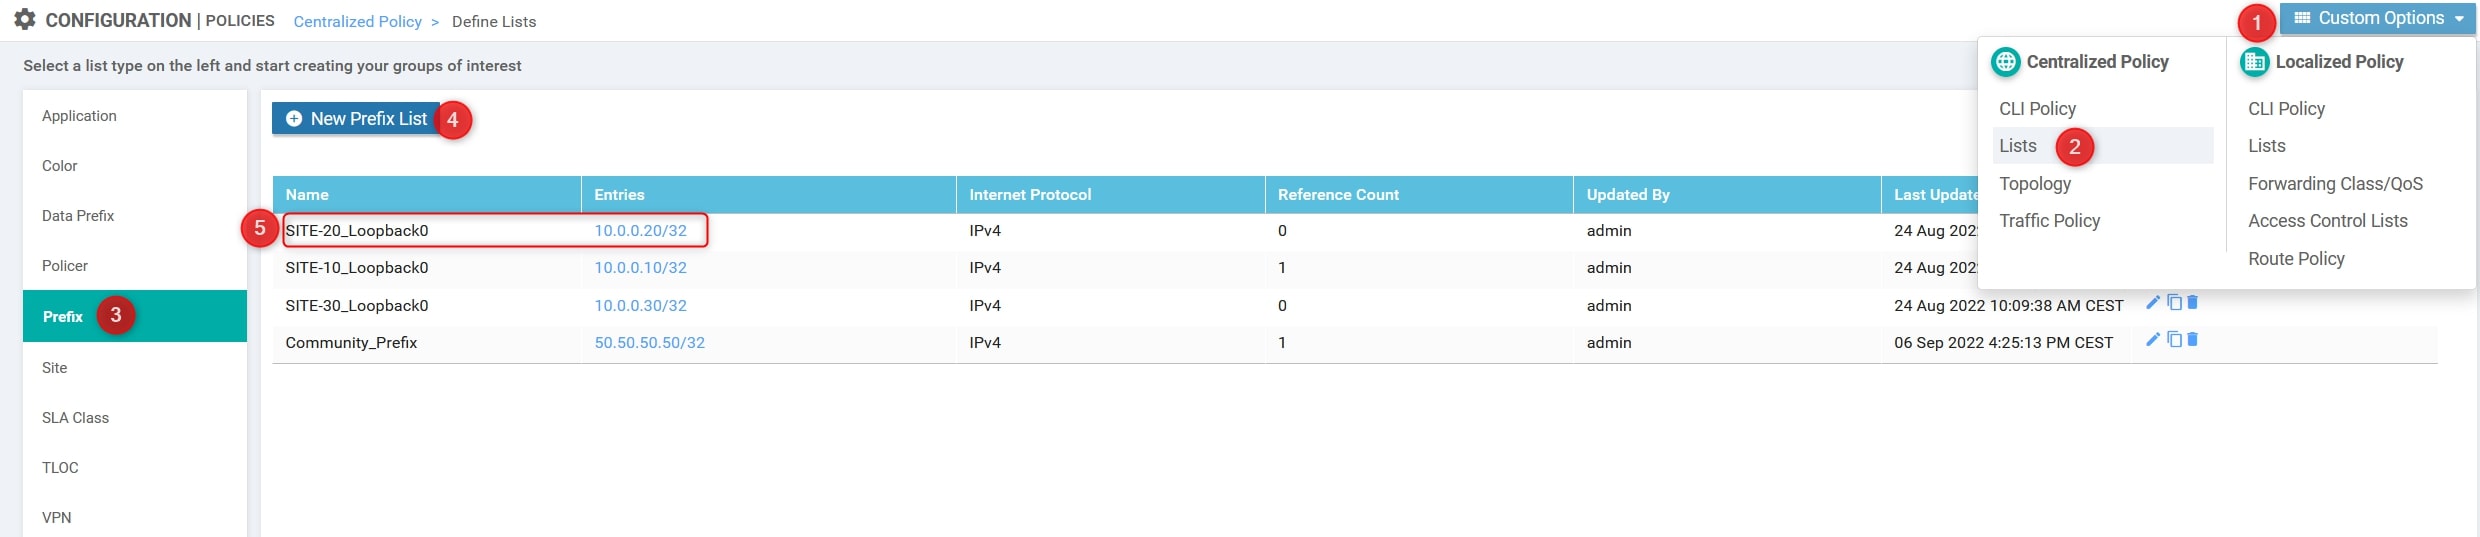
- Site List
Custom Options(centralized policy)>Lists>Prefix>Site List: Here we need to define the site list which includes sites involved in route leaking [ALL_SITES = 10, 20 and 30]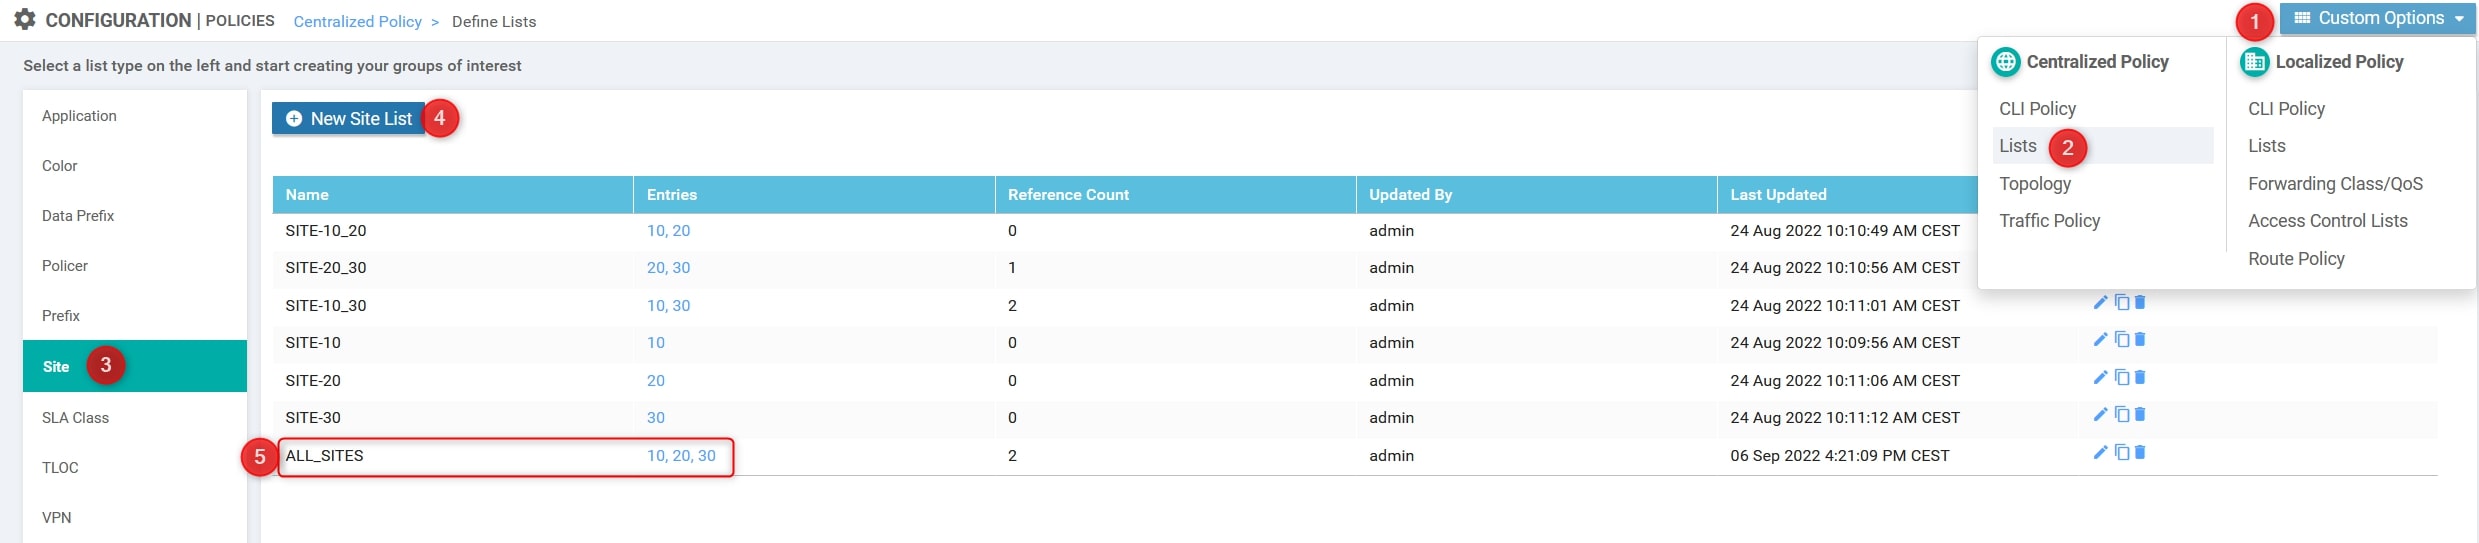
- VPN List
Custom Options(centralized policy)>Lists>Prefix>VPN List: Here we need to define the VPN IDs involved [VPN-10 and VPN-20]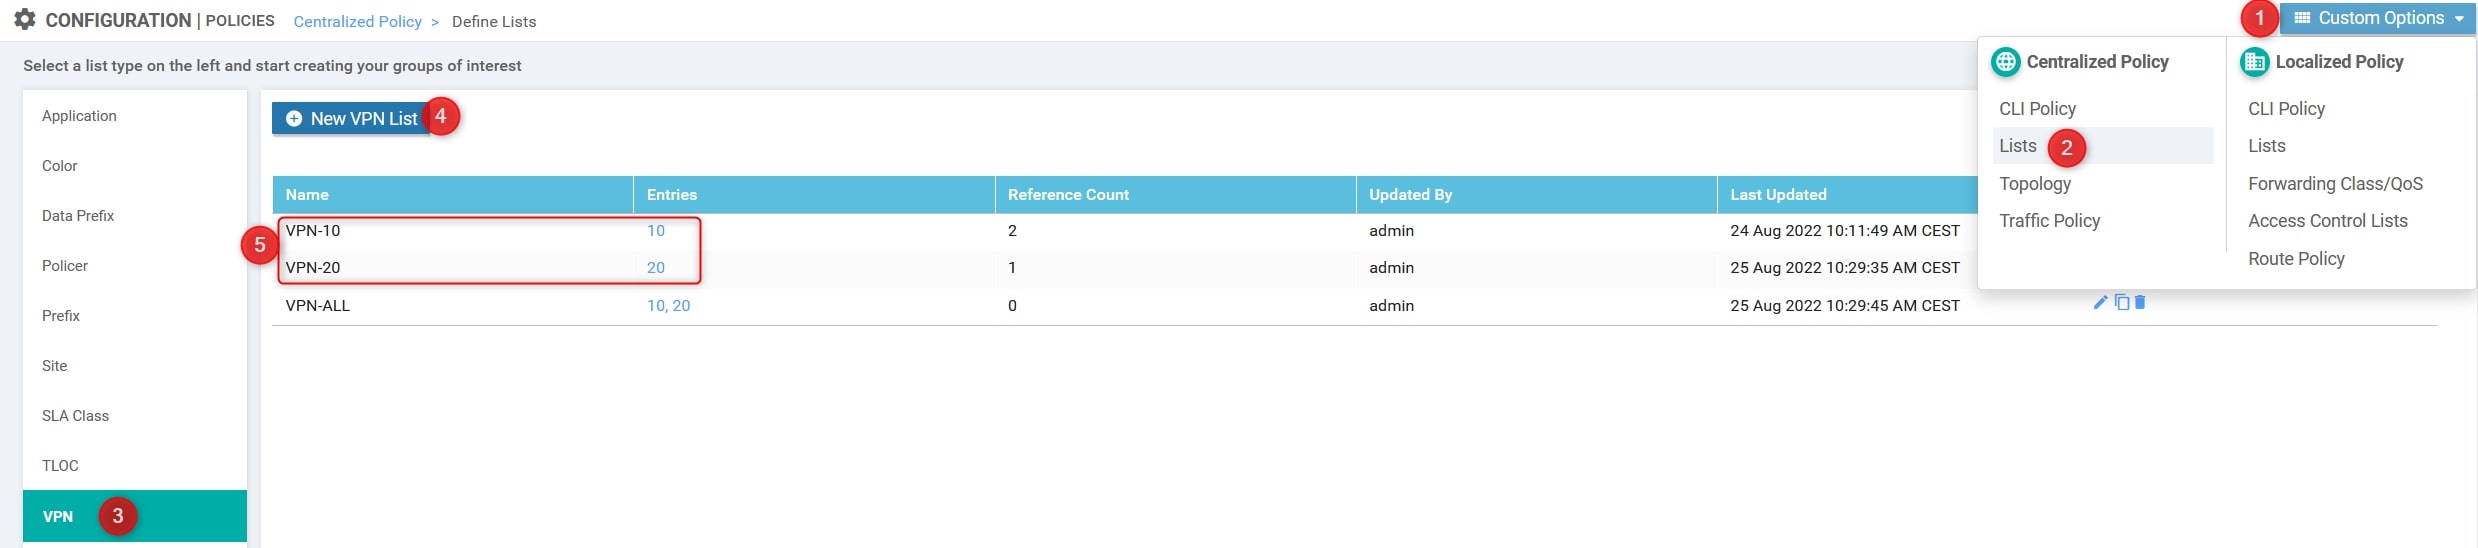
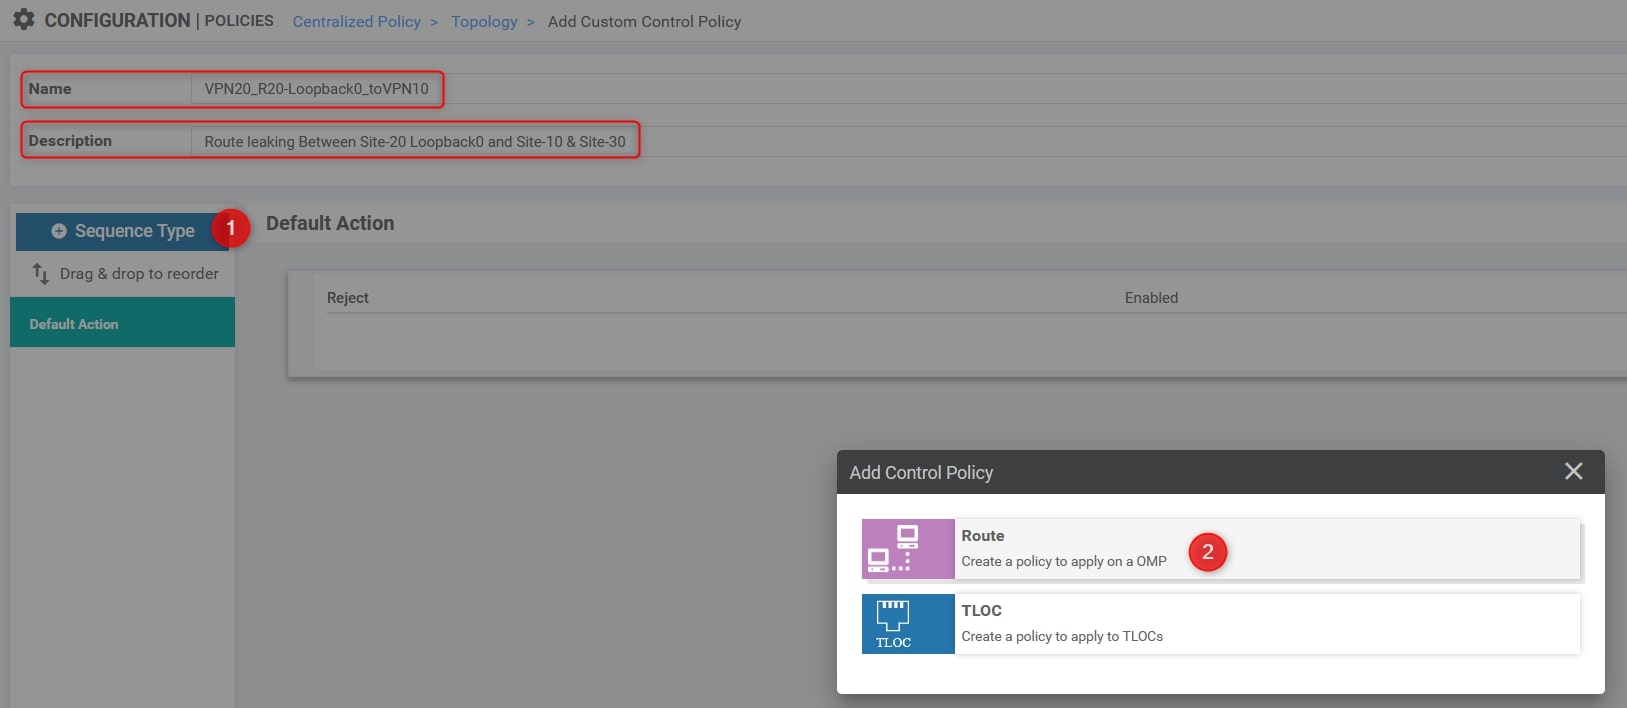
Again, using the Custom Options, create the Custom Control:
- Custom Options(centralized policy)>Topology>Add Topology>Custom Control(Route & TLOC)

Here we need to specify the following parameters:
- Name: VPN20_R20-Loopback0_toVPN10
- Description: Route leaking Between Site-20 Loopback0 and Site-10 & Site-30
- The Prefix List related to the 10.0.0.20/32 network.
- The VPN IDs
- Change the default action from reject to accept.
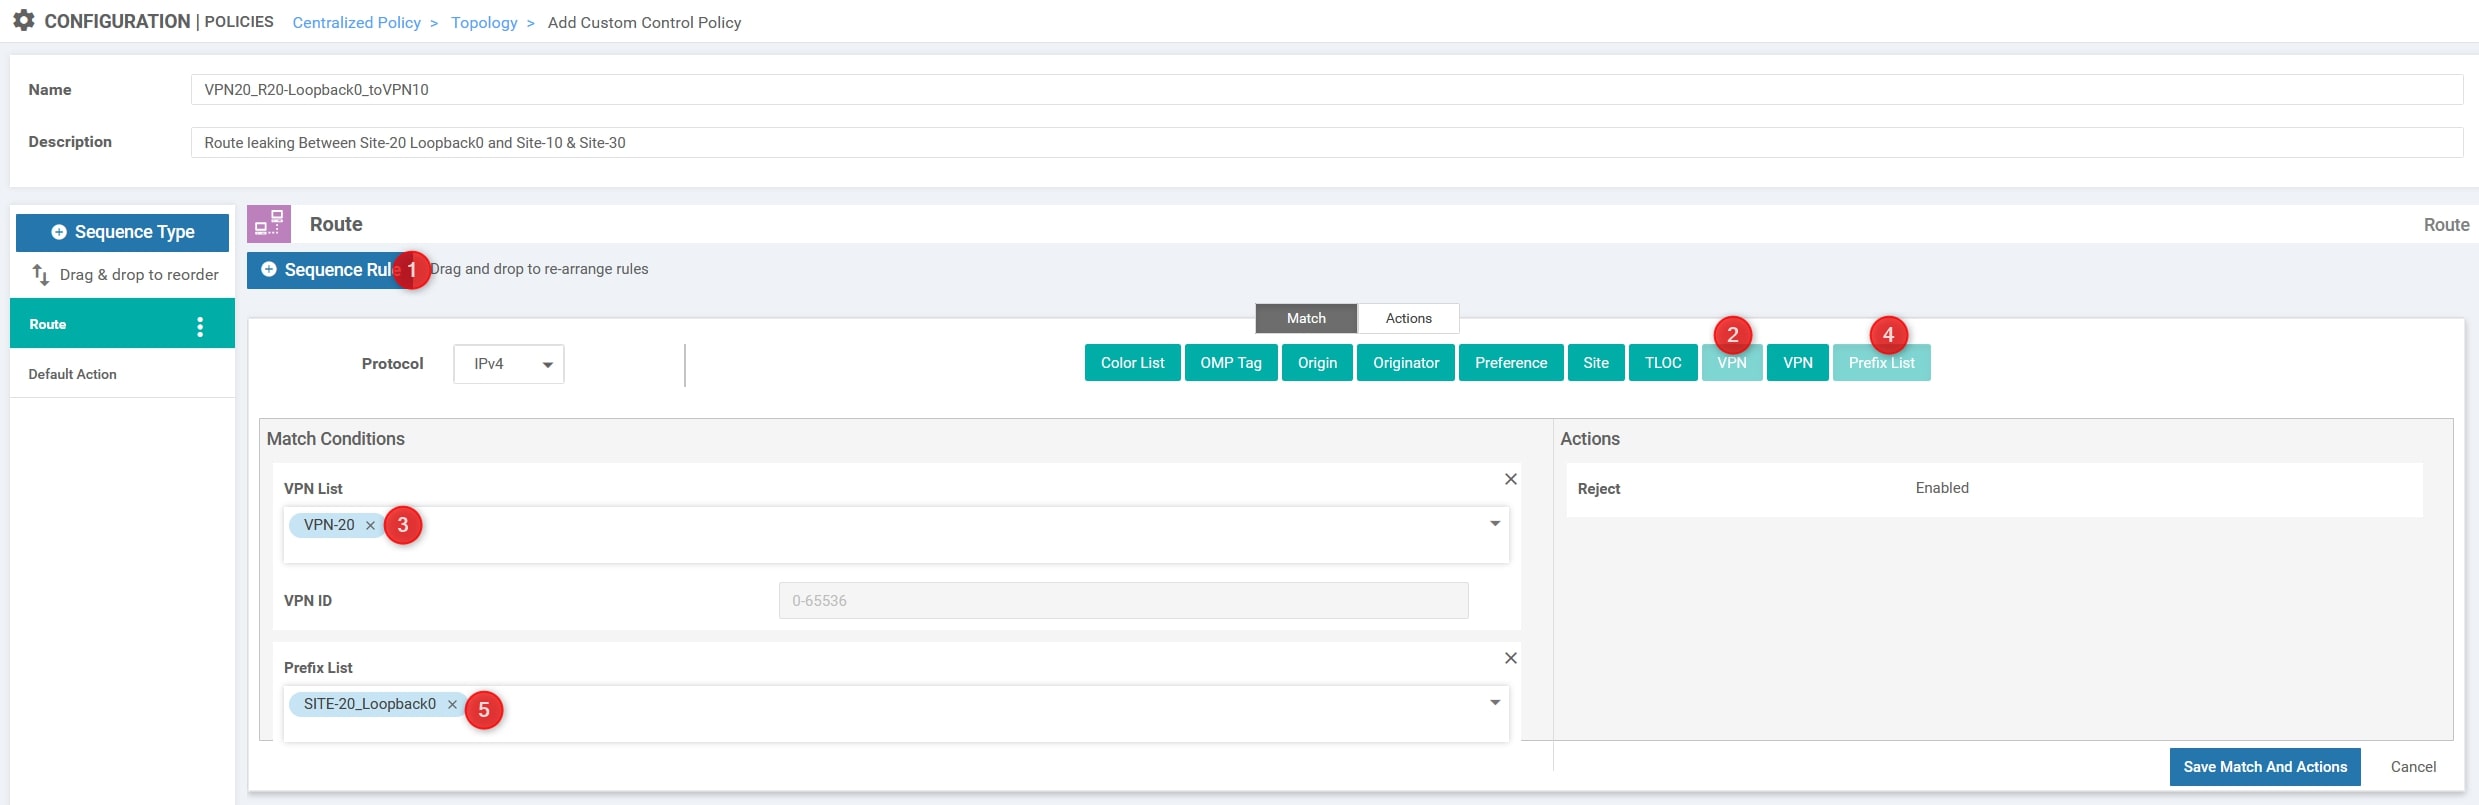
Click on “Sequence Type” and choose “Route”
Click on “Requence Rule” and choose “VPN” (the first one refers to VPN List, the second one refers to VPN ID) and “Prefix List”. In this example we’ll choose “VPN-20” as VPN List and “Site-20_R20_Loopback0” as Prefix List, here the configuration:
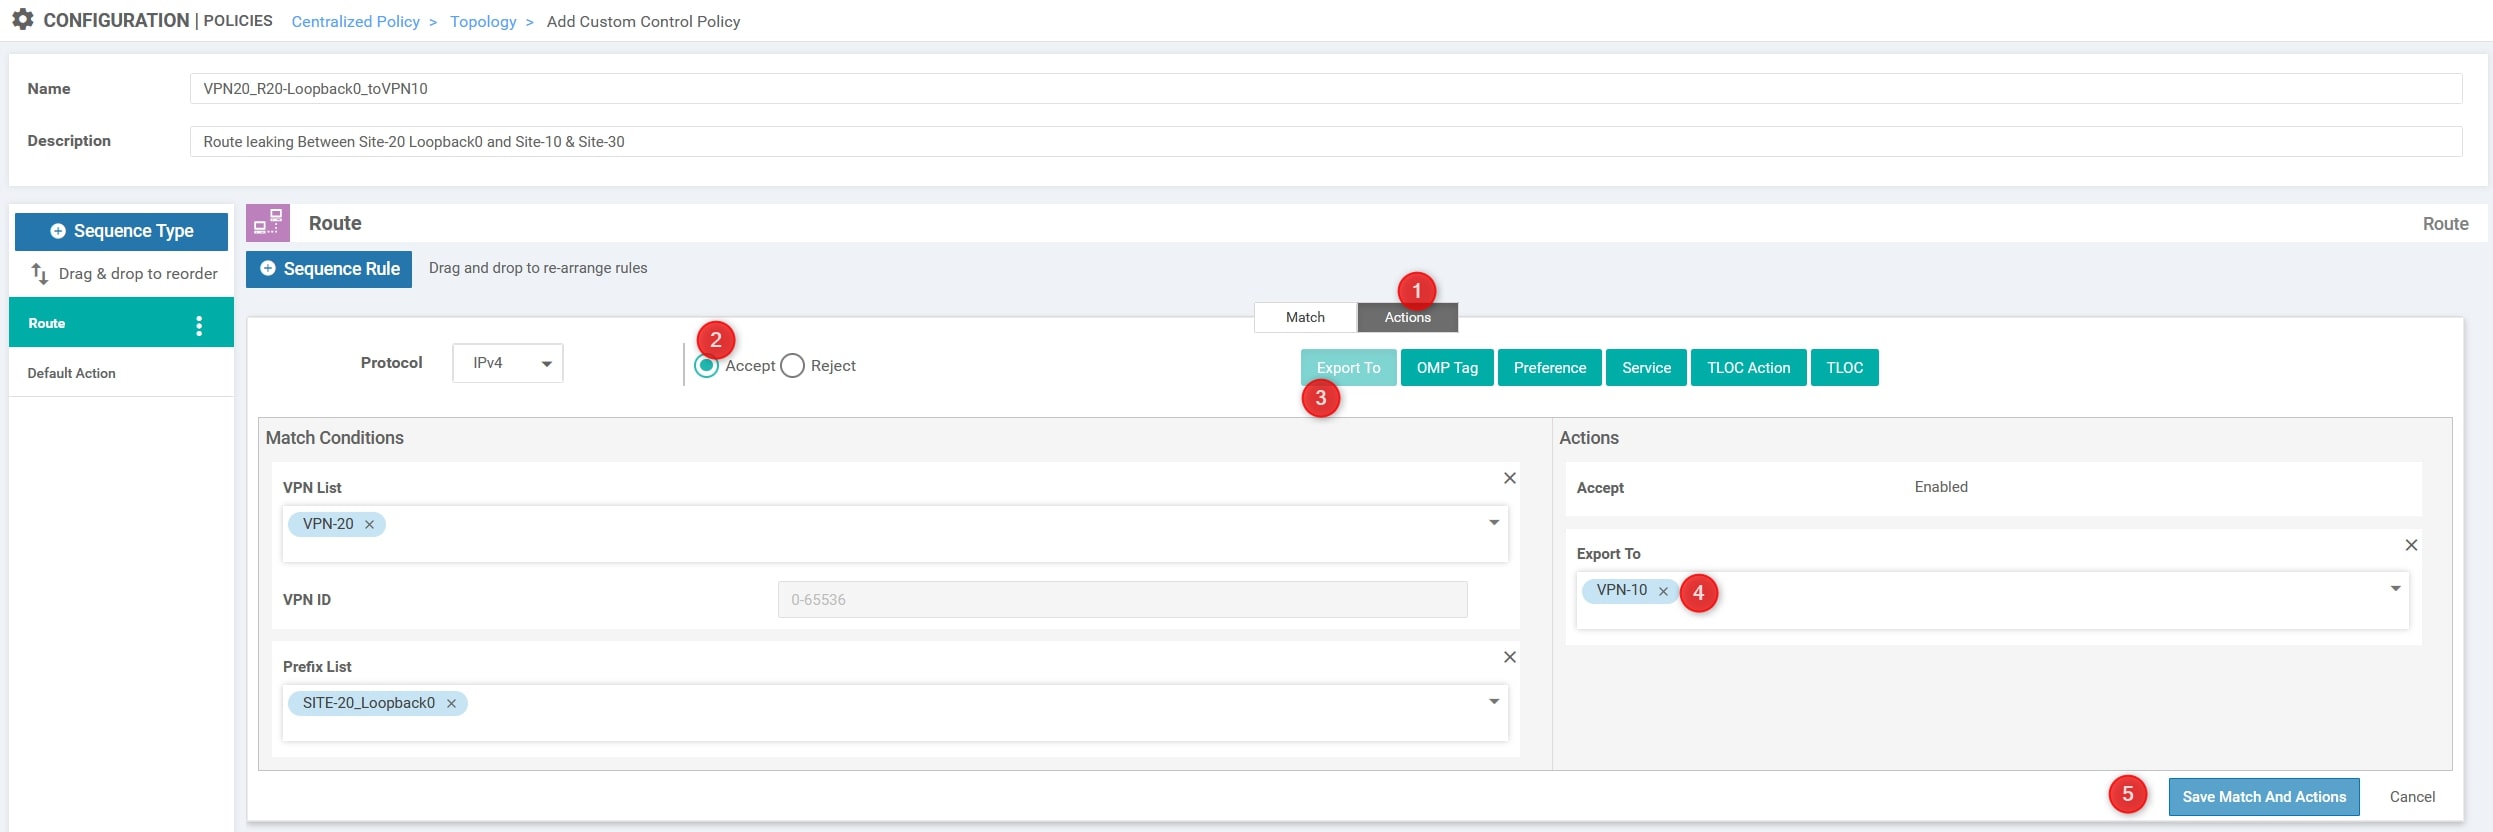
Then, in the “Action” section change it from “Reject” to “Accept” and choose “Export to”. Here we need to select the other VPN ID, VPN-10 and click “Save Match And Actions”:
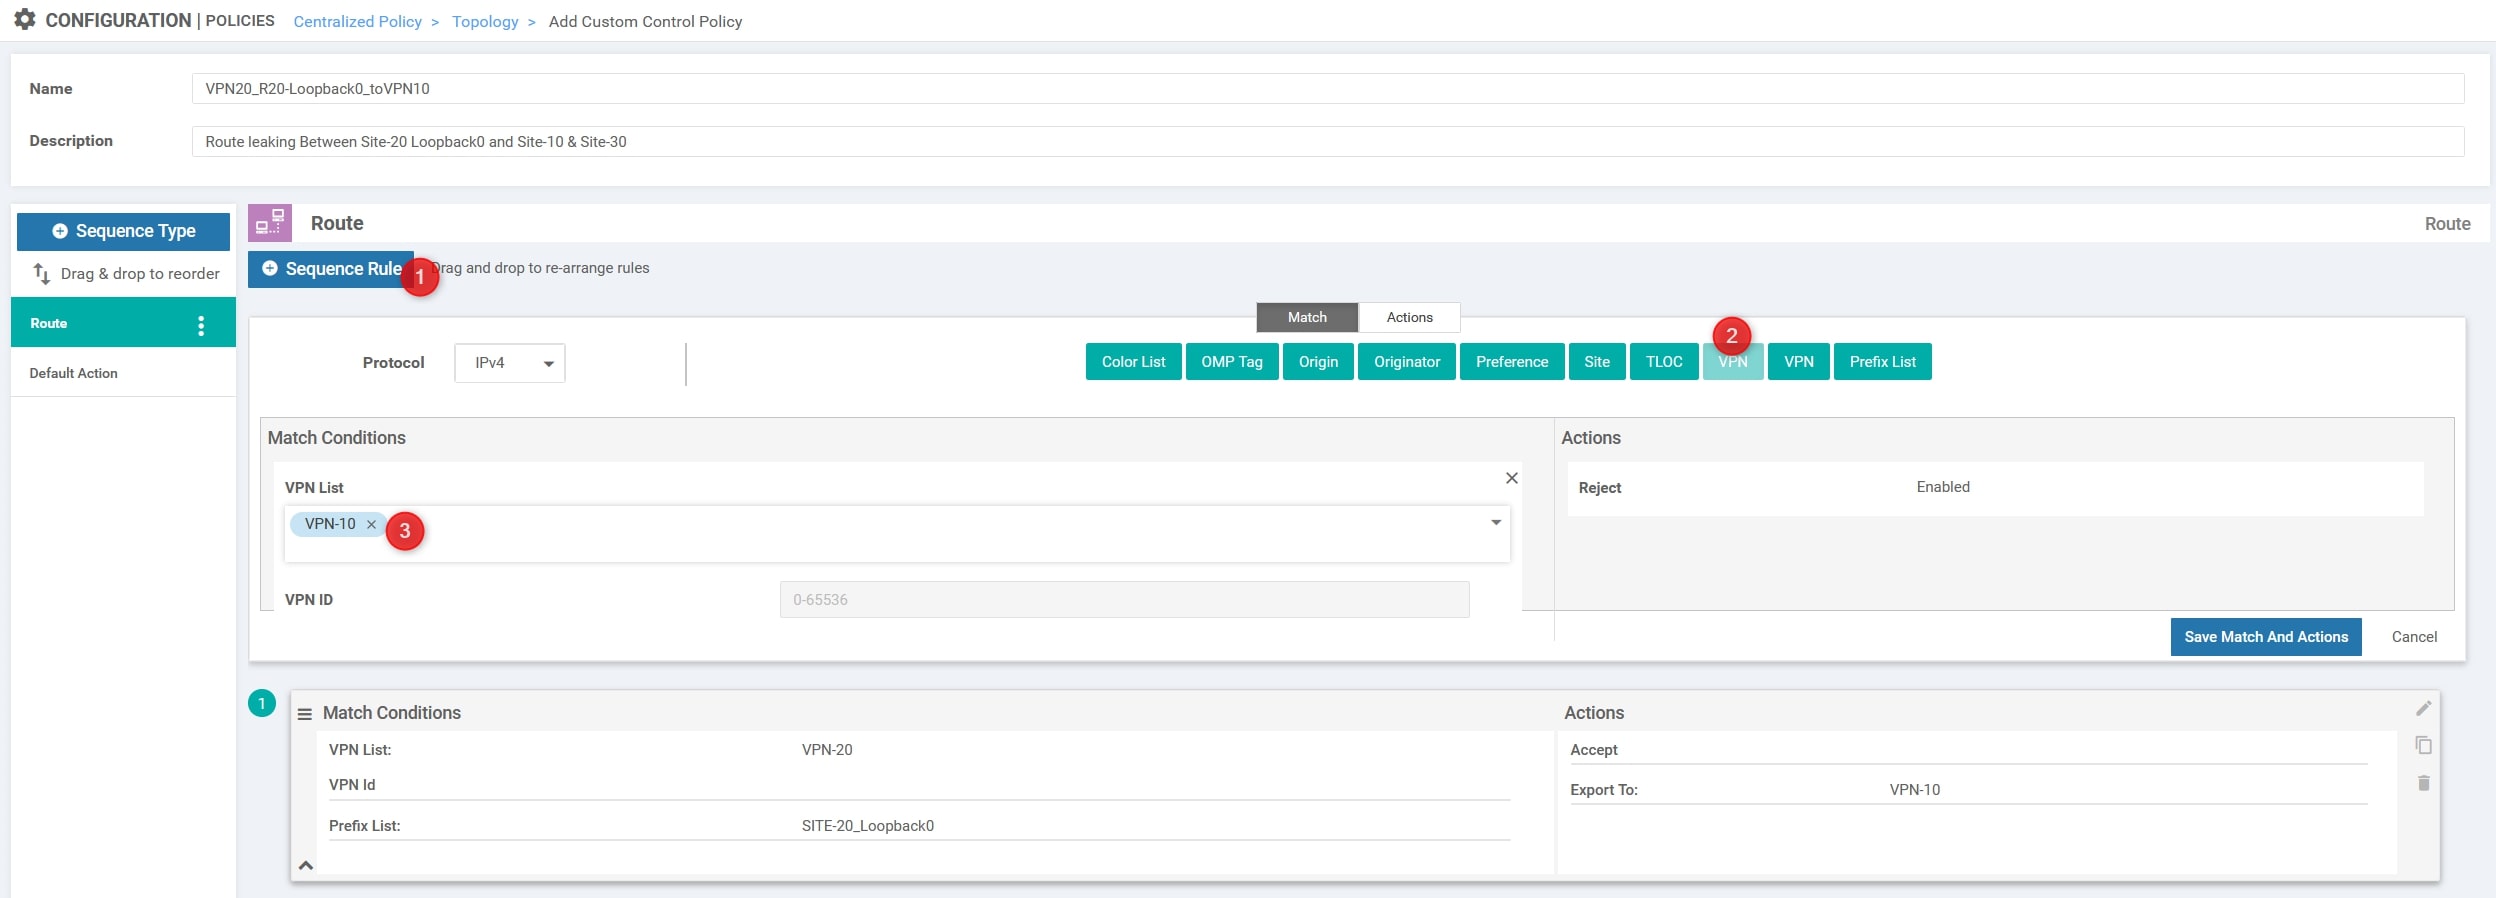
Now we need to create a second entry for the return traffic, basically we need to invert the VPN IDs and remove the Prefix List for this entry (match anything):
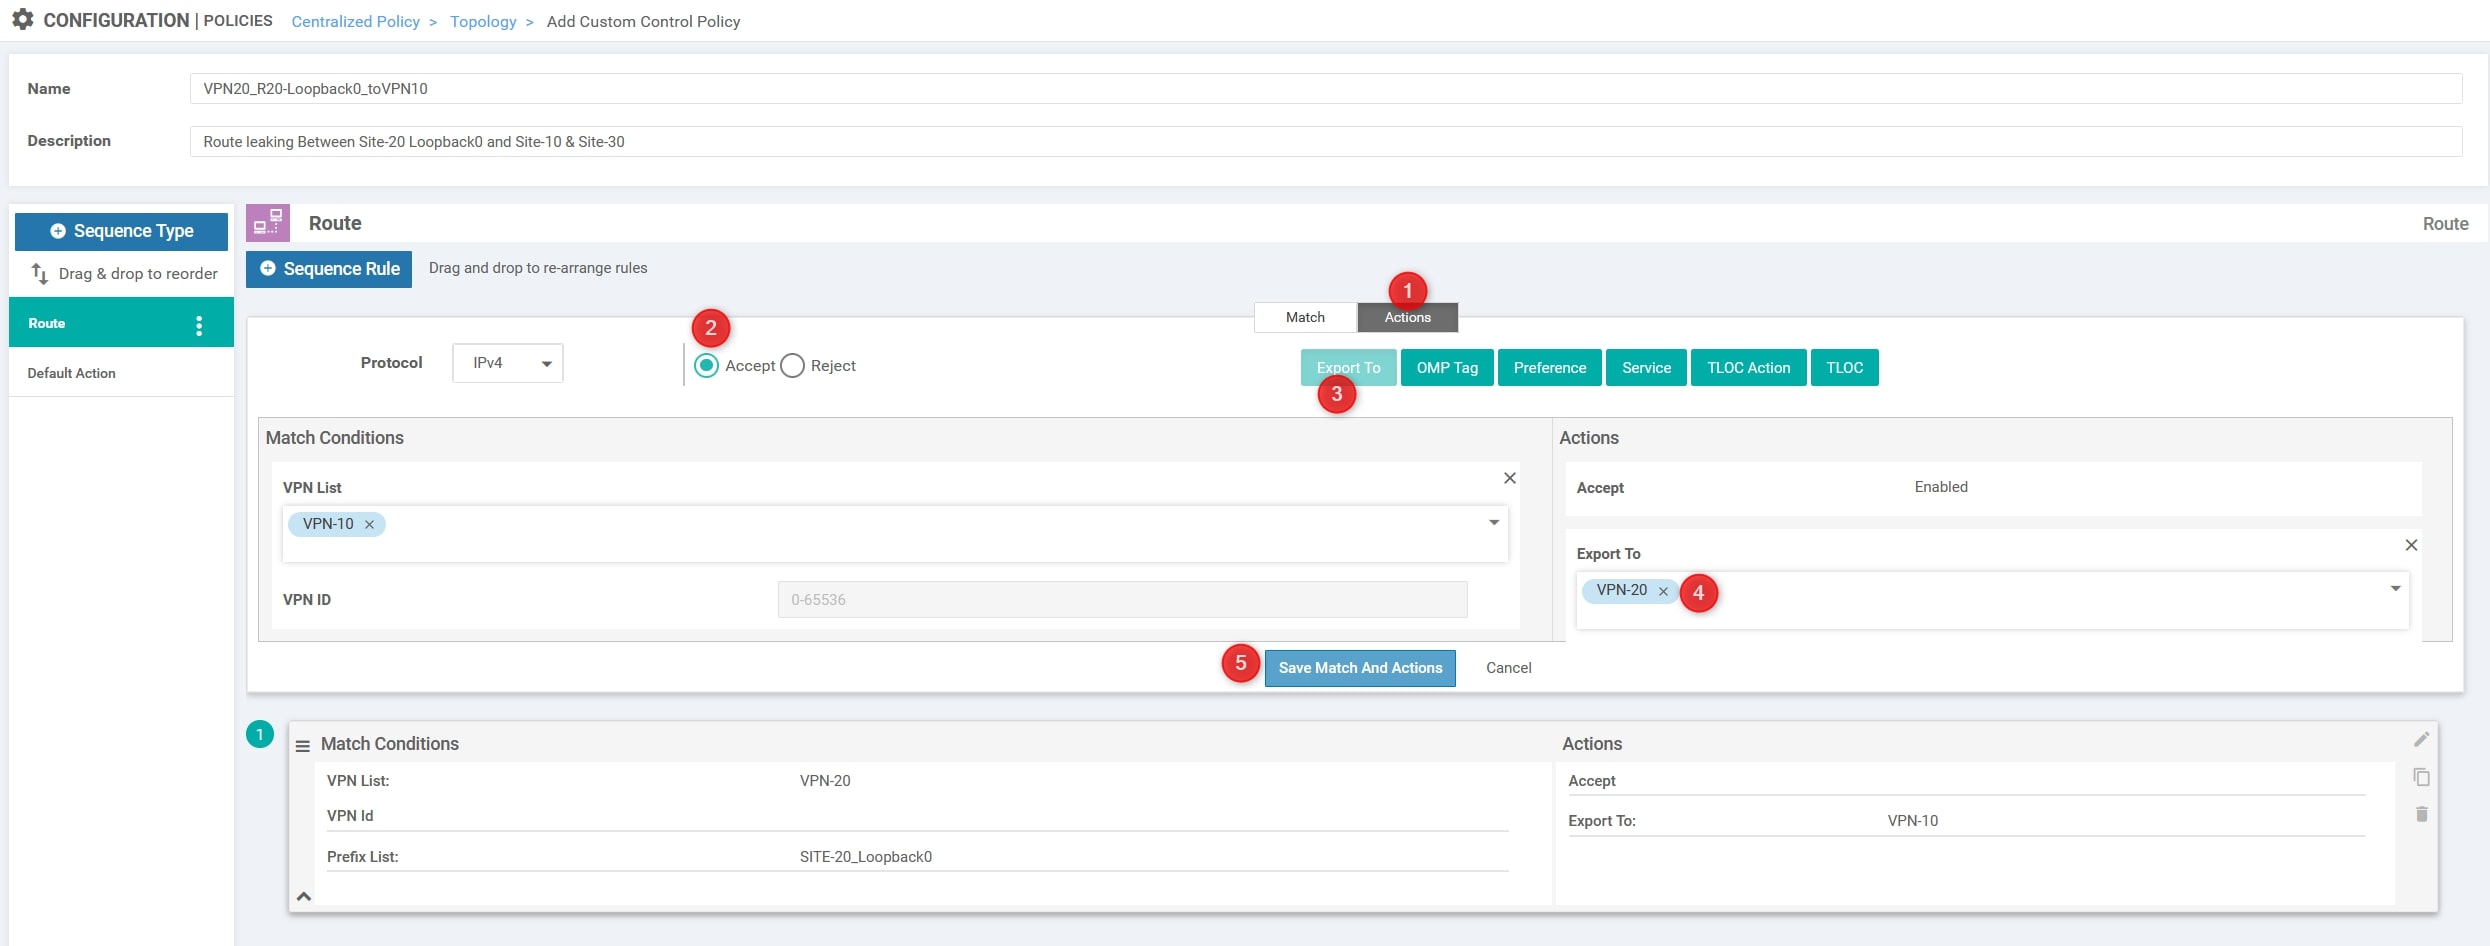
Again, in the “Action” section change it from “Reject” to “Accept” and choose “Export to”. Here we need to select the previous VPN ID, VPN-20 and click “Save Match And Actions”:
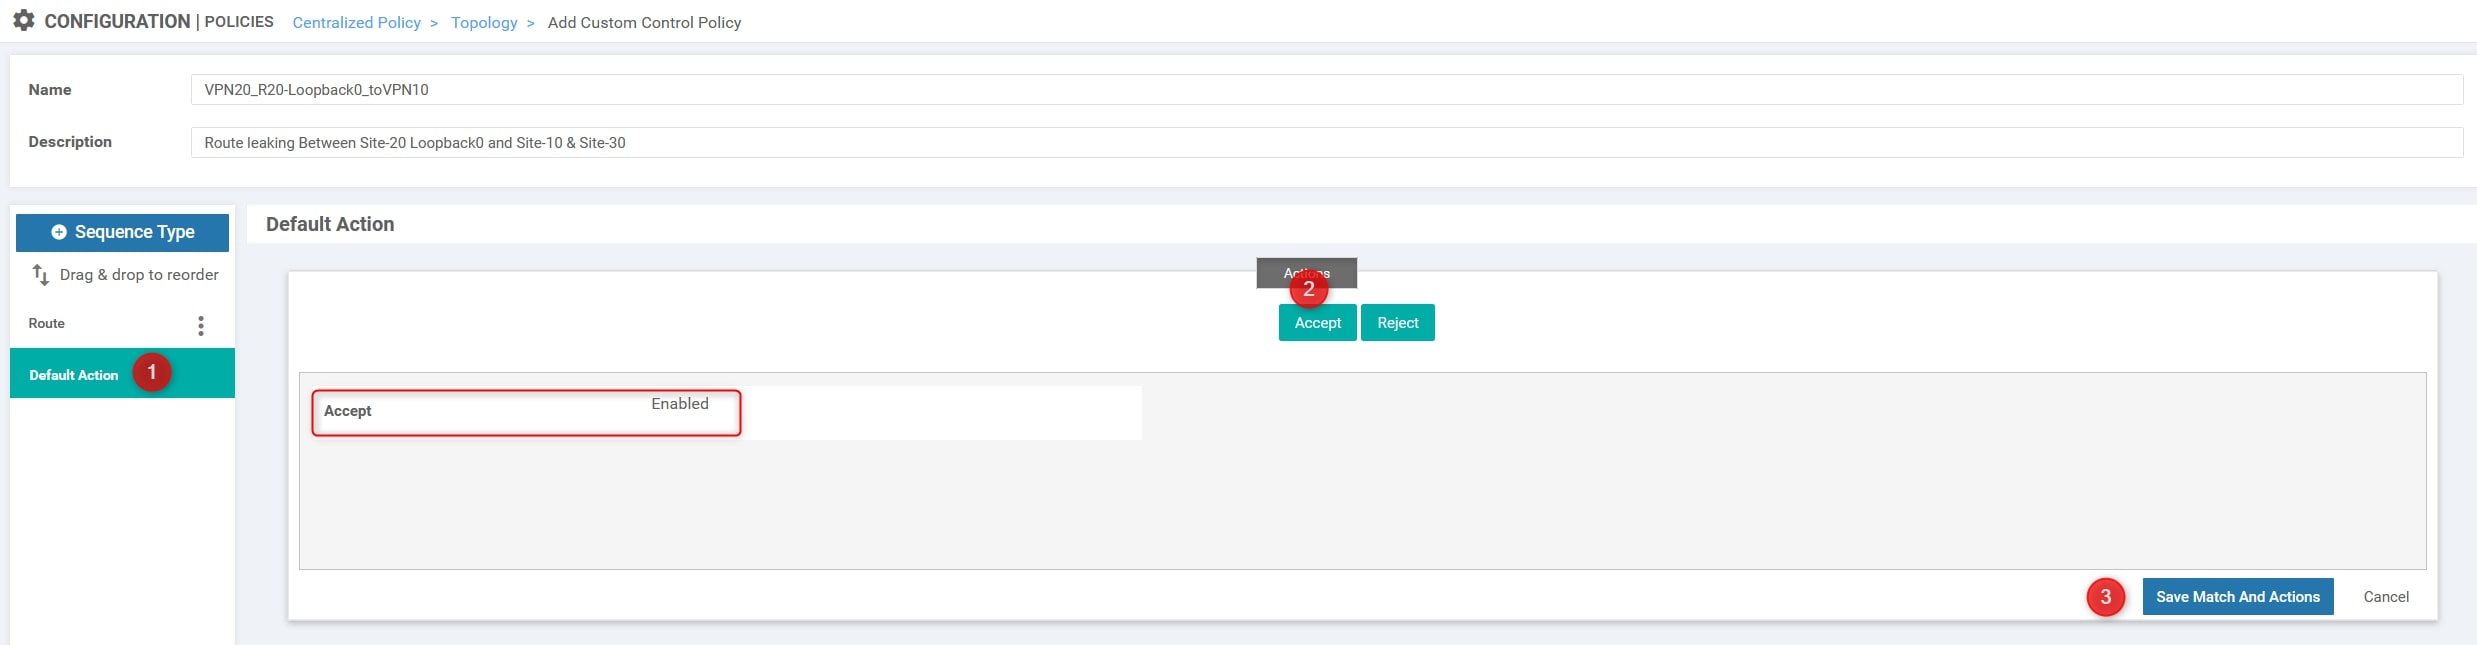
The final step is to modify the default action from “Reject” to “Accept”:
Great! Now let compose our policy 😉
Return to the initial policy section: Configuration>Policies and click “Add Policy”.
The first required step is to create the Groups of Interest, but we have done this task before so we can go ahead using the “Next” blue button at the bottom of the page.
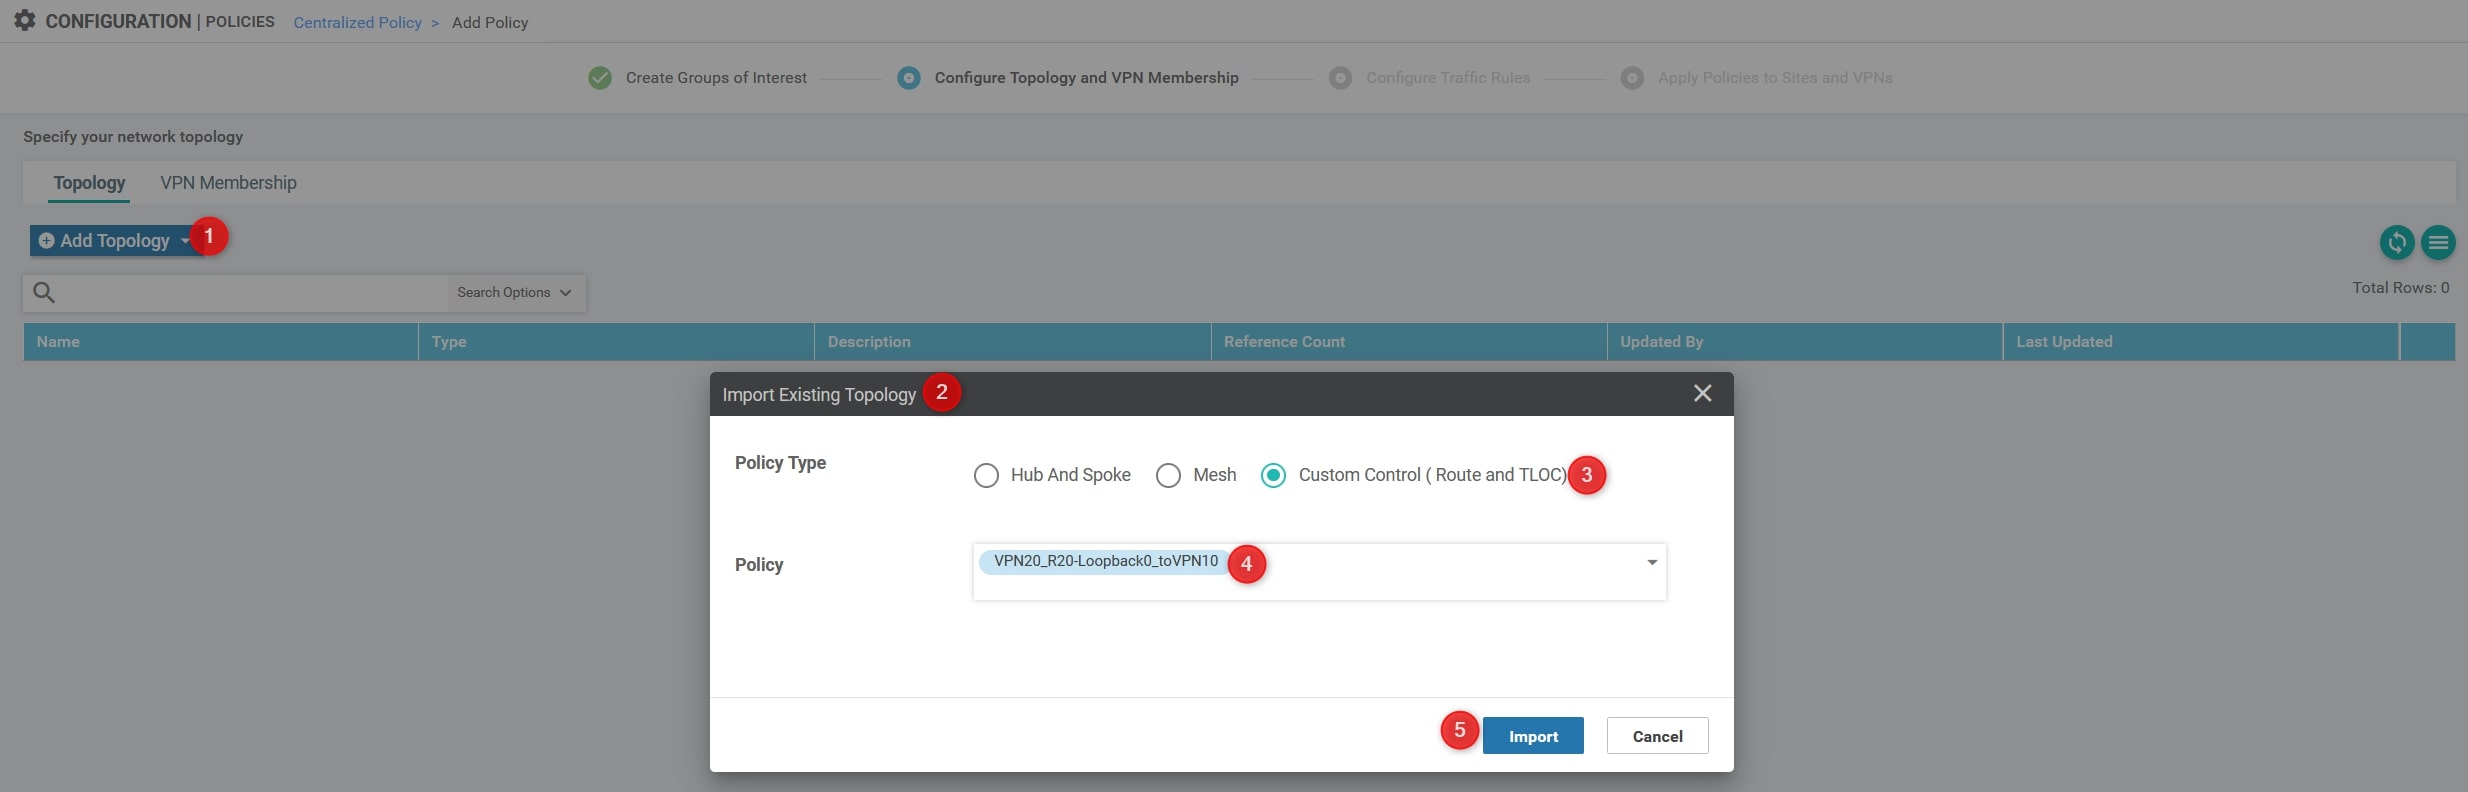
After that, click on “Add Topology” and choose “Import Existing Topology”. Here, specify what you configured before:
Then, click the “Next” blue button at the bottom of the page and again “Next” in order to skip the section called “Configure Traffic Rules”
Okay, we’re at the last step, we need to apply the policy to a specific site list!
Here we need to specify three things:
- Name: VPN20_R20-Loopback0_toVPN10
- Description: Leak Site-20 Loopback0 to Site-10 and Site-30
- The inbound Site List related to All the sites.
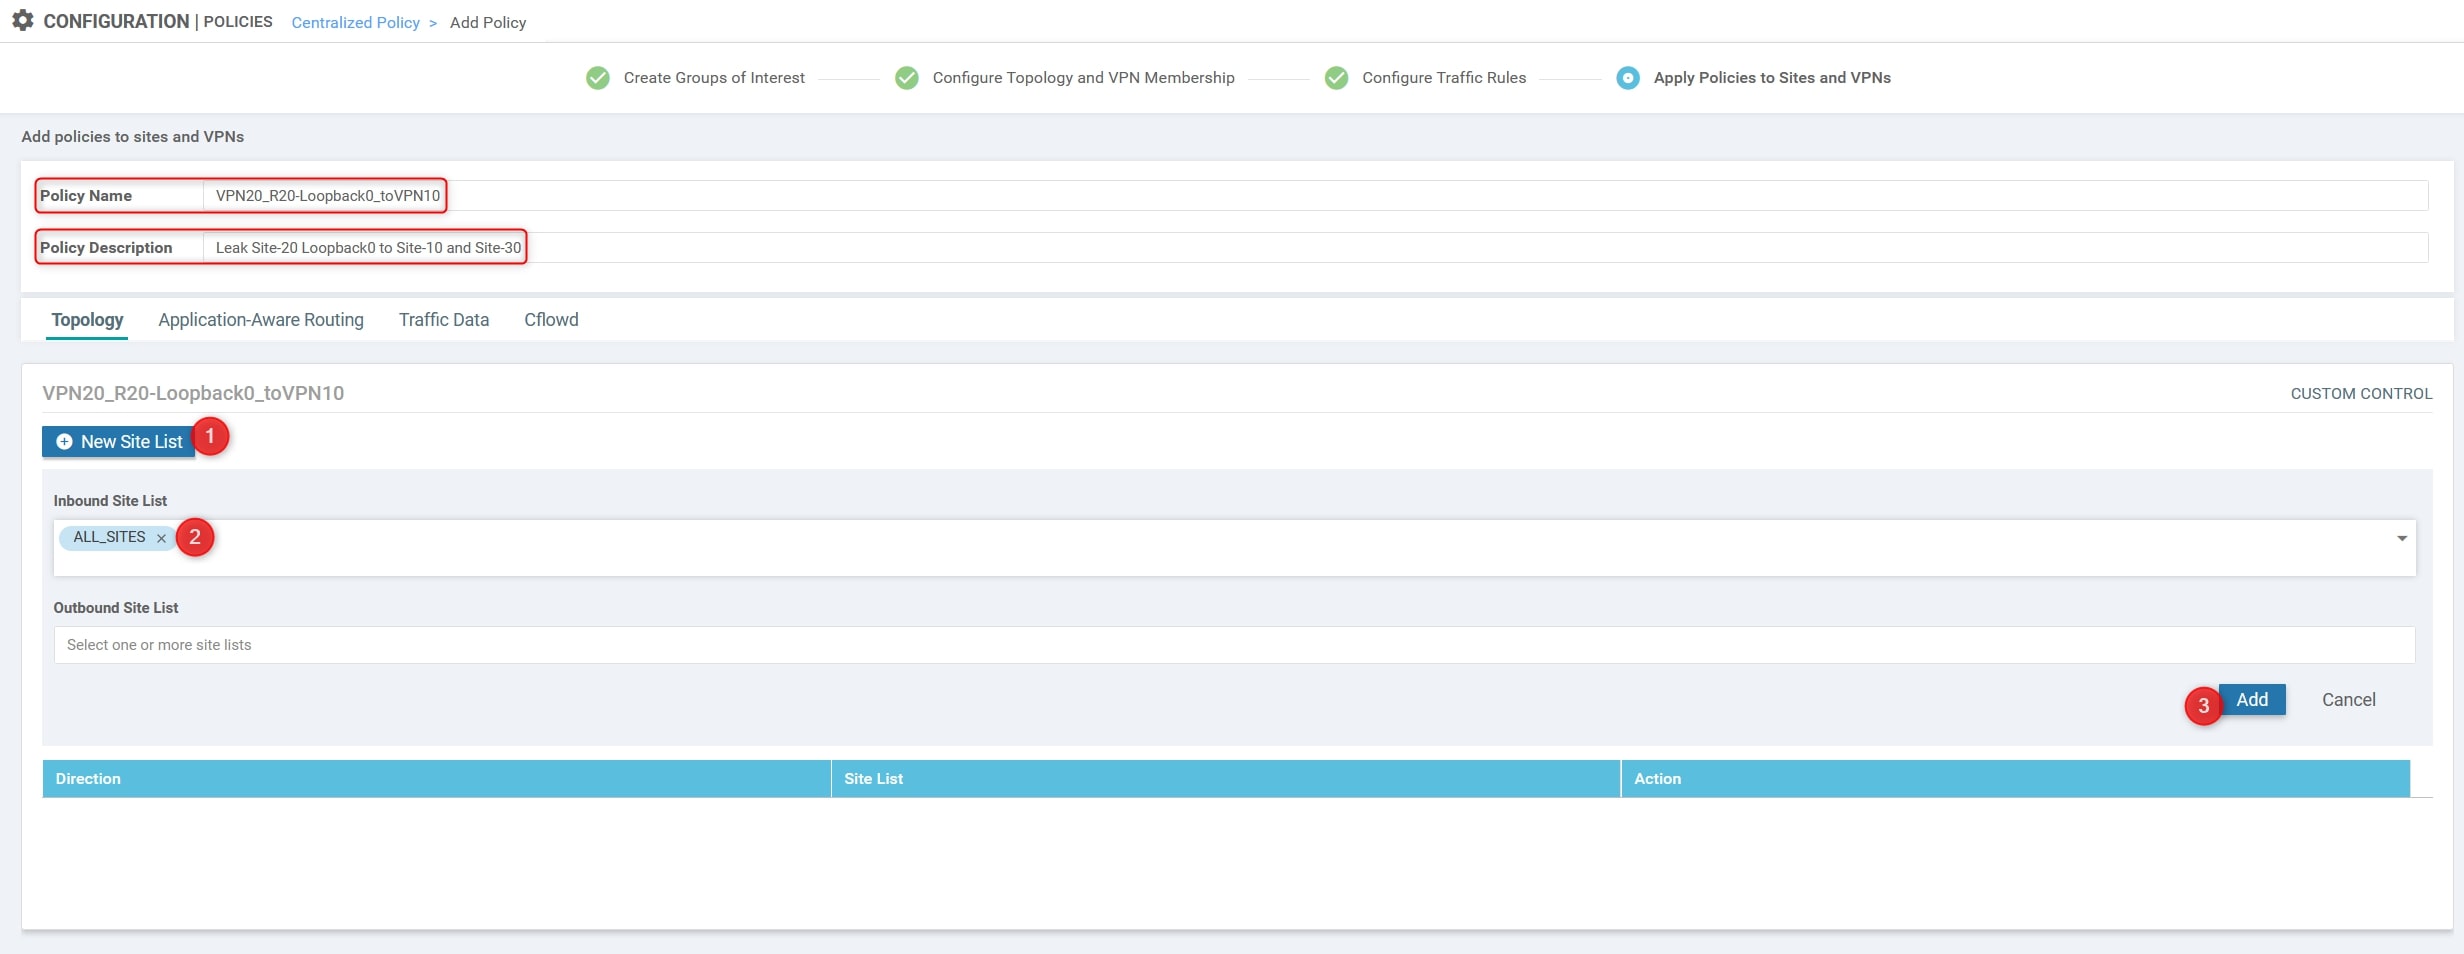
Now, you can finally click on “Save Policy”.
Great! We have almost done 😉
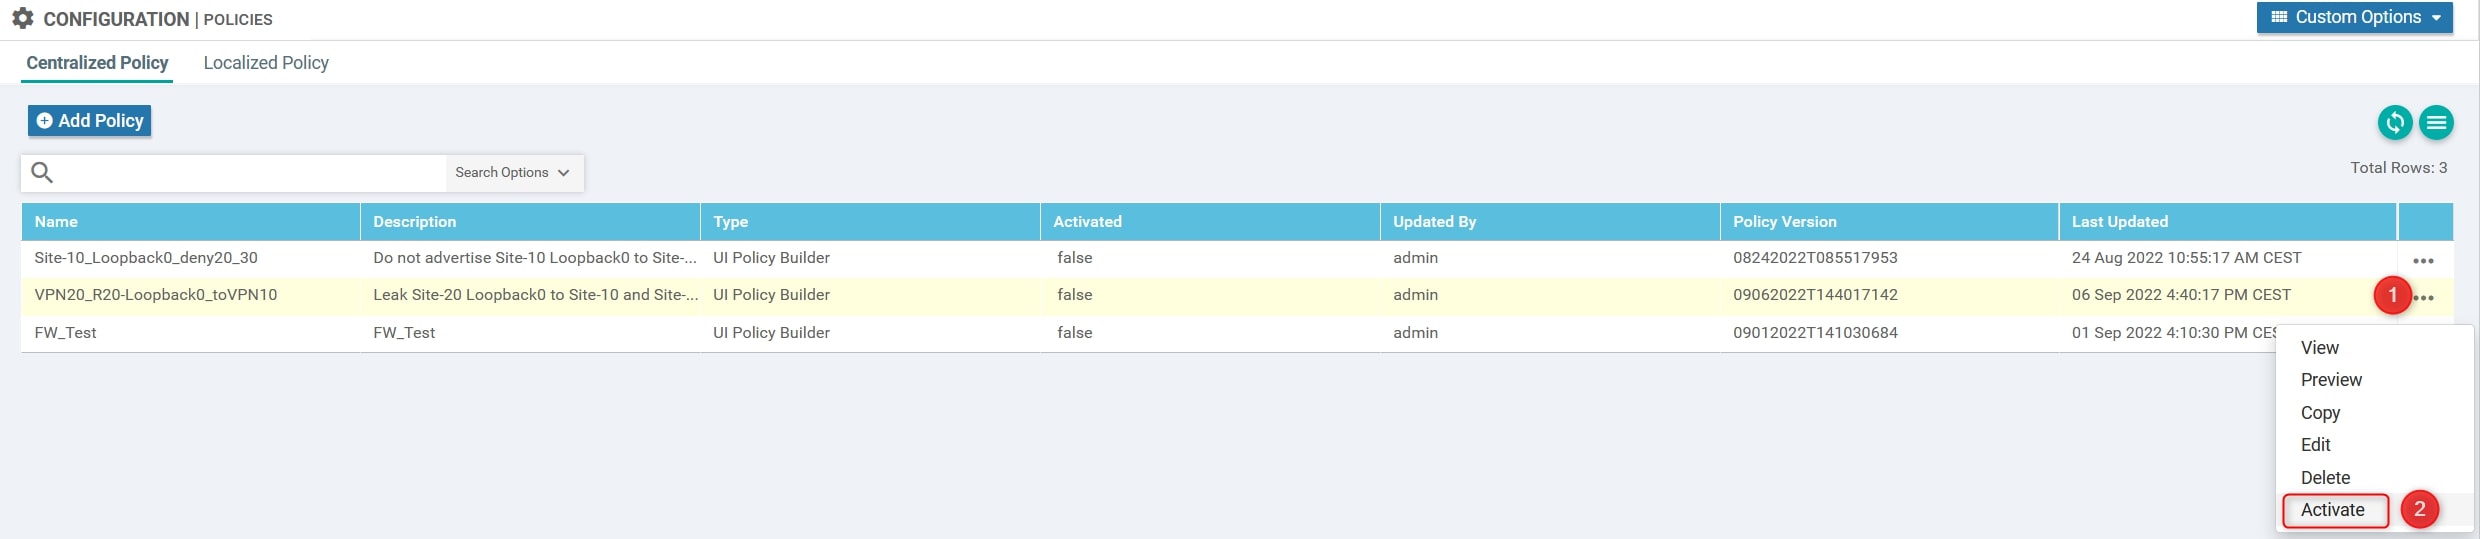
The last step is to activate the policy. To do that you can simply click on the policy, click on the three dots at the end of the row and click “Activate”:
vManage will push the configuration to vSmart using NETCONF.
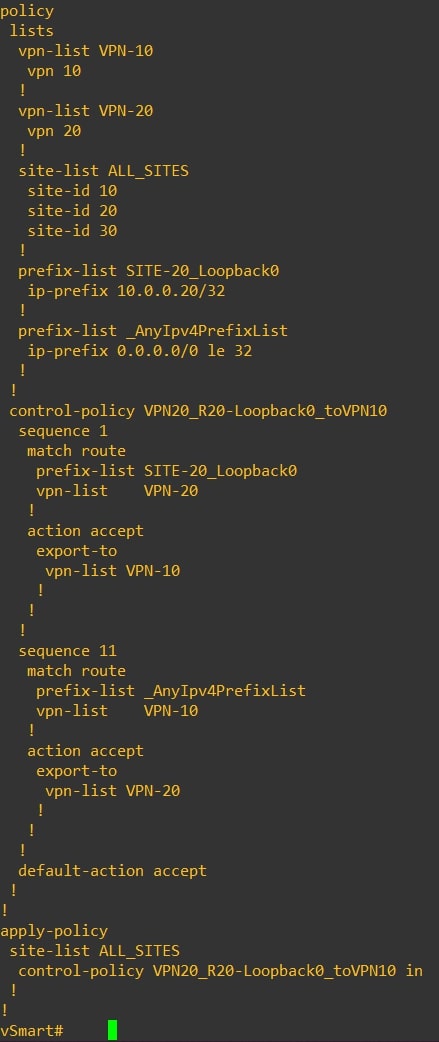
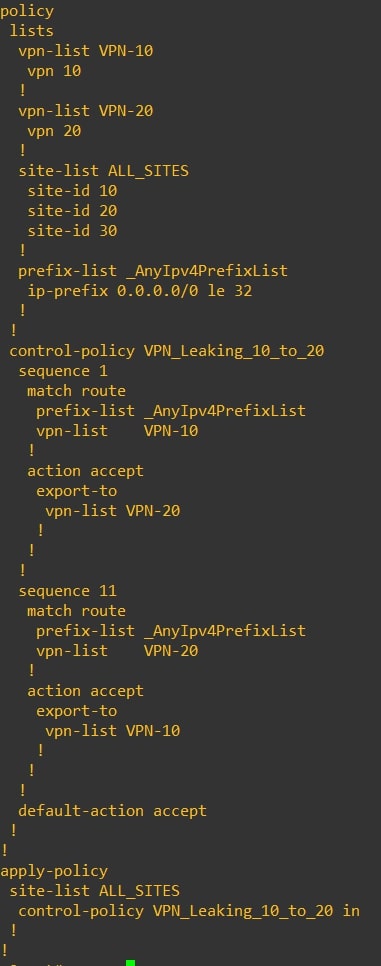
Output from vSmart CLI:
Verify
Now we need to verify that the policy is working properly. Let connects to all the routers and review their routing table:
-
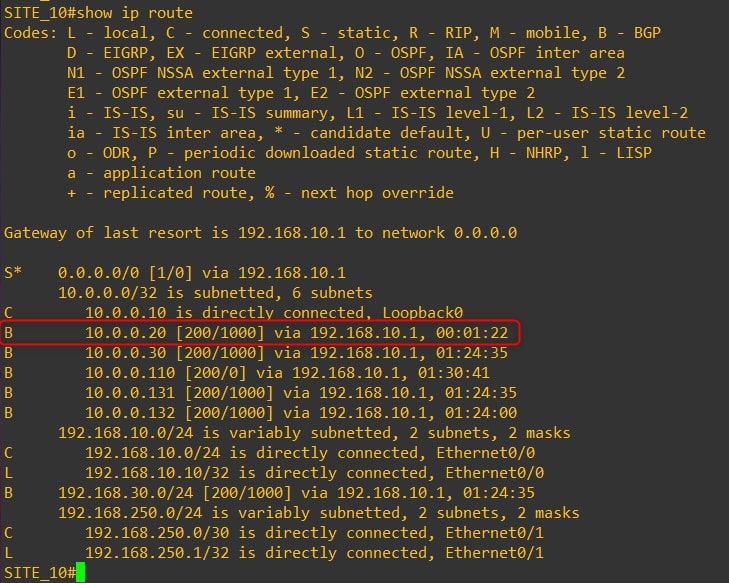
Router-10
-
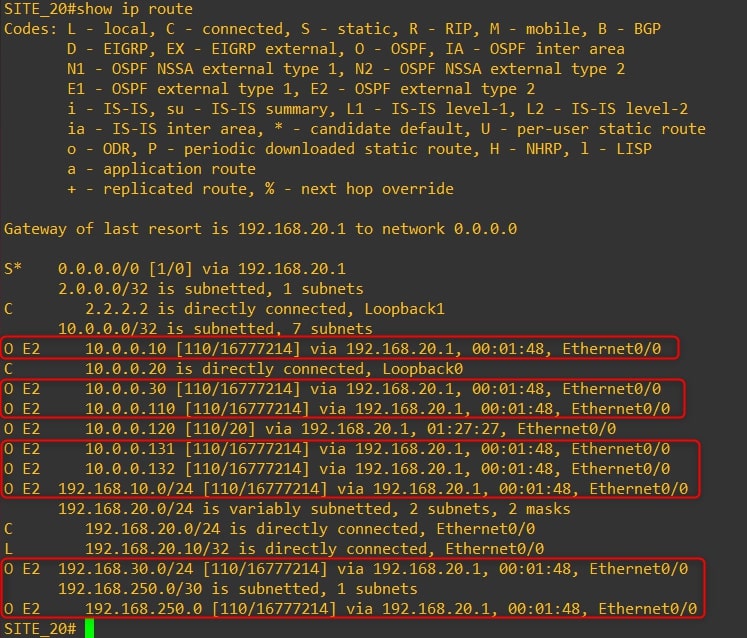
Router-20
-
Router-30
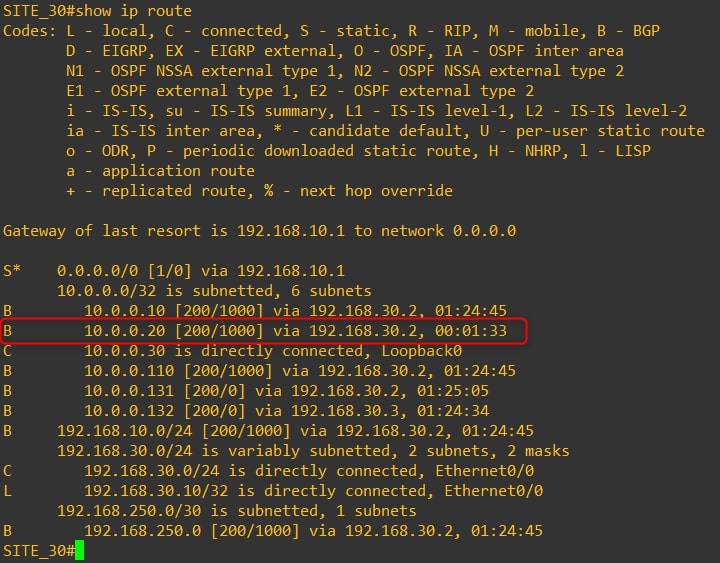
As you can see, we are receiving Router-20 Loopback0 to Site 10 and Site 30. Moreover, from Site-20 routing table we can see the subnets related to Site-10 and Site-30
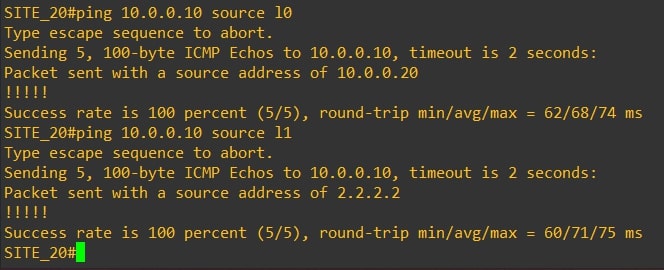
Ping test from Router-20 to Router-10:
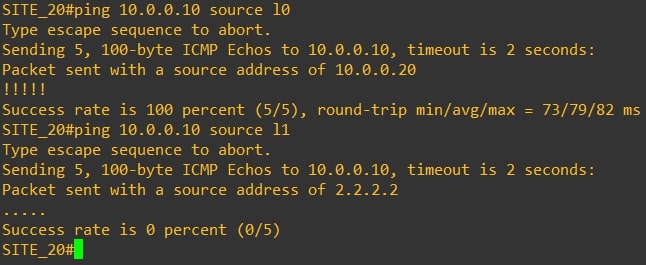
As you can see the ping from 10.0.0.20 to 10.0.0.10 is working. However, the ping from Router-20 Loopback2 (2.2.2.2/32) to Router-10 Loopback0 is not working
Now, we want to do route leaking for all the subnets and not only the Router-20 Loopback0, let’s start!
Leaking All Routes
The steps are the same with just one exception: We’ll not define any Prefix List into our Policy!
You can now remove the Prefix List from you Policy or you can follow this guide and create a new policy 😊
Create two Groups of Interest, AKA List.
- Site List
Custom Options(centralized policy)>Lists>Prefix>Site List: Here we need to define the site list which includes sites involved in route leaking [ALL_SITES = 10, 20 and 30]
- VPN List
Custom Options(centralized policy)>Lists>Prefix>VPN List: Here we need to define the VPN IDs involved [VPN-10 and VPN-20]
Again, using the Custom Options, create the Custom Control:
- Custom Options(centralized policy)>Topology>Add Topology>Custom Control(Route & TLOC)

Here we need to specify the following parameters:
- Name: VPN_Leaking_10_to_20
- Description: Route leaking between VPN-10 and VPN-20
- The VPN IDs
- Change the default action from reject to accept.
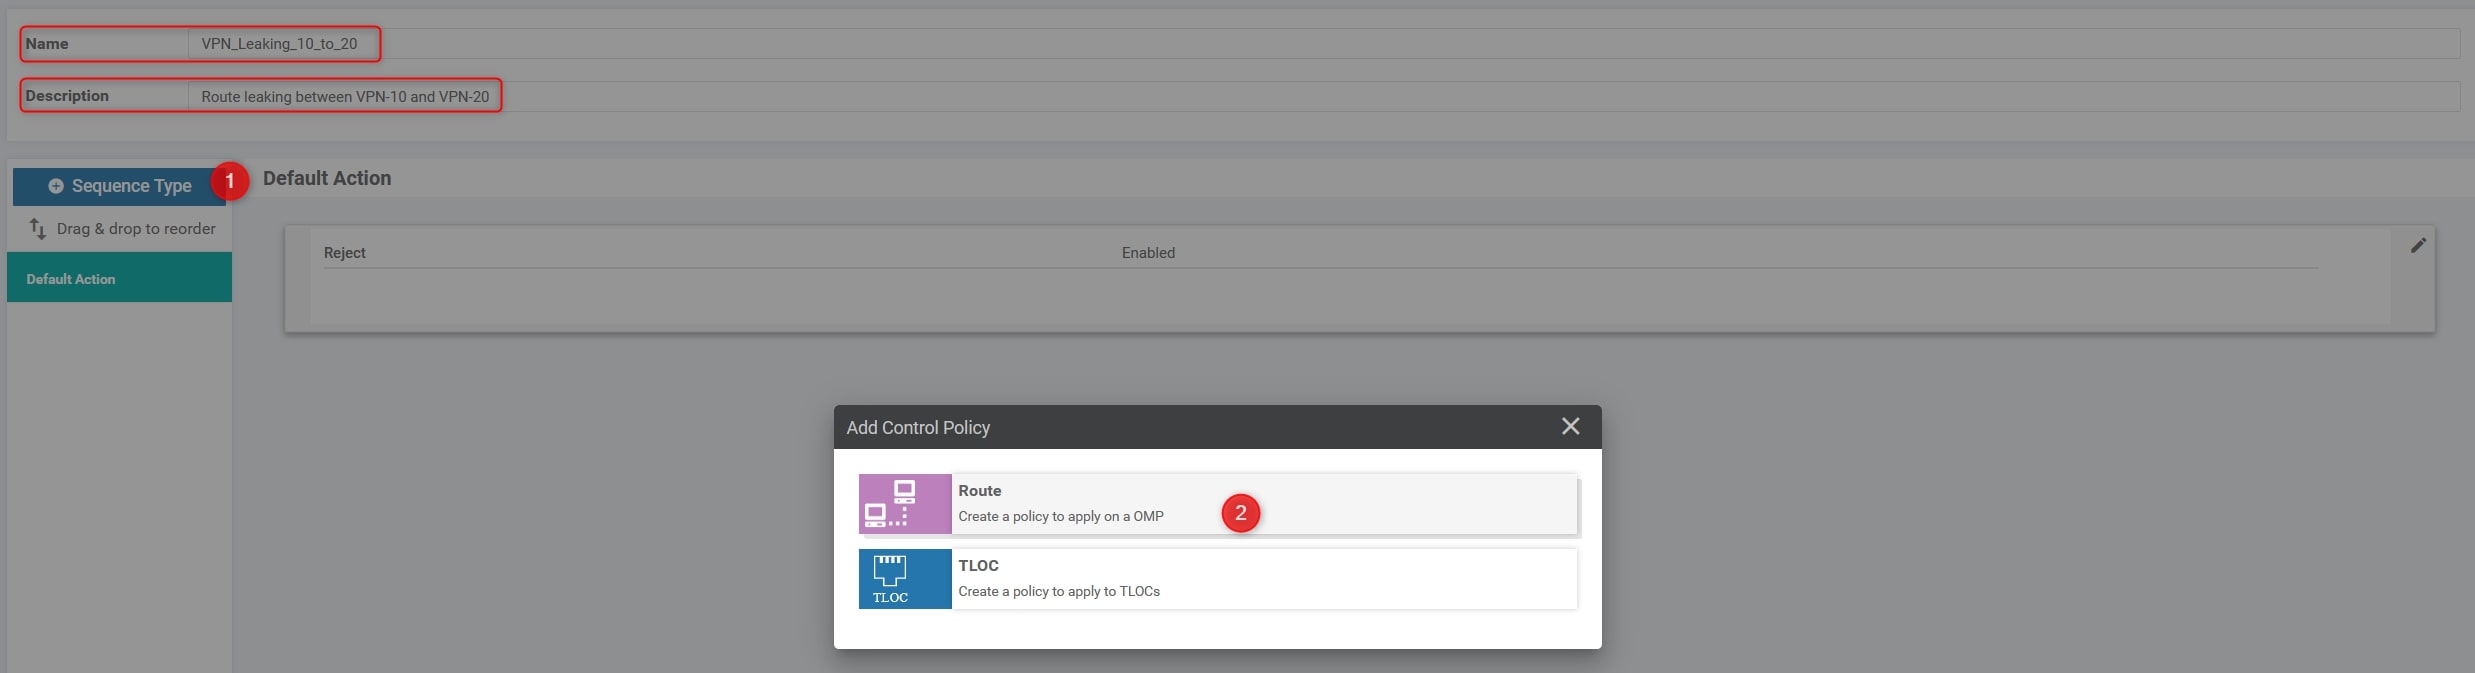
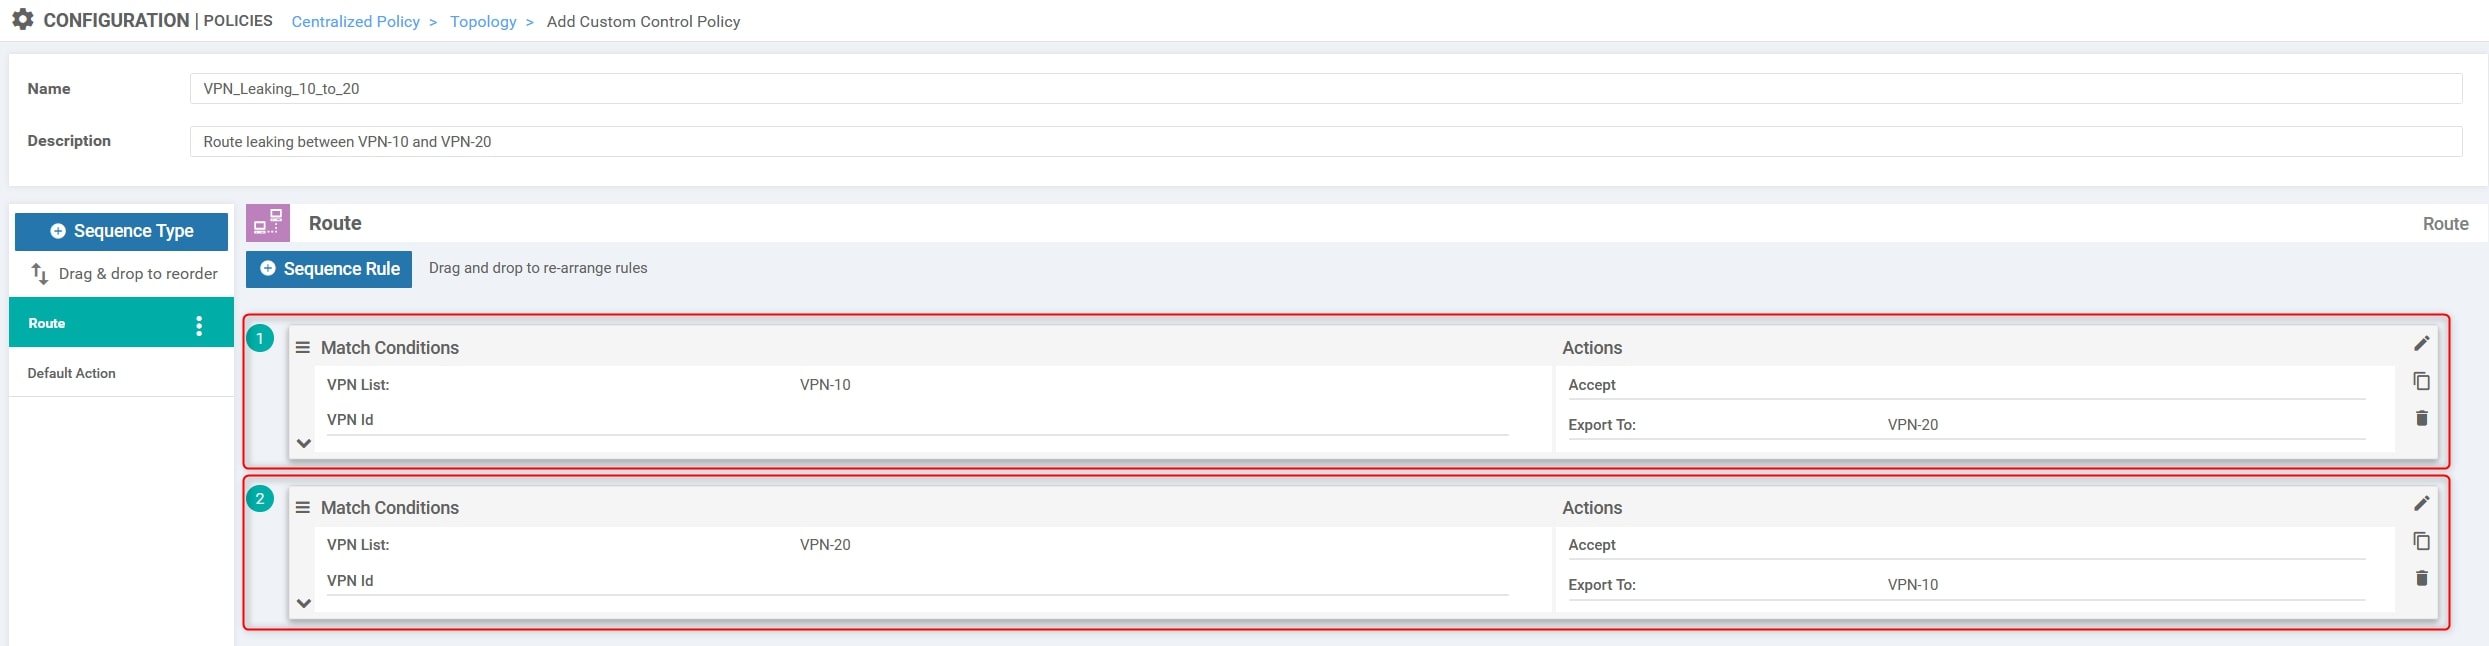
Click on “Sequence Type” and choose “Route”
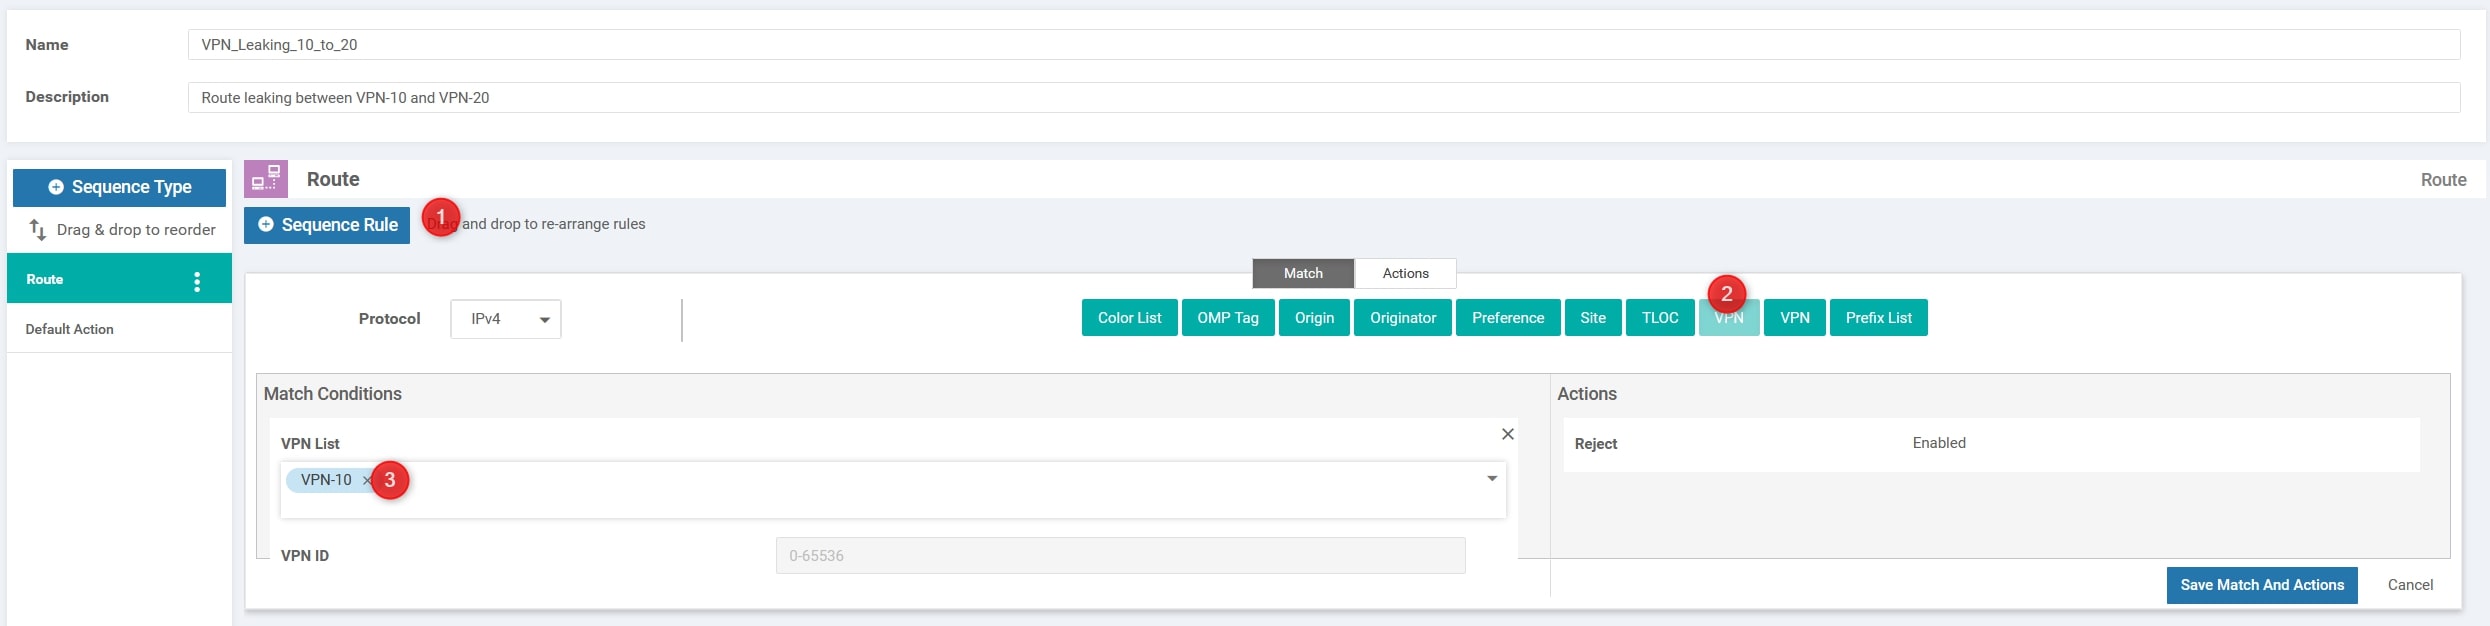
Click on “Requence Rule” and choose “VPN” (the first one refers to VPN List, the second one refers to VPN ID), here the configuration:
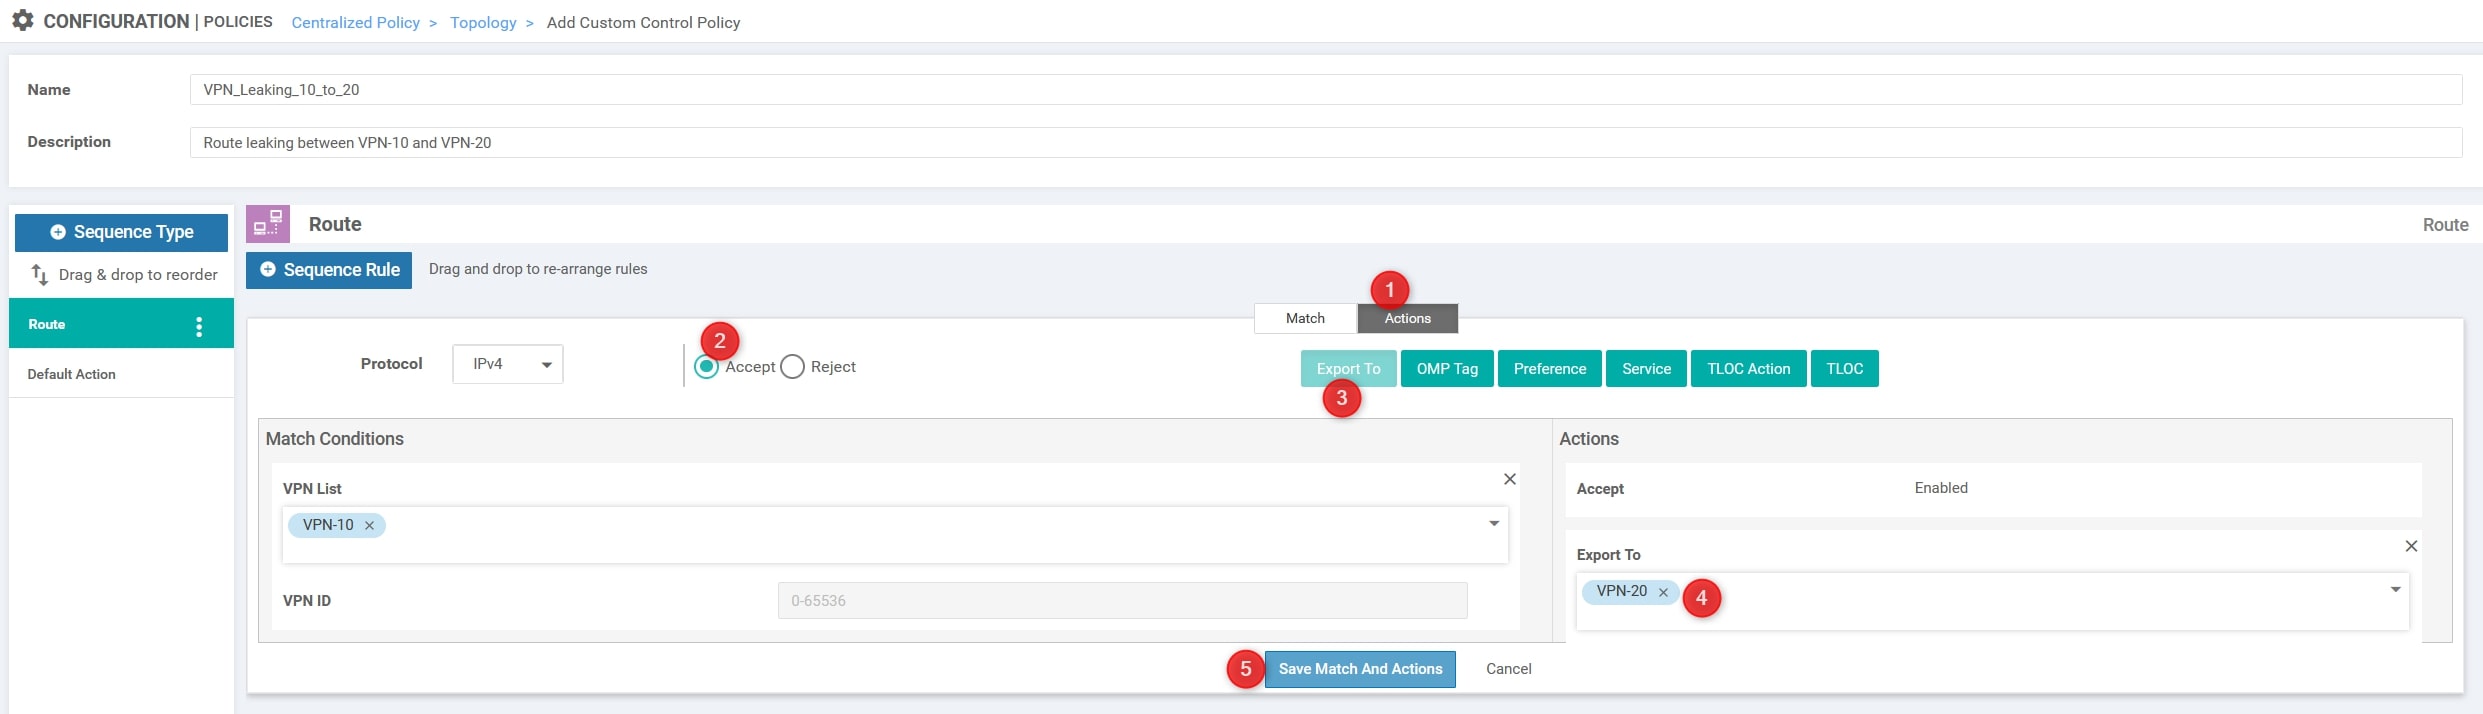
Then, in the “Action” section change it from “Reject” to “Accept” and choose “Export to”. Here we need to select the other VPN ID, VPN-20 and click “Save Match And Actions”:
Now we need to create a second entry for the return traffic, basically we need to invert the VPN IDs. To do that we can use the copy function at the right of the match entry:

With the edit button apply the changes. This is the final result:
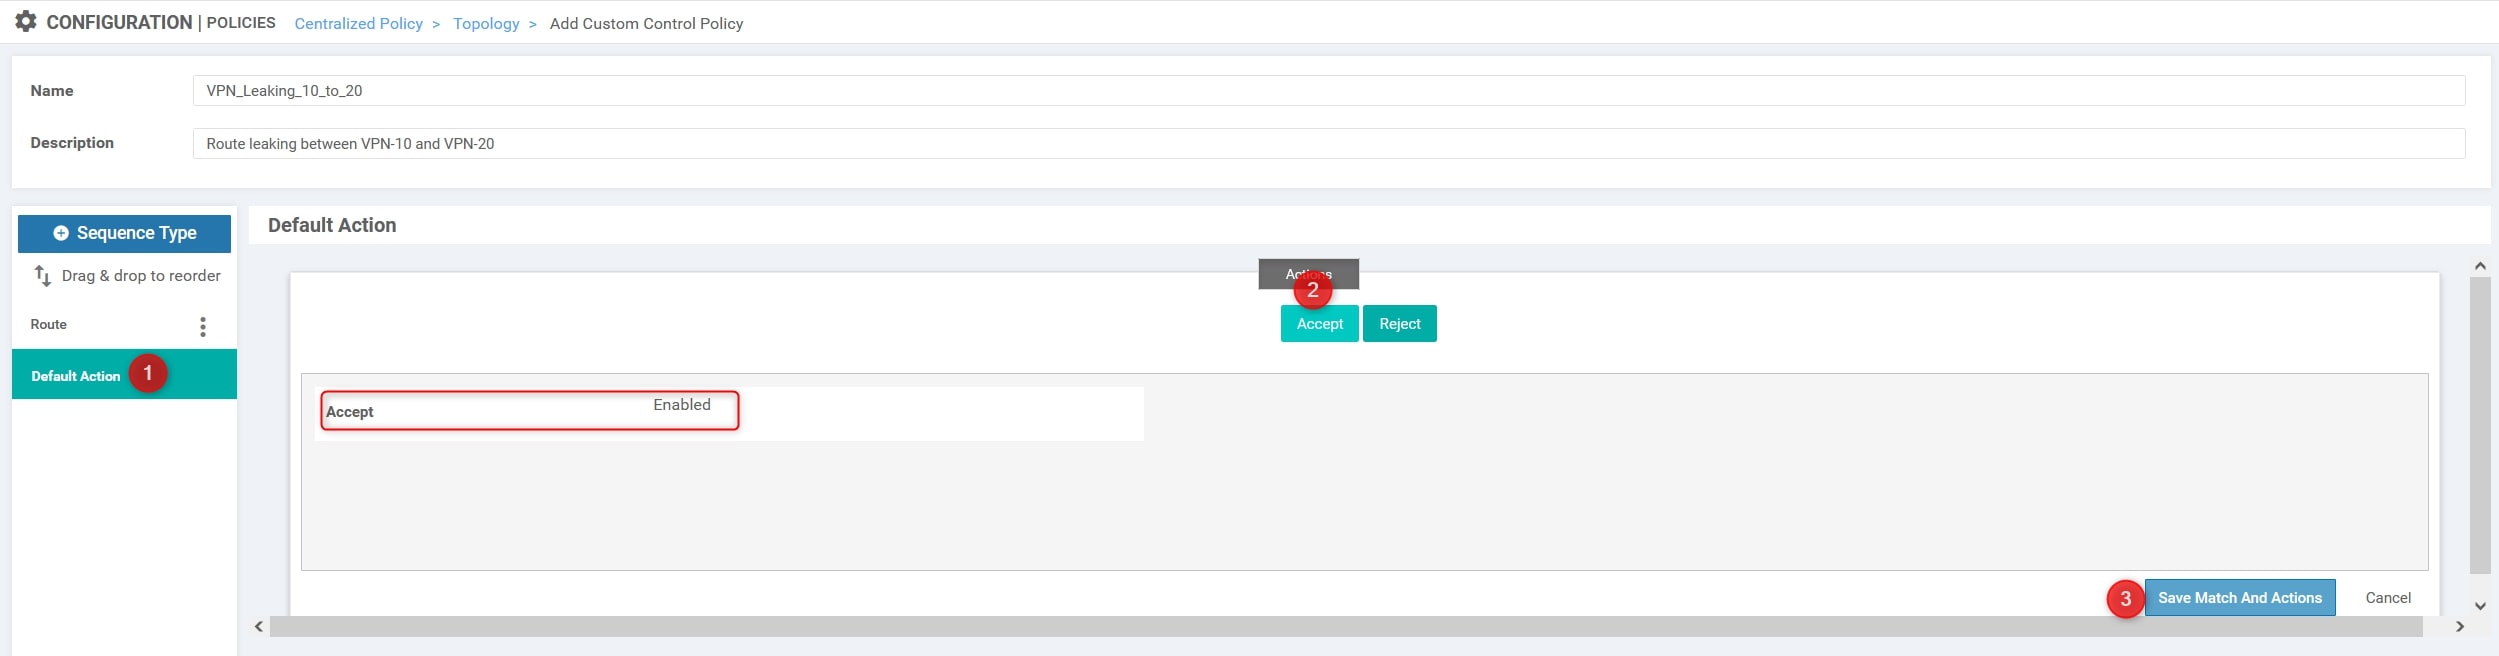
The final step is to modify the default action from “Reject” to “Accept”:
Great! Now let compose our policy 😉
Return to the initial policy section: Configuration>Policies and click “Add Policy”.
The first required step is to create the Groups of Interest, but we have done this task before so we can go ahead using the “Next” blue button at the bottom of the page.
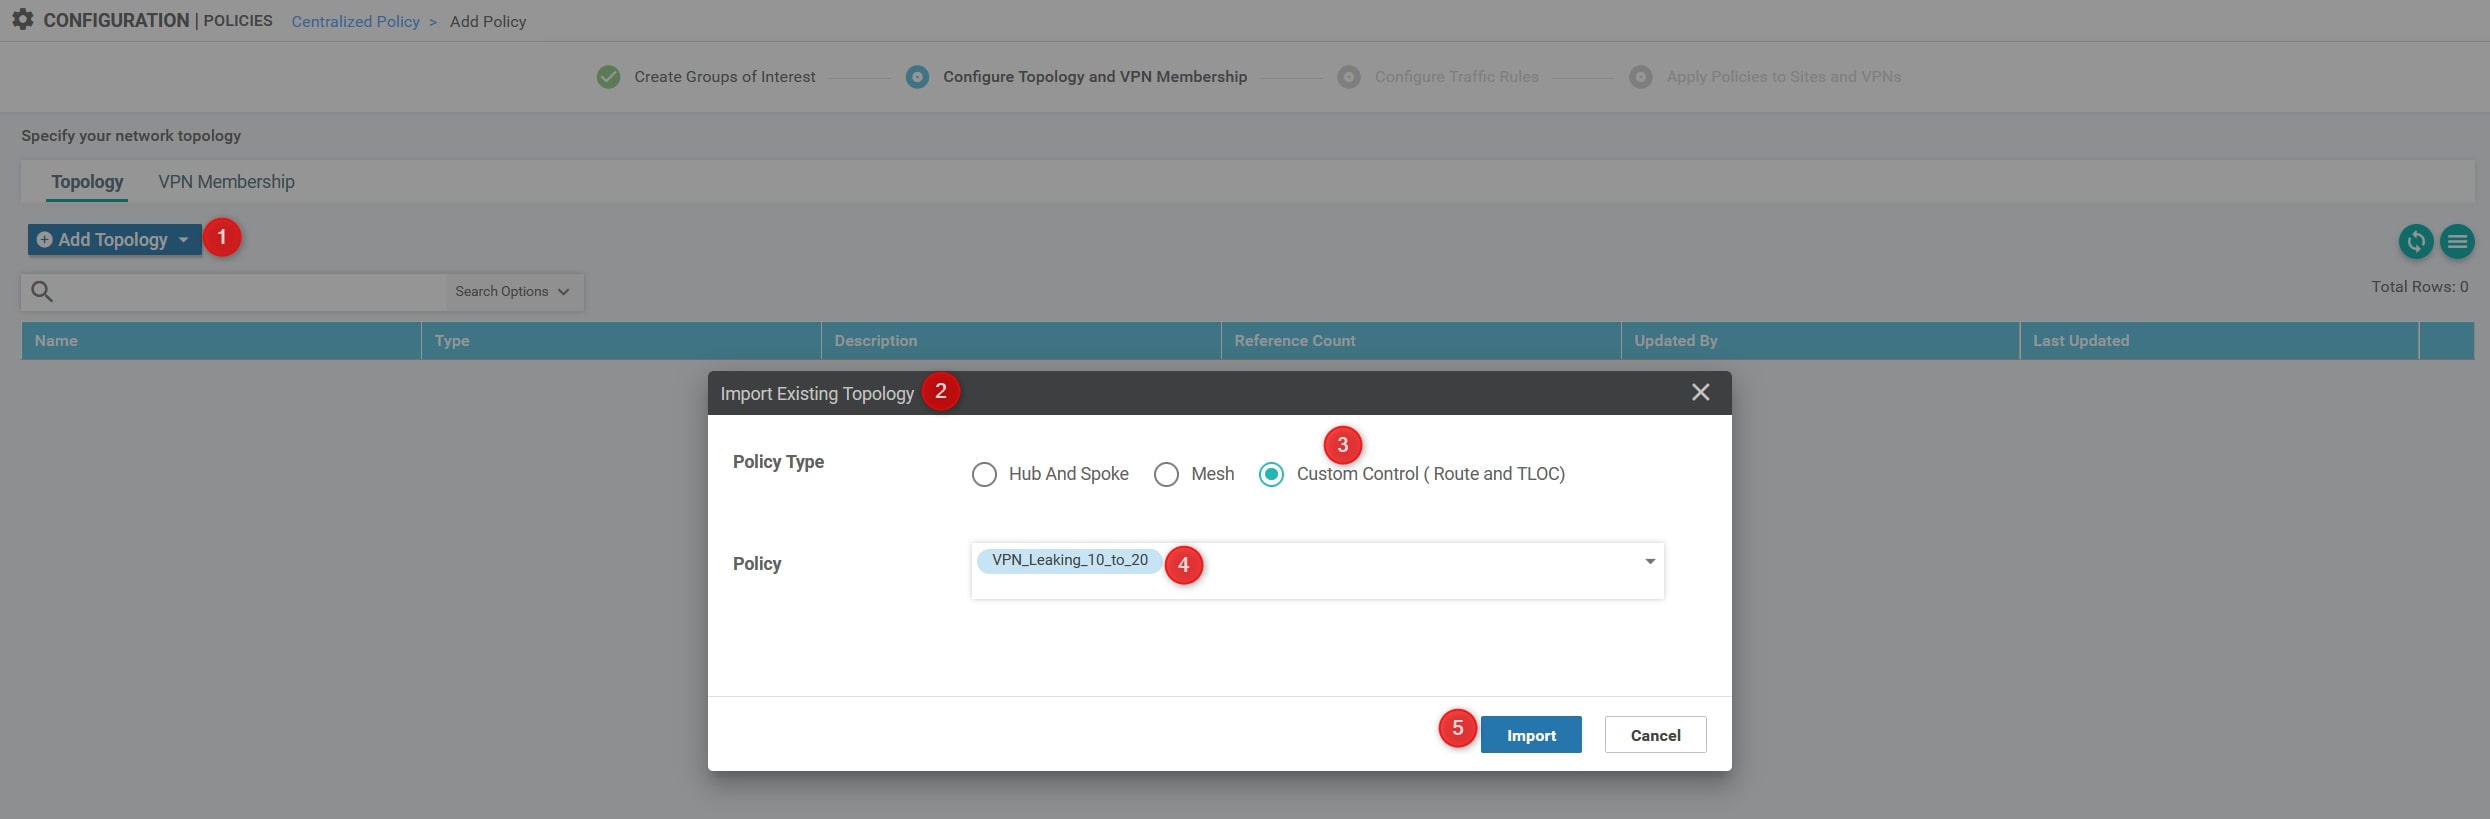
After that, click on “Add Topology” and choose “Import Existing Topology”. Here, specify what you configured before:
Then, click the “Next” blue button at the bottom of the page and again “Next” in order to skip the section called “Configure Traffic Rules”
Okay, we’re at the last step, we need to apply the policy to a specific site list!
Here we need to specify three things:
- Name: VPN_Leaking_10_to_20
- Description: Route leaking between VPN-10 and VPN-20
- The inbound Site List related to All the sites.
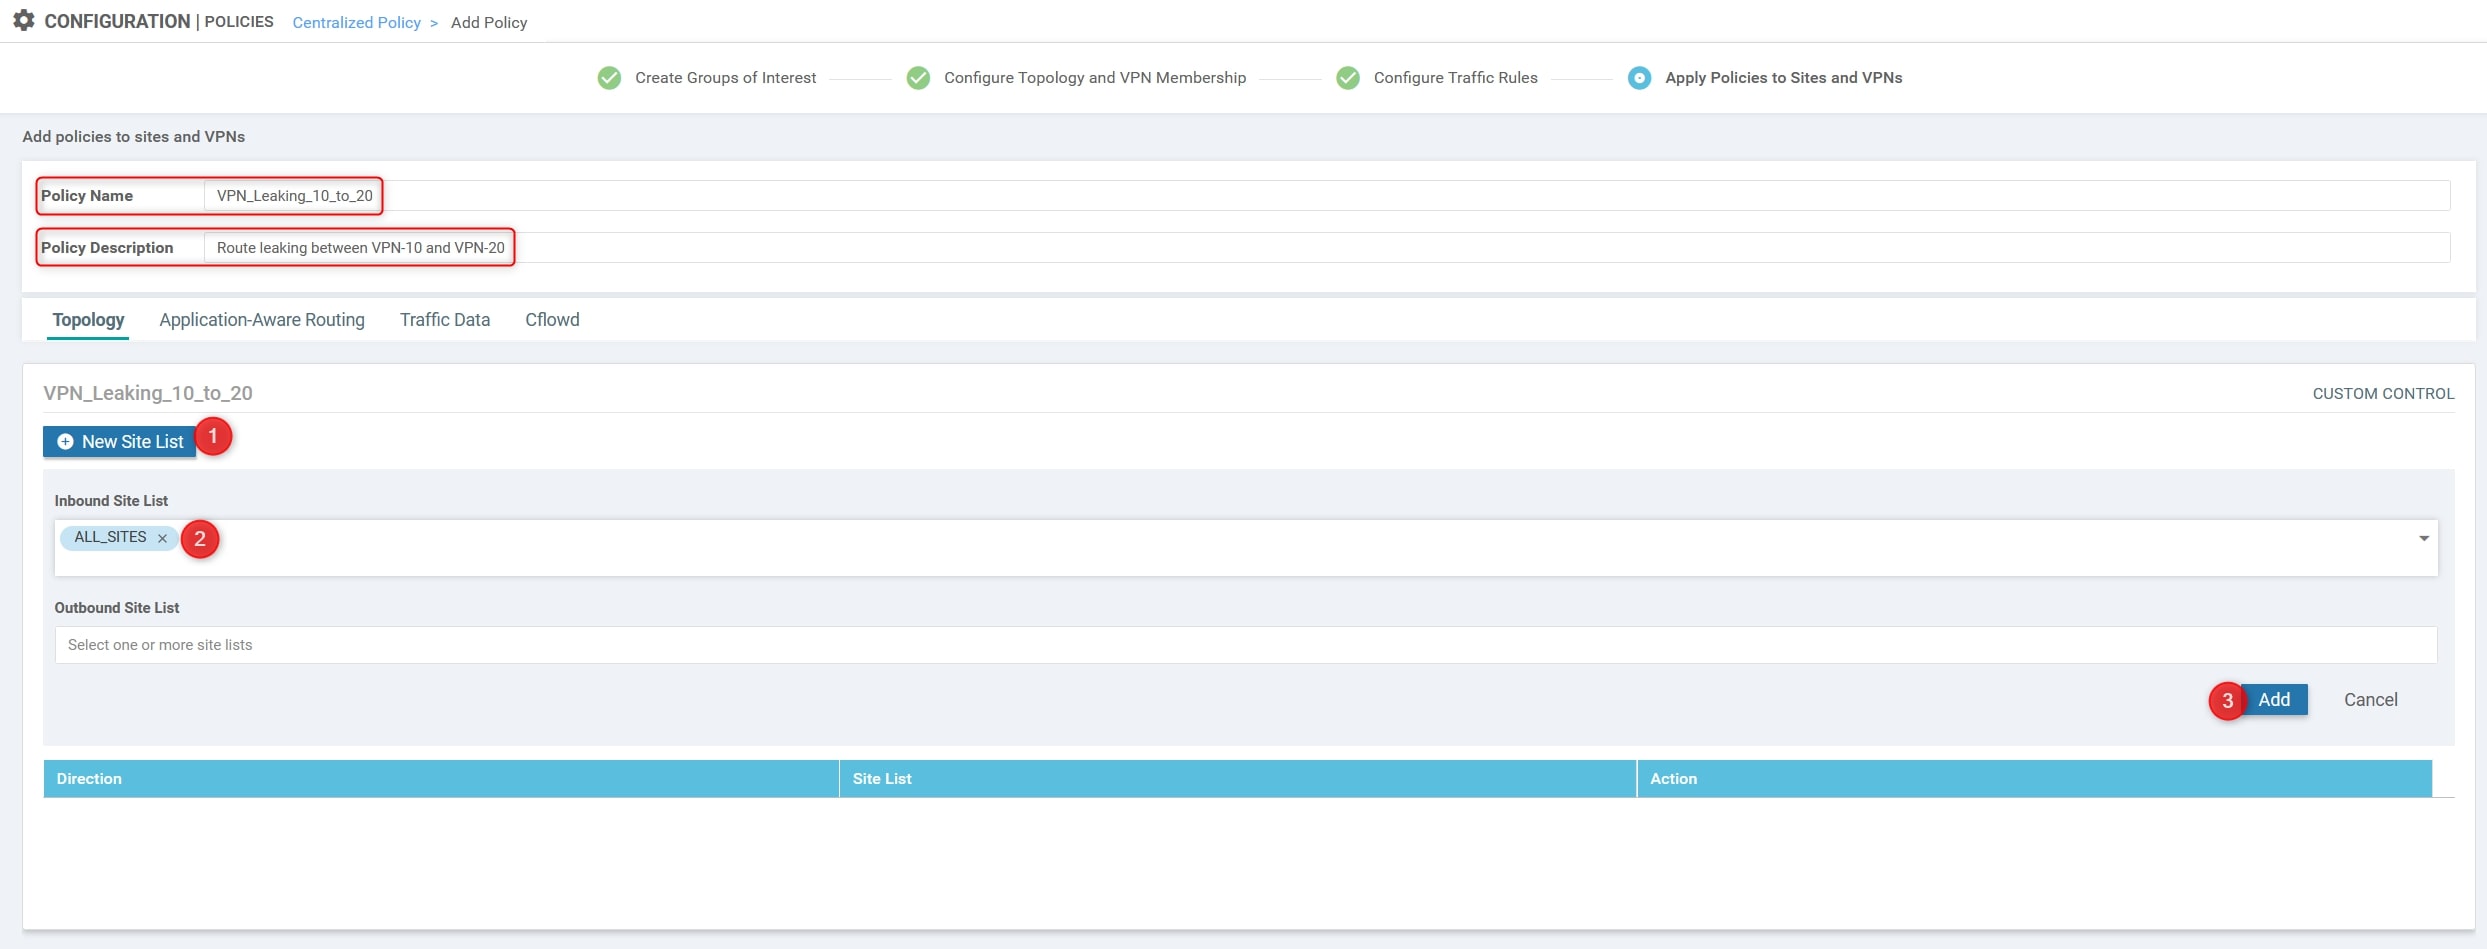
Now, you can finally click on Save Policy".
Great! We have almost done 😉
The last step is to activate the policy. To do that you can simply click on the policy, click on the three dots at the end of the row and click “Activate”:

vManage will push the configuration to vSmart using NETCONF.
Output from vSmart CLI:
Verify
Now we need to verify that the policy is working properly. Let connects to all the routers and review their routing table:
-
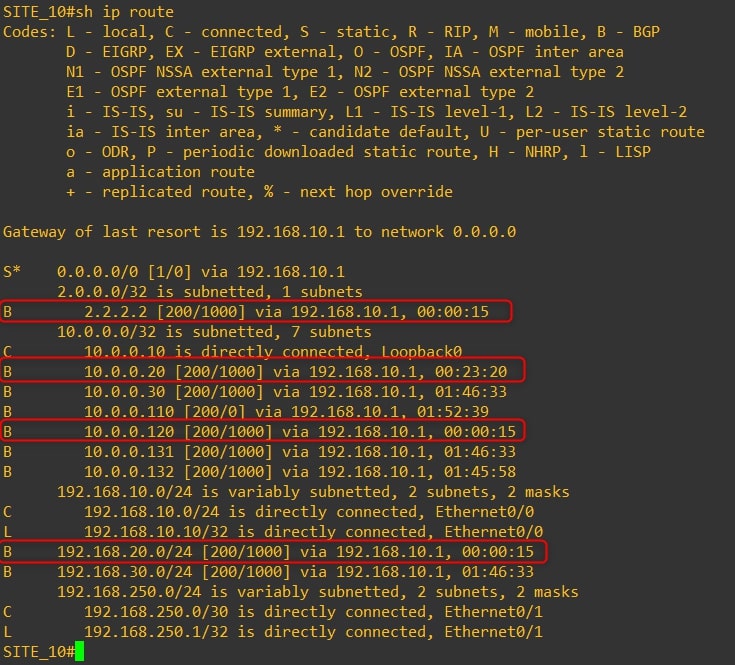
Router-10
-
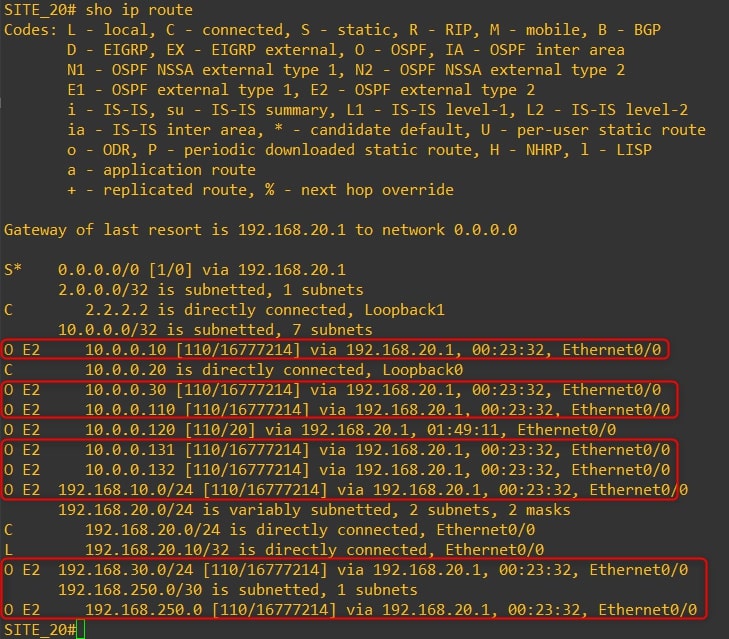
Router-20
-
Router-30
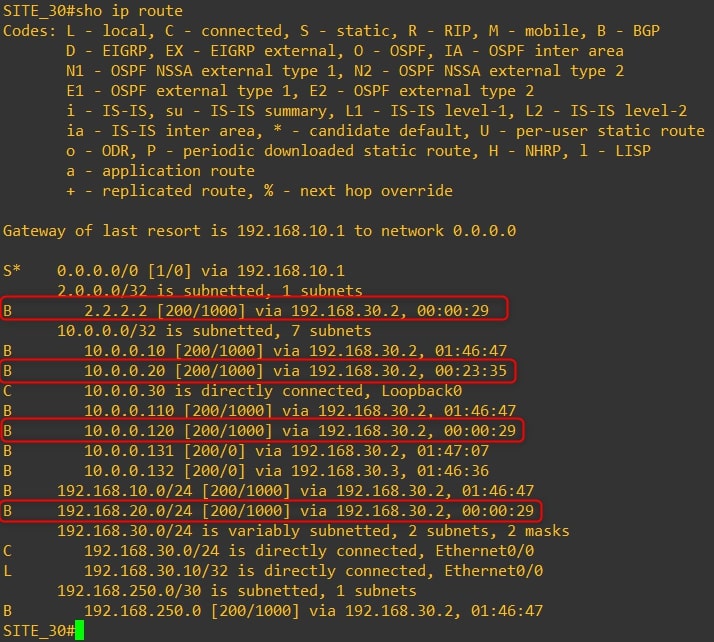
As you can see, we are receiving all Site-20 (VPN-20) subnets to Site 10 and Site 30 (VPN-10) and vice versa
Ping test from Router-20 to Router-10:
Congratulations, you did it!💥
Thanks for your time I hope that you’re enjoying my blog!
If you have some questions, please drop me a message through social networks!😊
👈 You can find the relative icons here on the left of the page
Riccardo