Cisco ACI - Deployment With Terraform - Basic
Finally, after some weeks/months the Cisco ACI sandbox is online again!
What is Terraform?
Terraform
is an open-source infrastructure as code (IaC) tool developed by HashiCorp
. It allows you to define and manage your infrastructure in a declarative manner, using a high-level configuration language. With Terraform, you can define your desired infrastructure as code and then use it to provision and manage your infrastructure across various cloud providers and on-premises data centers.
It allows you to create, update, and destroy infrastructure resources in a safe and consistent manner, making it easier to manage infrastructure at scale.
Terraform uses a declarative language called HashiCorp Configuration Language (HCL) to define your infrastructure. With HCL, you can specify the resources you want to create, their properties, and their dependencies. Terraform then generates a plan that shows the changes that will be made to your infrastructure, and you can apply the plan to make the changes.
Conclusion: Overall, Terraform simplifies the process of managing infrastructure and makes it more predictable and repeatable.
Cisco ACI and Terraform
If you are here, you already know what Cisco ACI is and you want to scale/automate your deployment using Terraform.
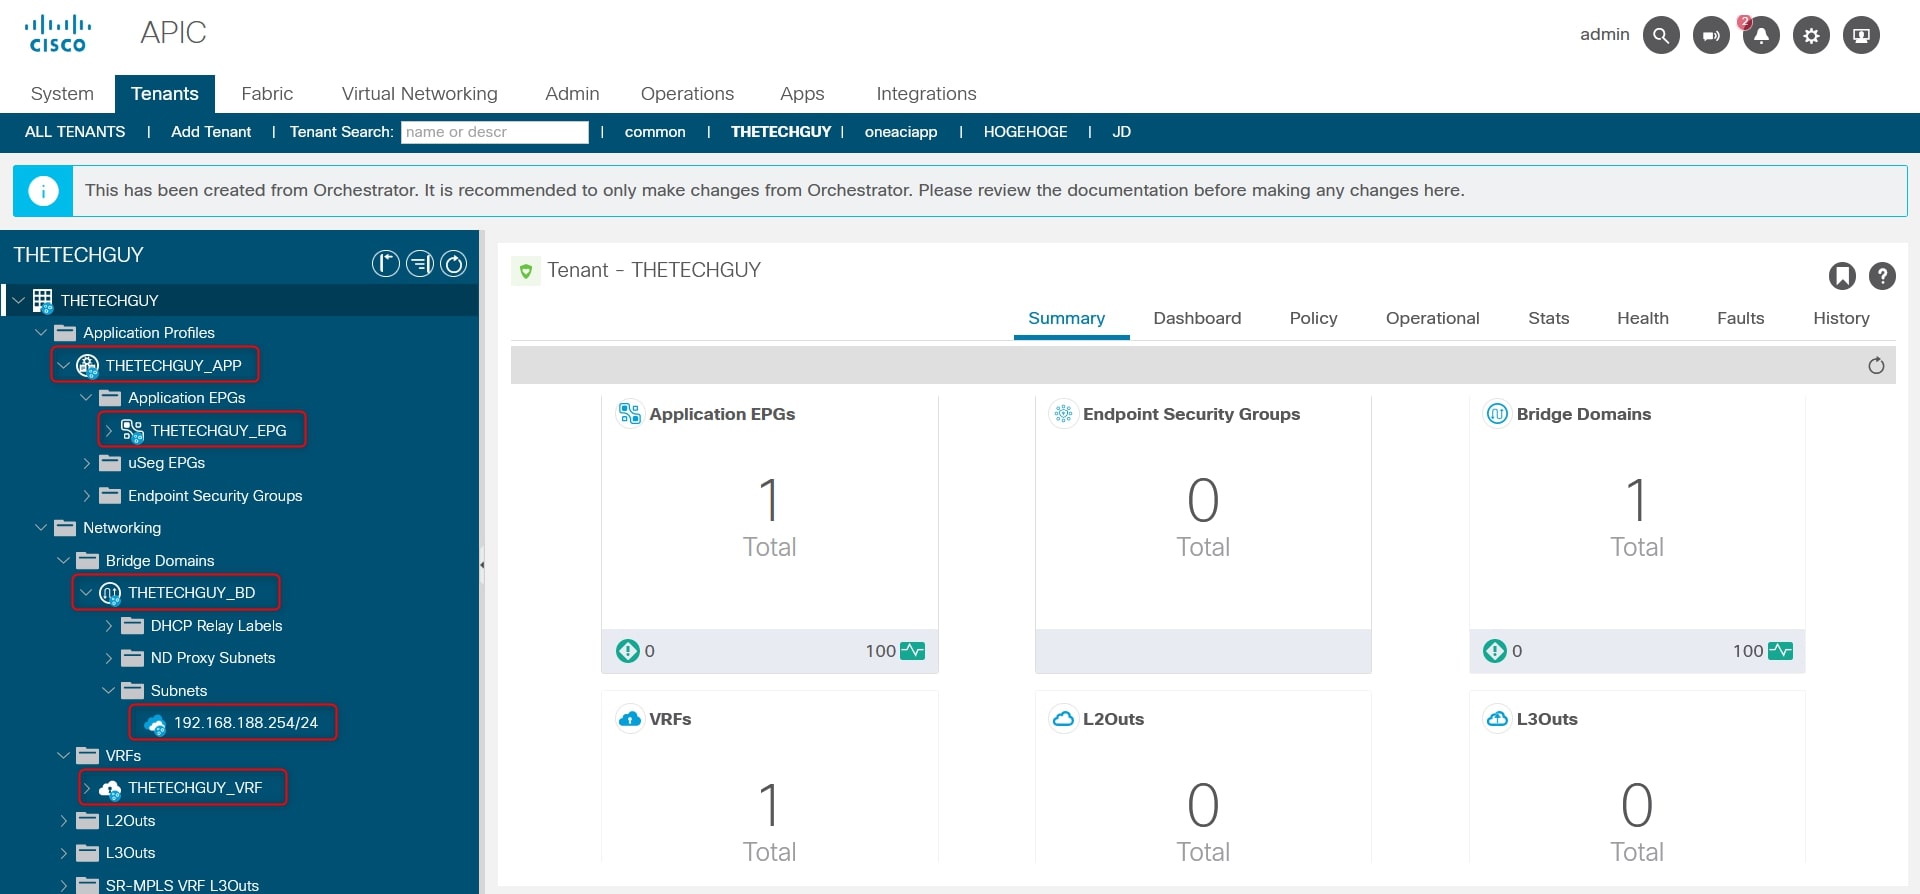
In this post we’re going to create a single Tenant with 1 APP that contains 1 EPG, associated to 1 BD that belongs to 1 VRF:
- Tenant: THETECHGUY
- VRF: THETECHGUY_VRF
- Application Profile: THETECHGUY_APP
- EndPoint Group: THETECHGUY_EPG
- Bridge Domain: THETECHGUY_BD
- Bridge Domain Subnet: 192.168.188.254/24 [public –> Advertise externally]
Obviously you can choose different names 😊
The Cisco ACI sandbox is available here:
- URL: https://sandboxapicdc.cisco.com
- username: admin
- password: !v3G@!4@Y
With all these information, we can proceed with our lab.
Tools
In this lab I’m using:
- Visual Studio
- WSL (Windows Subsystem for Linux, it allows you to install a complete Ubuntu terminal environment in minutes on your Windows machine)
- Cisco ACI Sandbox
Coding
The first step is to indicate our Terraform Provider. But wait… What is a provider? A provider is a plugin that lets Terraform manage an external API, in our example it’s “ciscodevnet/aci
”.
Here you can find all the Terraform providers available
Open a new page in your favorite IDE (I’m using Visual Studio Code) and create a file “.tf”, for example “tenant.tf”.
To install Cisco ACI provider, copy and paste this code into your Terraform configuration.
terraform {
  required_providers {
    aci = {
      source = "CiscoDevNet/aci"
      version = "2.7.0"
    }
  }
}
Great! Now that we have indicated the provider, put the credentials inside our code:
provider "aci" {
  username = "admin"
  password = "!v3G@!4@Y"
  url = "https://sandboxapicdc.cisco.com"
}
The last thing to do is to add the resources (tenant, vrf, app, epg, bd) inside the code. Let’s start with the Tenant:
resource "aci_tenant" "prod-tenant" {
  name = "THETECHGUY"
  description = "Production Tenant"
}
Ok now, before adding all the other resources, let’s see if everything is working fine.
The file “tenant.tf” should be like that:
# Provider Declaration
terraform {
  required_providers {
    aci = {
      source = "CiscoDevNet/aci"
      version = "2.7.0"
    }
  }
}

# Provider Configuration
provider "aci" {
  username = "admin"
  password = "!v3G@!4@Y"
  url = "https://sandboxapicdc.cisco.com"
}

# Tenant
resource "aci_tenant" "prod-tenant" {
  name = "THETECHGUY"
  description = "Production Tenant"
}
Open your terminal (WSL), move into your target folder (where the file is stored) and type:
terraform init
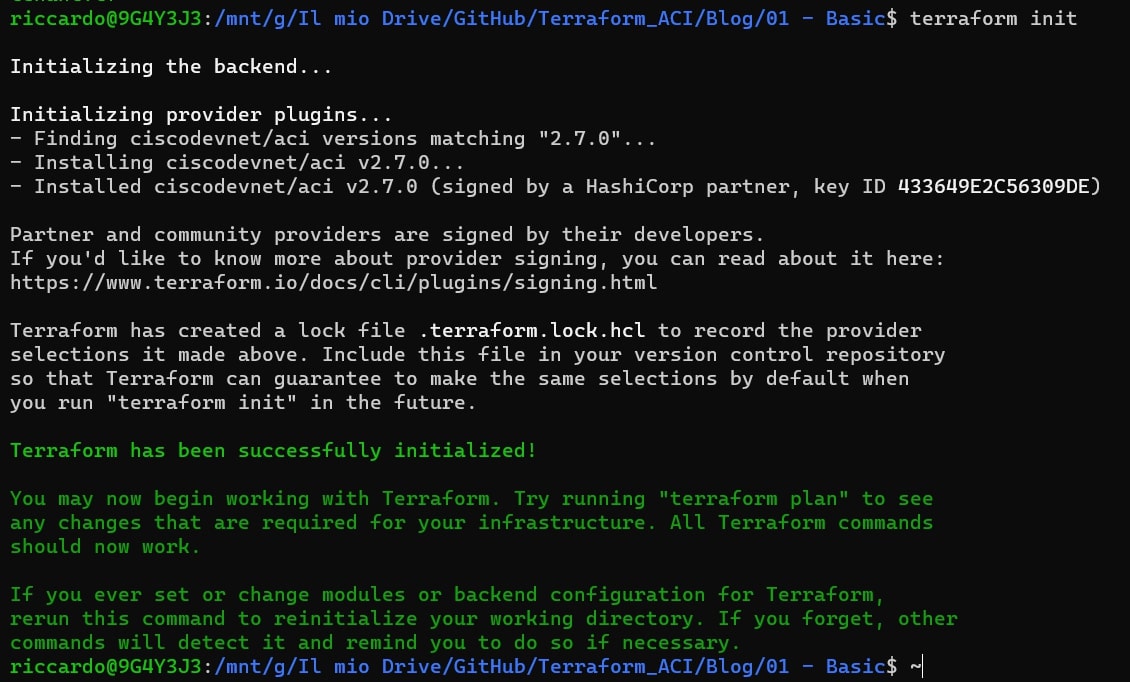
Great, you have successfully initialized Terraform and you’re ready to launch your script! Before that, let’s see what our code will do by typing:
terraform plan
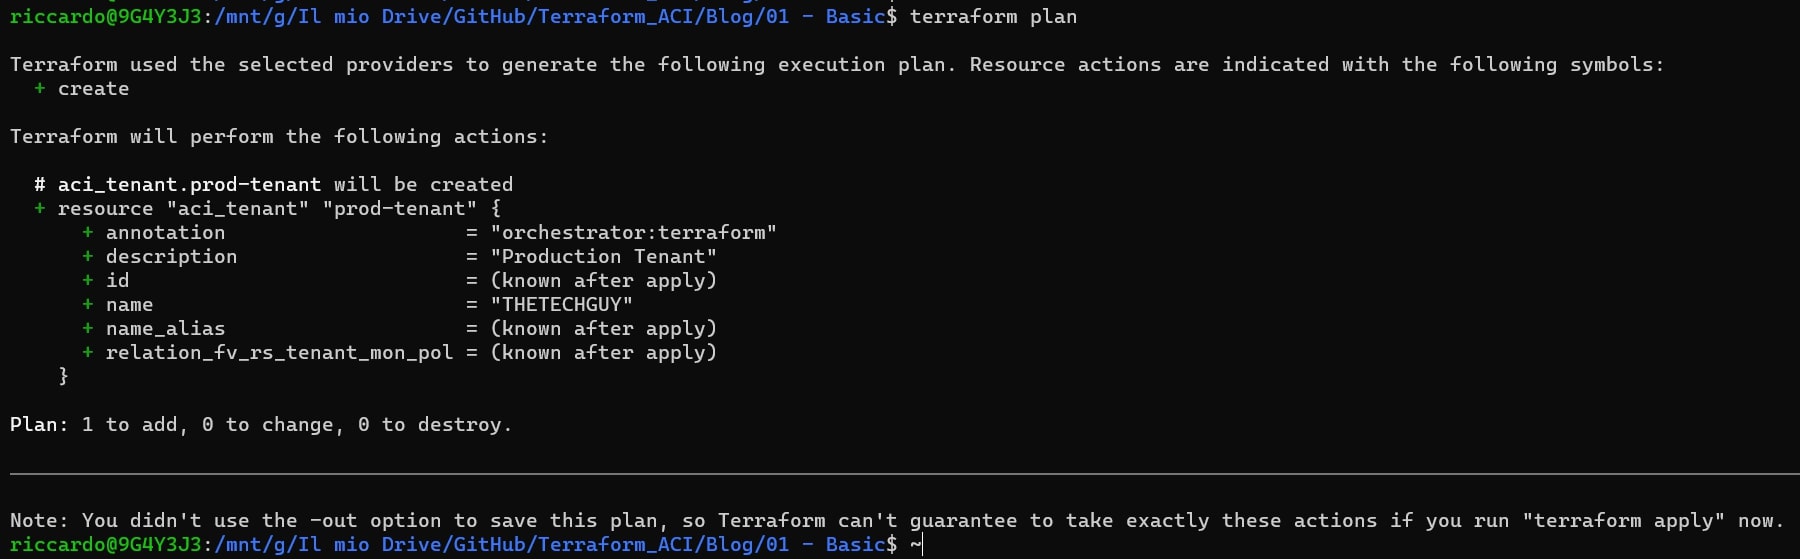
This is very important because it allows us to see what the code will create/change/destroy BEFORE… we don’t like surprises in our production environment, right? 😉
In our example, the code is telling us that he will add 1 item (tenant), it will not change or destroy any other resources.
Perfect, now let’s move on and launch the script:
terraform apply
It will ask us if we are sure, let’s type “yes” and wait till the end. Finally, this is the output:
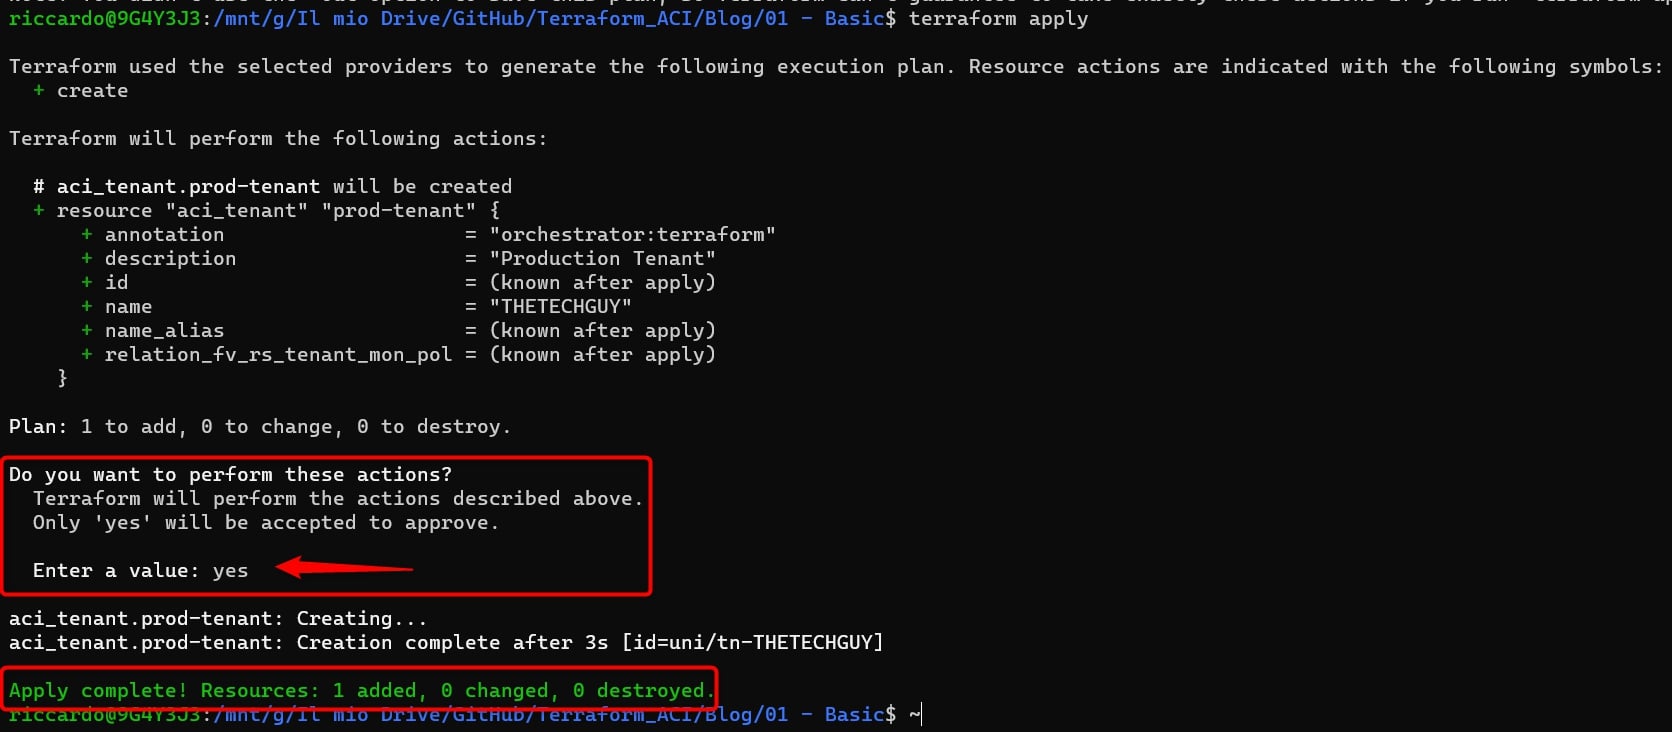
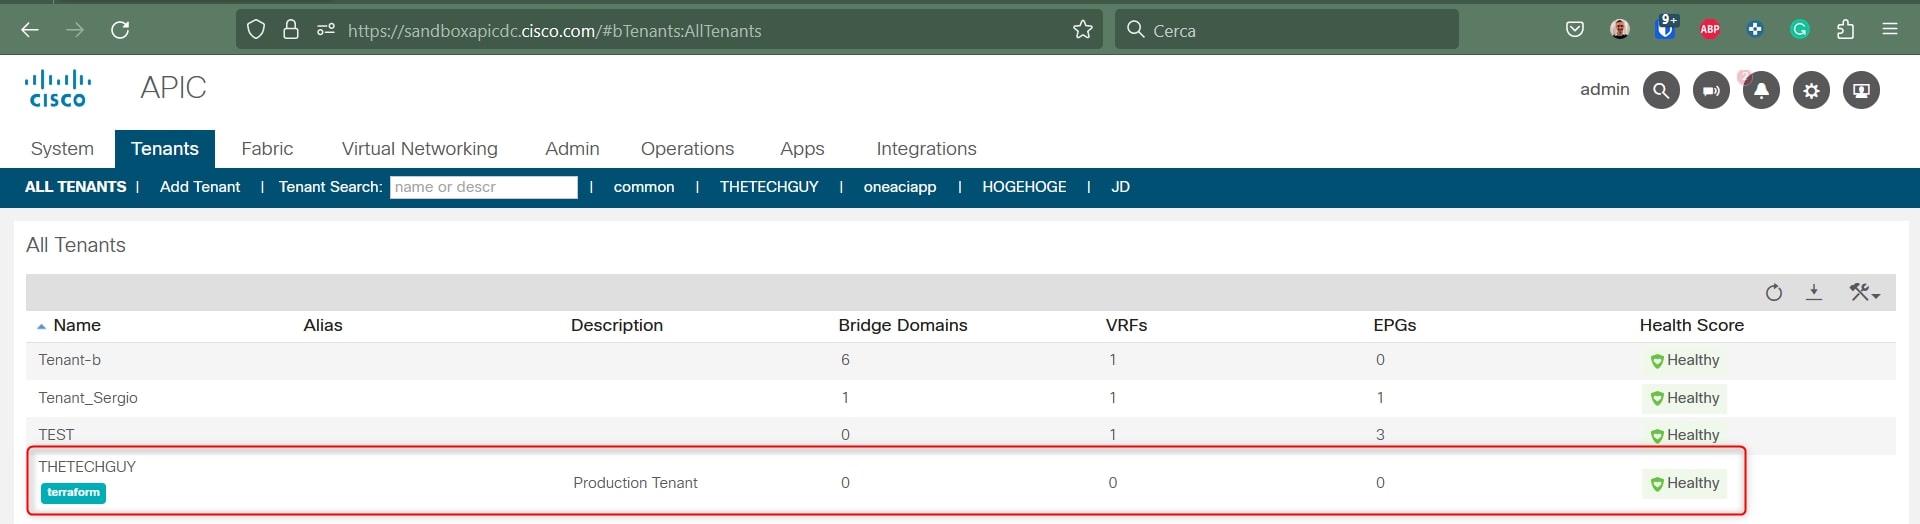
And drumroll….. HERE WE GO! Our tenant has been successfully deployed:
Perfect, now let’s add all the other resources: VRF, Application Profile, EPG, BD and the relative subnet.
At the end of the code add the following lines of code:
# VRF
resource "aci_vrf" "prod-vrf" {
  tenant_dn = aci_tenant.prod-tenant.id #It allows you to associate this VRF to the Tenant resource called "prod-tenant"
  name = "THETECHGUY_VRF"
  ip_data_plane_learning = "enabled"
  knw_mcast_act = "permit"
  pc_enf_dir = "ingress"
  pc_enf_pref = "enforced"
}

# Application Profile
resource "aci_application_profile" "prod-app" {
  tenant_dn = aci_tenant.prod-tenant.id #It allows you to associate this Application Profile to the Tenant resource called "prod-tenant"
  name = "THETECHGUY_APP"
}

# EPG1
resource "aci_application_epg" "prod-epg" {
    application_profile_dn = aci_application_profile.prod-app.id #It allows you to associate this EPG to the Application Profile resource called "prod-app"
    name = "THETECHGUY_EPG"
    relation_fv_rs_bd = aci_bridge_domain.prod-bd.id #It allows you to associate this EPG to the BD resource called "prod-bd"
}

# BD1
resource "aci_bridge_domain" "prod-bd" {
        tenant_dn = aci_tenant.prod-tenant.id #It allows you to associate this BD to the Tenant resource called "prod-tenant"
        name = "THETECHGUY_BD"
        arp_flood = "yes"
        unicast_route = "yes"
        relation_fv_rs_ctx = aci_vrf.prod-vrf.id #It allows you to associate this BD to the VRF resource called "prod-vrf"
}

# Subnet BD1
resource "aci_subnet" "prod-bd-subnet" {
        parent_dn = aci_bridge_domain.prod-bd.id #It allows you to associate this Subnet to the BD resource called "prod-bd"
        description = "subnet"
        ip = "192.168.188.254/24"
        preferred = "no"
        scope = ["public"]
        virtual = "no"
        ctrl = ["unspecified"]
}

# EPG to Domain
resource "aci_epg_to_domain" "prod-epg_to_domain" {
  application_epg_dn = aci_application_epg.prod-epg.id
  tdn = aci_physical_domain.Physical_Dom.id
}
This is the common part that helps you to create the AAEP, Physical Domain and VLAN Pool:
# VLAN Pool
resource "aci_vlan_pool" "Physical_VLAN-Pool" {
  name = "Physical_VLAN-Pool"
  alloc_mode = "static"
}
resource "aci_ranges" "prod-vlanpool-range" {
  vlan_pool_dn = aci_vlan_pool.Physical_VLAN-Pool.id
  from = "vlan-2"
  to = "vlan-1000"
  alloc_mode = "static"
}

# Physical Domain
resource "aci_physical_domain" "Physical_Dom" {
  name = "Physical_Dom"
  relation_infra_rs_vlan_ns = aci_vlan_pool.Physical_VLAN-Pool.id
}

# AAEP
resource "aci_attachable_access_entity_profile" "Physical_AAEP" {
  name = "Physical_AAEP"
}

# AAEP and Domain Association
resource "aci_aaep_to_domain" "aaep_to_domain" {
  attachable_access_entity_profile_dn = aci_attachable_access_entity_profile.Physical_AAEP.id
  domain_dn = aci_physical_domain.Physical_Dom.id
}
Save the file and open the BASH, type
terraform plan
You should now see a lot of information about the resources that will be created by Terraform. Is everything is OK, you can proceed with:
terraform apply -auto-approve
PS. You can pass the “-auto-approve” option to instruct Terraform to apply the plan without asking for confirmation (attention in production)
This should be the result from BASH:

This should be the result from GUI:
Congrats! You successfully deployed a Cisco ACI Tenant with some basic resources.
For all the options available in the resources please read the documentation provided
. Here you can find how to modify all the available check boxes, options and strings.
BONUS
If you want to refactor a little bit the code, you can put the variables like username, passwords, URL and more in a separate file! Here an example:
- Create a file called “variables.tf”:
locals {
    username = "admin"
    password = "!v3G@!4@Y"
    url = "https://sandboxapicdc.cisco.com"
}
- Modify the “tenant.tf” file from:
# Provider Configuration
provider "aci" {
  username = "admin"
  password = "!v3G@!4@Y"
  url = "https://sandboxapicdc.cisco.com"
}
To:
# Provider Configuration
provider "aci" {
  username = local.username
  password = local.password
  url = local.url
}
You can apply the same with the other variables like Tanant, VRF, APP, EPG and BD names (try yourself 😉)
Terraform problem
❗ ❗ ❗
It’s very very important to understand that the Terraform language is declarative! When you run the code it will create the resources defined into the code. If you manually modify a resource created by Terraform via GUI and you do not update your code, it will be overwritten again by Terraform after running the code (you can verify it by using the “terraform plan” command).
So if you are implementing a new Tenant keep in mind that it’s highly recommended to perform all the future changes through Terraform and not manually.
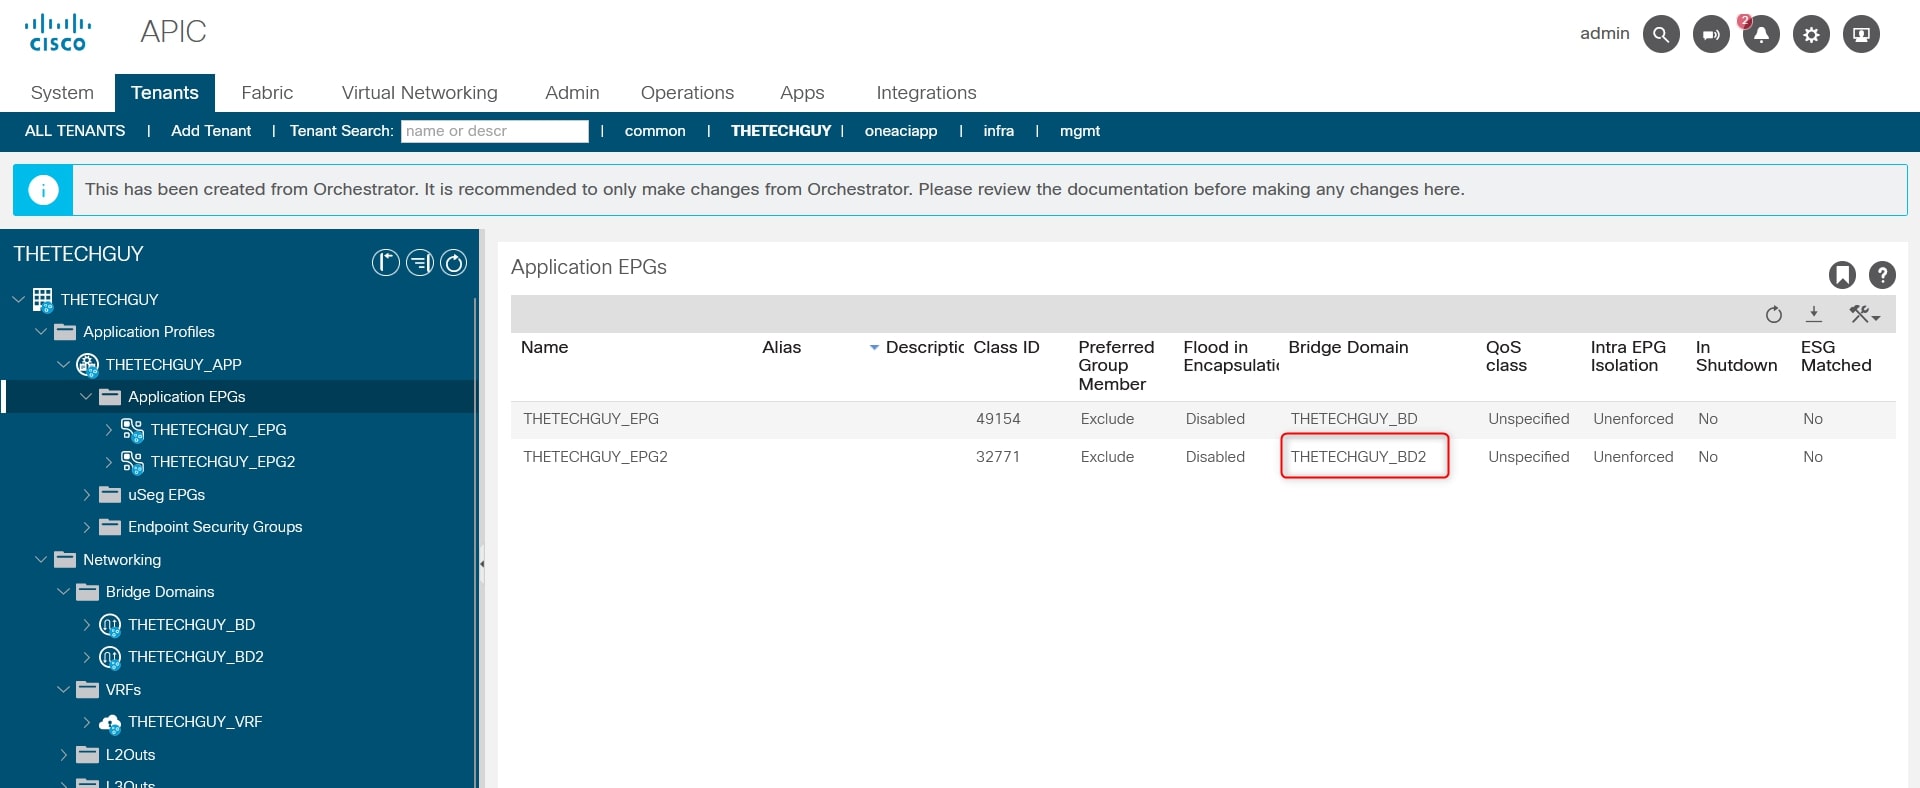
Let me create a new EPG and BD for you using Terraform.
- THETECHGUY_EPG2
- THETECHGUY_BD2
And associate this new EPG with the new BD.

As you can see from the screenshot, I associated this new EPG, THETECHGUY_EPG2, to the “old” BD called THETECHGUY_BD and not to THETECHGUY_BD2.
Let’s modify it via GUI.
Ok now add a new EPG to your terraform script and run:
terraform plan
and see what happen:

As you can see, the terraform script will inform you that there is a change to the resource called THETECHGUY_EPG2 and it will apply the change.
Please, keep it mind this scenario when performing manual changes to an infrastructure created via Terraform 😉
❗ ❗ ❗
Are you interested in something more complex than this? Like iterate several EPGs/BDs/VRFs/APPs?
Stay tuned! I’ll publish the “Cisco ACI - Deployment with Terraform - Advanced” in the next few weeks!
Here is my GitHub page with this example
Here is my GitHub page for Terraform (WIP)
DISCLAIMER
I take no responsibility for any damage you may do running the scripts I provide here. Use it at your own risk, always test before running in production.
Thanks for your time I hope that you’re enjoying my blog!
If you have some questions, please drop me a message through social networks!😊
👈 You can find the relative icons here on the left of the page
Riccardo