VXLAN - Flood and Learn
Hi 😊 Today we’re going to learn how to implement VXLAN Flood and Learn with eve-ng and Nexus 9000v!
VXLAN
VXLAN, short for Virtual Extensible LAN, is a network virtualization technology that enables the creation of overlay networks in data center environments. It is an extension of the VXLAN standard and is specifically implemented by networking devices, such as switches and routers, to provide scalable and efficient communication between virtual machines (VMs) across diverse physical hosts and network segments. VXLAN addresses the limitations of traditional VLANs by allowing for a much larger number of virtual network segments, known as VXLAN Network Identifiers (VNIs). Each VNI serves as a unique identifier for a specific virtual network, enabling network administrators to create thousands of isolated and secure Layer 2 networks over existing Layer 3 infrastructures.
How VXLAN Works:
-
Encapsulation: VXLAN encapsulates Layer 2 Ethernet frames within UDP packets, with each frame assigned to a particular VNI. This encapsulation ensures that VXLAN traffic can traverse Layer 3 networks while maintaining the necessary information to deliver the frames to the correct destination.
-
VXLAN Tunnel Endpoints (VTEPs): devices that support VXLAN functionality are known as VTEPs. VTEPs participate in the VXLAN overlay network, providing the necessary encapsulation and decapsulation of VXLAN frames. They are responsible for receiving, forwarding, and forwarding VXLAN traffic based on the VNI.
-
Flood and Learn: In the VXLAN environment, a technique called “Flood and Learn” is utilized to handle unknown destination MAC addresses. When a VTEP receives a unicast frame with an unknown destination MAC address, it floods the frame to all other VTEPs within the same VXLAN segment. The destination VTEP that owns the VM with the corresponding MAC address learns the association between the MAC address and the VNI, facilitating future direct communication.
Benefits of VXLAN:
- Scalability: VXLAN allows for the creation of a virtually unlimited number of logical network segments, ensuring scalability even in large-scale data center deployments.
- VM Mobility: VXLAN supports seamless VM mobility, enabling VMs to move between physical hosts and even across data centers while maintaining connectivity and preserving their network identity.
- Network Segmentation: VXLAN provides efficient network segmentation, allowing administrators to isolate traffic for different applications or tenants, improving security and performance.
- Multitenancy: In multitenant environments, VXLAN enables secure coexistence of multiple customers or departments within the same physical infrastructure, maintaining logical isolation.
Disclaimer
DYOR (Do Your Own Research). Test the procedure before apply changes into your production environment.
Topology
I build the following topology in order to test the VXLAN Flood and Learn technology:
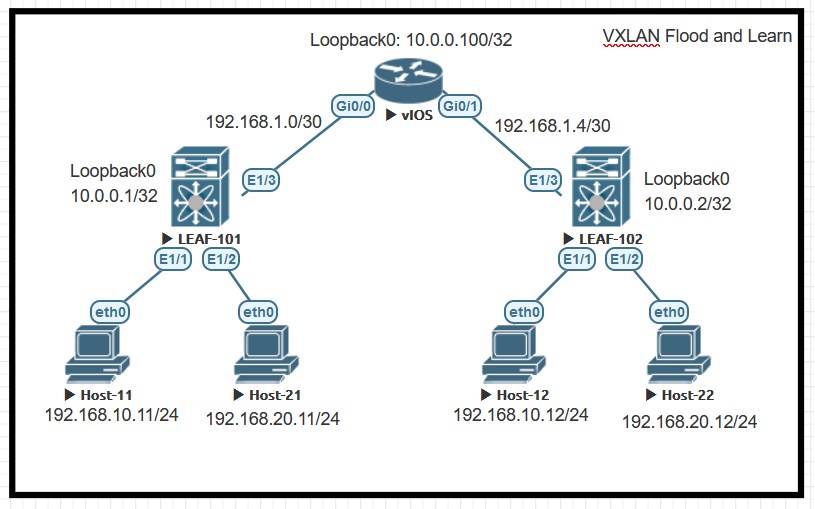
As we can see, there are 2Nexus, called LEAF-101 and LEAF-102 and one virtual router. There are NO L2 between them but only L3 point-to-point. Then we have the endpoints, the virtual PC
- 2 in the 192.168.10.0/24 subnet (VLAN 10)
- 2 in the 192.168.20.0/24 subnet (VLAN 20)
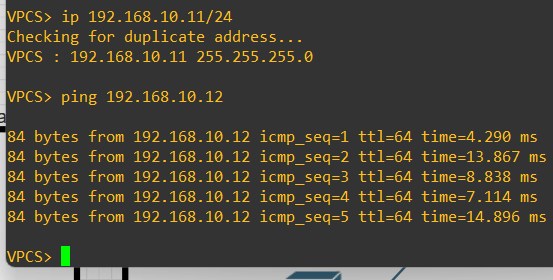
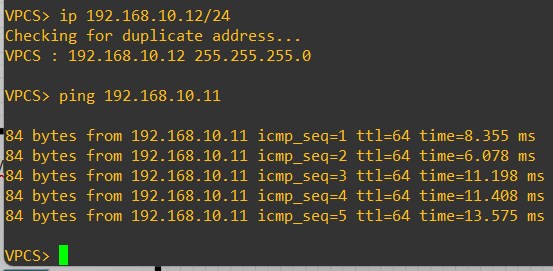
At the end of this lab “Host-11” (192.168.10.11/24) will be able to ping “Host-12” (192.168.10.12/24) without having a direct L2 link between them. Same concept for Host-21 and Host-22.
Configuration
Let’s review the configuration of the devices.
Create the basic config + the ptp connections
vIOS
hostname R-1
no ip domain lookup

interface Loopback0
 ip address 10.0.0.100 255.255.255.255
 ip ospf 1 area 0

interface GigabitEthernet0/0
 no shutdown
 ip address 192.168.1.1 255.255.255.252
 ip ospf 1 area 0

interface GigabitEthernet0/1
 no shutdown
 ip address 192.168.1.5 255.255.255.252
 ip ospf 1 area 0

router ospf 1
alias exec c configure terminal
LEAF-101
hostname NX9k-1

feature ospf

username admin password adminadmin

interface Ethernet1/3
  no switchport
  ip address 192.168.1.2/30
  ip router ospf 1 area 0.0.0.0
  no shutdown

interface loopback0
  ip address 10.0.0.1/32
  ip router ospf 1 area 0.0.0.0

router ospf 1

cli alias name c configure terminal
cli alias name wr copy run start
boot nxos bootflash:/nxos.9.3.9.bin
LEAF-102
hostname NX9k-2

feature ospf

username admin password adminadmin

interface Ethernet1/3
  no switchport
  ip address 192.168.1.6/30
  ip router ospf 1 area 0.0.0.0
  no shutdown

interface loopback0
  ip address 10.0.0.2/32
  ip router ospf 1 area 0.0.0.0

router ospf 1

cli alias name c configure terminal
cli alias name wr copy run start
boot nxos bootflash:/nxos.9.3.9.bin
OSPF - Underlay
Verify the OSPF neighborship
R-1

LEAF-101

LEAF-102

From an OSPF prospective, each device receives the Loopback0 of the other devices. LEAF-101 OSPF routes:
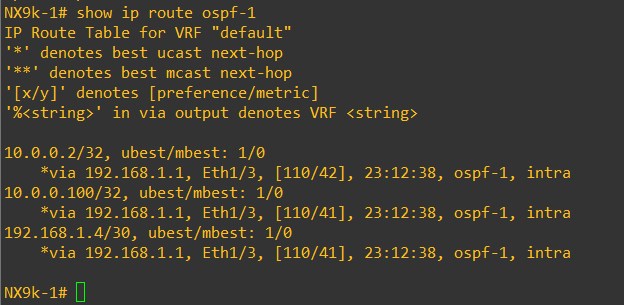
And LEAF-101 Loopback0 can reach LEAF-102 Loopback0:

Great!
PIM - Multicast Routing
Configure the PIM protocol in our topology
R-1
ip multicast-routing

interface Loopback0
 ip pim sparse-mode

interface GigabitEthernet0/0
 ip pim sparse-mode

interface GigabitEthernet0/1
 ip pim sparse-mode

ip pim rp-address 10.0.0.100
LEAF-101
feature pim

ip pim rp-address 10.0.0.100

interface Ethernet1/3
  ip pim sparse-mode

interface loopback0
  ip pim sparse-mode
LEAF-102
feature pim

ip pim rp-address 10.0.0.100

interface Ethernet1/3
  ip pim sparse-mode

interface loopback0
  ip pim sparse-mode
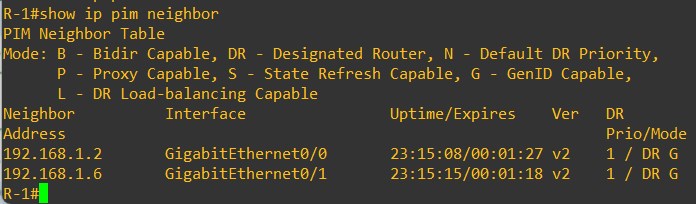
Verify the PIM neighborship in R-1
VXLAN
R-1
interface GigabitEthernet0/0
  mtu 9216

interface GigabitEthernet0/1
  mtu 9216
LEAF-101
feature vn-segment-vlan-based
feature nv overlay

vlan 10,20
vlan 10
  vn-segment 10010
vlan 20
  vn-segment 10020

interface nve1
  no shutdown
  source-interface loopback0
  member vni 10010
    mcast-group 239.1.1.1
  member vni 10020
    mcast-group 239.1.1.2

interface Ethernet1/1
  switchport access vlan 10

interface Ethernet1/2
  switchport access vlan 20

interface Ethernet1/3
  mtu 9216
LEAF-102
feature vn-segment-vlan-based
feature nv overlay

vlan 10,20
vlan 10
  vn-segment 10010
vlan 20
  vn-segment 10020

interface nve1
  no shutdown
  source-interface loopback0
  member vni 10010
    mcast-group 239.1.1.1
  member vni 10020
    mcast-group 239.1.1.2

interface Ethernet1/1
  switchport access vlan 10

interface Ethernet1/2
  switchport access vlan 20

interface Ethernet1/3
  mtu 9216
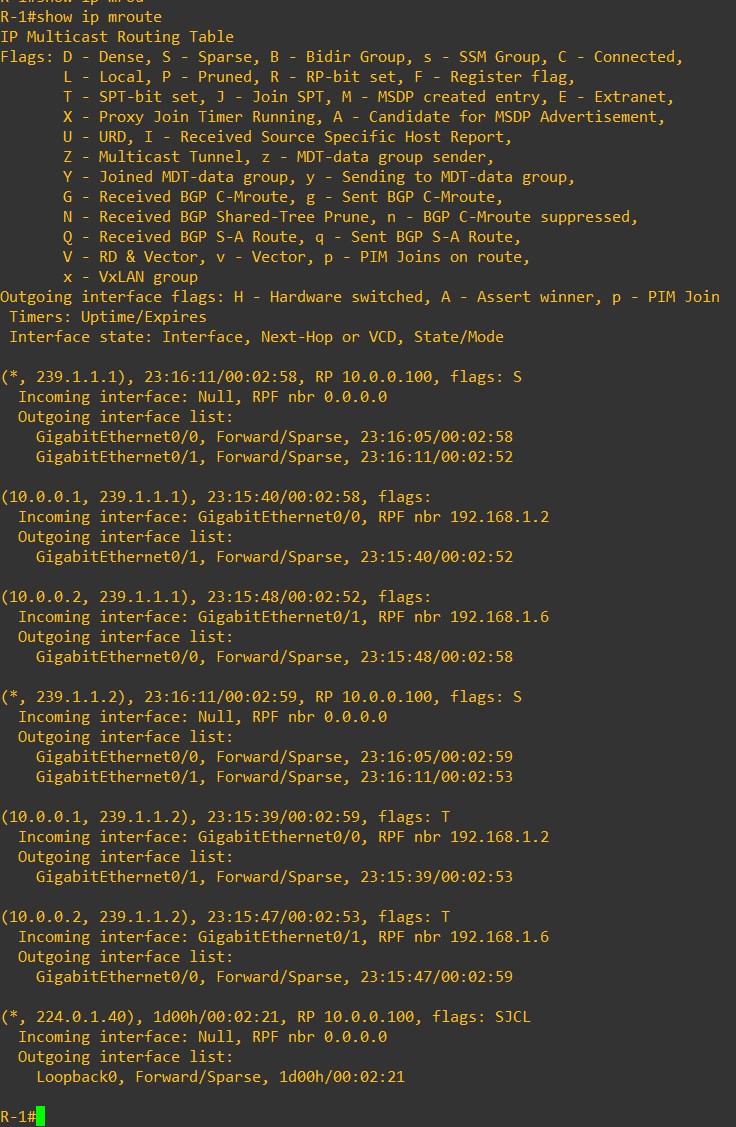
Verify that the multicast group defined into Nexus vni configuration is visible into R-1
VPC IP Configuration and reachability Test
Configure the Virtual PC and assign them an IP Address, then verify the IP reachability:
Host-11
ip 192.168.10.11/24
Host-12
ip 192.168.10.12/24
If you’re facing issue in reachability, try to shut/no shut the Eth1/3 interfaces on both Leaves.
Congrats! You configure a VXLAN Fabric 😉
Thanks for your time I hope that you’re enjoying my blog!
If you have some questions, please drop me a message through social networks!😊
👈 You can find the relative icons here on the left of the page
Riccardo